Tesla Model 3: Harness - Instrument Panel (Remove and Replace)
Tesla Model 3 2017-2026 Service Manual / Electrical / Harnesses / Harness - Instrument Panel (Remove and Replace)
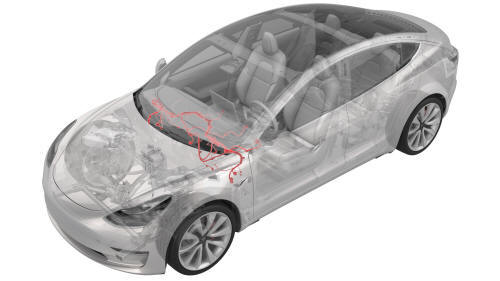
Remove
- Remove the rear underhood apron. See Underhood Apron - Rear (Remove and Replace).
- Remove the cabin intake duct. See Duct - Cabin Intake (Remove and Replace).
- Remove the hood latch cover. See Cover - Hood Latch (Remove and Replace).
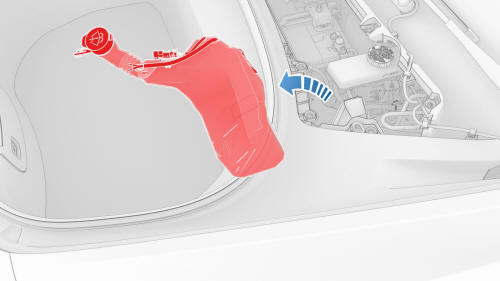
- Remove the underhood storage unit carpet. See Carpet - Underhood Storage (Remove and Install).
- Remove the underhood storage unit. See Underhood Storage Unit (Remove and Replace).
- Remove the wiper arms. See Wiper Arms (Remove and Replace).
- Remove the wiper motor. See Wiper Motor (Remove and Replace)

- Release the clip that attaches the electrical harness to the windshield washer reservoir.
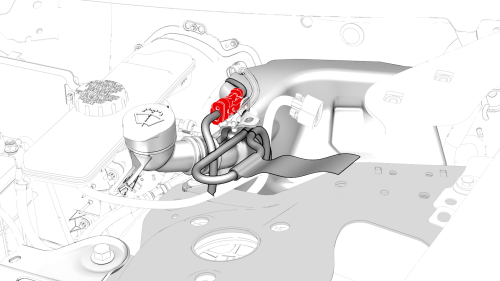
- Disconnect the electrical connector from the windshield washer reservoir.
- Open all 4 doors and lower all 4 windows.
- Remove the 2nd row lower seat cushion. See Seat Cushion - Lower - 2nd Row (Remove and Replace).
- Move the LH and RH front seats fully backward.
- Remove the LH and RH instrument panel end caps. See End Cap - Instrument Panel - LH (Remove and Replace)
- Remove the LH and RH mid A-pillar trim. See Trim - A-Pillar - Middle - LH (Remove and Replace).
- Remove the LH and RH lower A-pillar trim. See Trim - A-Pillar - Lower - LH (Remove and Replace).
- Remove the LH and RH upper A-pillar trim. See Trim - A-Pillar - Upper - LH (Remove and Replace).
- Remove the driver footwell cover. See Cover - Footwell - Driver (Remove and Replace).
- Remove front passenger footwell cover. See Cover - Footwell - Passenger (LHD) (Remove and Replace).
- Remove the driver seat and front passenger seat. See Seat - Driver (Remove and Replace).
- Raise the vehicle. See Raise Vehicle - 2 Post Lift.
- Place the vehicle into Park.
- Disconnect 12V power. See 12V Power (Disconnect and Connect).
- Remove the LH front wheel. See Wheel (Remove and Install).
- Remove the LH front wheel arch liner. See Wheel Arch Liner - Front - LH (Remove and Replace).
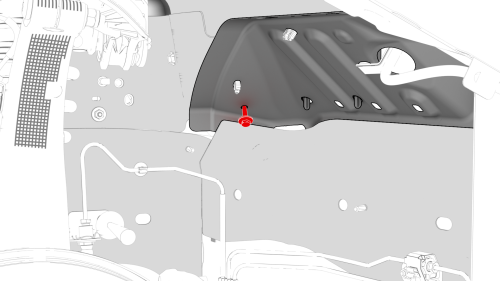
- Remove the lower bolt that attaches the windshield washer reservoir to
the body.
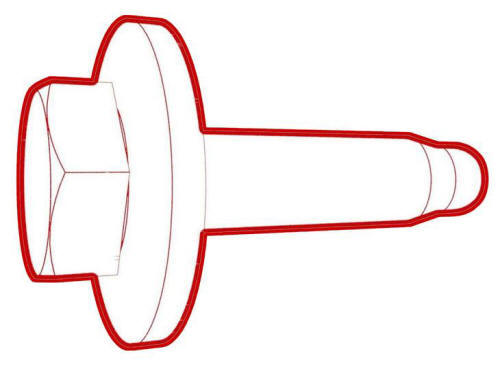 Torque 3 Nm
 - Install the LH front wheel. See Wheel (Remove and Install).
- Partially lower the vehicle.

- Remove the upper bolt that attaches the windshield washer reservoir to
the body.
Torque
3 Nm
- Remove the windshield washer reservoir from the vehicle.
- Release the LH and RH rear parking brakes, and then reconnect the LH and RH rear brake caliper electrical connectors. See Parking Brake - Caliper - Rear - LH (Release).
- Lower the vehicle fully and, with assistance, push the vehicle to the work area.
Warning: Do not push the vehicle faster than 1 mph.
- Place wheel chocks to keep the vehicle from moving.
- Remove the driver knee airbag, if present. See Airbag - Knee - Driver (Remove and Install).
- Remove the LH footwell duct. See Duct - Footwell - LH (Remove and Replace).
- Remove the LH and RH center console side panel carpets. See Carpet - Side Panel - Center Console - LH (Remove and Replace).
- Remove the center console lower rear panel. See Panel - Lower Rear - Center Console (Remove and Replace).
- Remove the center console. See Center Console (Remove and Install).
- Remove the front passenger knee airbag, if present. See Airbag - Knee - Front Passenger (Remove and Replace).
- Remove the LH and RH air wave end caps. See End Cap - Air Wave - LH (Remove and Replace).
- Remove the main instrument panel decor trim. See Decor Trim - Instrument Panel - Main (Remove and Replace).
- Remove the glove box. See Glove Box (LHD) (Remove and Replace).
- Remove the RH footwell duct. See Duct - Footwell - RH (Remove and Replace).
- Remove the RH air wave duct. See Duct - Air Wave - RH (Remove and Replace).
- Remove the driver airbag. See Airbag - Driver (Remove and Replace).
- Remove the steering wheel. See Steering Wheel (Remove and Install).
- Remove the steering column control module. See Module - Steering Column Control (Remove and Replace).
- Remove the touchscreen. See Touchscreen (Remove and Replace).
- Remove the vent finisher. See Finisher - Vent (Remove and Replace).
- Remove the RH front vent. See Vent - Front - RH (Remove and Replace).
- Remove the LH front vent. See Vent - Front - LH (Remove and Replace).
- Remove the instrument panel speaker grille. See Grille - Speaker - Instrument Panel (Remove and Replace).
- Remove the LH and RH dash speakers. See Speaker - Dash - LH (Remove and Replace).
- Remove the center dash speaker. See Speaker - Dash - Center (Remove and Replace).
- Remove the dash tweeter. See Tweeter - Dash (Remove and Replace).
- With assistance, remove the instrument panel carrier. See IP Carrier (Remove and Install).
- Remove the LH air wave duct. See Duct - Air Wave - LH (Remove and Replace).
- Remove the LH front carpet. See Carpet - Front - LH (Remove and Replace).
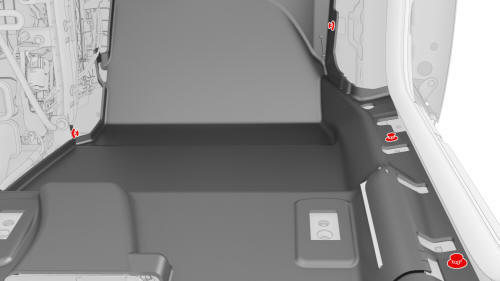
- Release the clips that attach the RH front carpet to the vehicle, and then remove the carpet.
- Remove the cross car beam. See Beam - Cross Car (Remove and Replace).
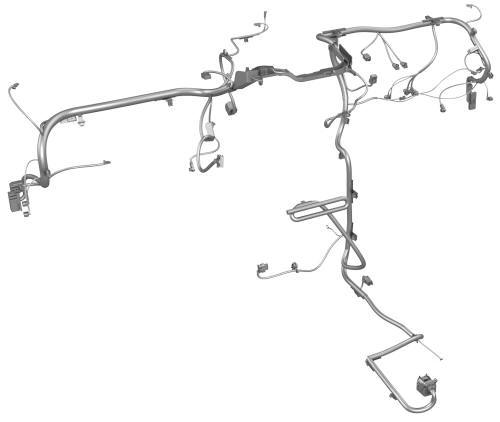
- Remove the instrument panel harness from the cross car beam.
Install
Installation procedure is the reverse of removal.
READ NEXT:
 Harness - Main Front (Remove and Replace)
Harness - Main Front- Remove
Remove
Open the front LH and front RH doors
Open the hood.
Place wheel chocks on both rear wheels.
Put vehicle in Neutral.
Disconnect 12V power. See 12V Power (Dis
SEE MORE:
Panel - Door Trim - Front - LH (Remove and Install)
Panel - Door Trim - Front - LH (Remove and Install) - Remove
Remove
Open the front LH door, and fully lower the window.
Remove the front LH door tweeter. See
Tweeter - Front Door - LH (Remove and Replace).
Remove the LH front door puddle light. See
Puddle Light - Front Door - LH (Remov
Switch - Child Safety - Underhood Storage Area (Remove and Replace)
Remove
Remove the hood latch cover. See
Cover - Hood Latch (Remove and Replace).
Release the clips that attach the child safety switch to the hood latch
cover, and remove the switch from the cover.
Install
Installation procedure is the reverse of removal.
© 2019-2026 Copyright www.tmodel3.com
