Tesla Model 3: HV Header - HV Battery- Remove
Tesla Model 3 2017-2024 Service Manual / Battery System / HV Battery Electrical Components / HV Header - HV Battery (Remove and Replace) / HV Header - HV Battery- Remove
SPECIAL TOOLS
Extractor, Battery HV Header, Model 3 (1140423-00-B)
Lever Lock, HV Connector, Model 3 (1140311-00-A)
Warning:
Only technicians who have been trained in High Voltage Awareness are permitted to perform this procedure. Proper personal protective equipment (PPE) and insulating HV gloves with a minimum rating of class 0 (1000V) must be worn at all times a high voltage cable, busbar, or fitting is handled. Refer to Tech Note TN-15-92-003, "High Voltage Awareness Care Points" for additional safety information.
Remove
- Perform the vehicle electrical isolation procedure. See Vehicle Electrical Isolation Procedure.
- Remove the rear HV battery skid plate. See Skid Plate - HV Battery - Rear (Remove and Replace).
.png)
- Release the clips that attach the RH inner HV battery return hose to the HV battery.
.png)
- Remove the nuts that attach the rear drive unit HV electrical harness
bracket to the HV battery.
.png) Torque 10 Nm
Torque 10 Nm
.png)
- Release the locking tab of the rear drive unit HV electrical harness.
.png)
- Raise the handle, and them disconnect the rear drive unit HV electrical harness from the HV battery connector.

- Remove the bolts that attach the HV header to the HV battery.
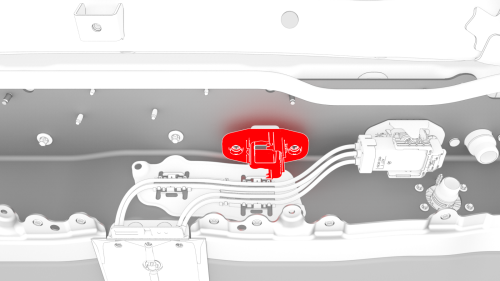
- Insert the extractor tool into the HV header, push the tool handle in, and pull on the header to remove it from the HV battery.
READ NEXT:
 HV Header - HV Battery- Install
Install
Install the HV header onto the HV battery.
Note: Push and pull on the header to make sure it is secured.
Install and hand-tighten the bolts that attach the HV header to the HV
batte
Insulators - HV Battery (Install)
Warning:
Only technicians who have been trained in High Voltage Awareness are
permitted to perform this procedure. Proper personal protective equipment (PPE)
and insulating HV gloves with a minimum
SEE MORE:
Speaker - Parcel Shelf - LH (Remove and Replace)
Note:
This procedure was formulated using a release candidate or production
model. Follow safety requirements and use extreme caution when working on or
near high-voltage systems and components.
Remove
Remove the 2nd row lower seat cushion. See Seat Cushion - Lower - 2nd
Row (Remove and Rep
Panel - Lower Rear - Center Console (Remove and Replace)
Remove
Move the driver seat and front passenger seat fully forward.
Note: Notice the location of the driver seat and front passenger
seat prior to moving them forward to help restore the seats back into their
original position.
Release the clips that attach the center console lower rear
© 2019-2024 Copyright www.tmodel3.com
