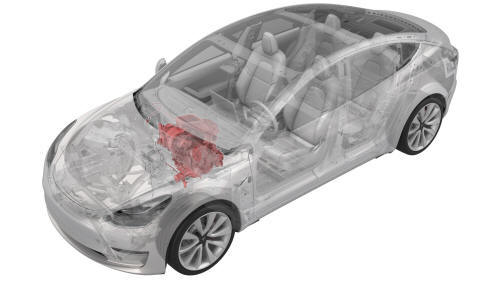
Tesla Model 3: HVAC Assembly- Remove
Tesla Model 3 2017-2024 Service Manual / Thermal Management / Cabin HVAC / HVAC Assembly (Remove and Replace) / HVAC Assembly- Remove
SPECIAL TOOLS
Kit, EPB Release, Handheld (1134520-00-A)
XP-10 Power Supply, XP-10 (1129348-00-A)
Remove
- Remove the rear underhood apron. See Underhood Apron - Rear (Remove and Replace).
- Remove the cabin intake duct. See Duct - Cabin Intake (Remove and Replace).
- Remove the hood latch cover. See Cover - Hood Latch (Remove and Replace).
- Remove the underhood storage unit. See Underhood Storage Unit (Remove and Replace).
- Remove the LH and RH wiper arms. See Wiper Arms (Remove and Replace).
- Remove the LH and RH shock tower covers. See Cover - Shock Tower - LH (Remove and Replace).
- Remove the cowl screen panel. See Panel - Cowl Screen (Remove and Replace).
- Remove the wiper motor. See Wiper Motor (Remove and Replace).
.png)
- Release the clip that attaches the electrical harness to the windshield washer reservoir.
.png)
- Disconnect the electrical connector from the windshield washer reservoir.
- Remove the outer HVAC plenum duct. See Duct - HVAC Plenum - Outer (Remove and Replace).
- Remove the inner HVAC plenum duct. See Duct - HVAC Plenum - Inner (Remove and Replace).
- Perform the A/C refrigerant recovery procedure. See A/C Refrigerant (Recovery and Recharge).
- Remove the 2nd row lower seat cushion. See Seat Cushion - Lower - 2nd Row (Remove and Replace).
- Remove the LH and RH instrument panel end caps. See End Cap - Instrument Panel - LH (Remove and Replace).
- Remove the LH and RH middle A-pillar trim. See Trim - A-Pillar - Middle - LH (Remove and Replace).
- Remove the LH and RH lower A-pillar trim. See Trim - A-Pillar - Lower - LH (Remove and Replace).
- Remove the LH and RH upper A-pillar trim. See Trim - A-Pillar - Upper - LH (Remove and Replace).
- Remove the driver and front passenger footwell cover. See Cover - Footwell - Driver (Remove and Replace).
- Perform steps 2 -7 of the removal of the driver and front passenger seats. See Seat - Driver (Remove and Replace).
Note: Do not review the driver and front passenger seat at this time.
- Disconnect 12V power. See 12V Power (Disconnect and Connect).
- Perform the vehicle electrical isolation procedure. See Vehicle Electrical Isolation Procedure.
- Remove the LH and RH front wheels. See Wheel (Remove and Install).
- Remove the LH front wheel arch liner. See Wheel Arch Liner - Front - LH (Remove and Replace).
- Remove the windshield washer reservoir. See Reservoir - Windshield Washer (Remove and Replace).
- Remove the front aero shield panel. See Panel - Aero Shield - Front (Remove and Replace).
.jpg)
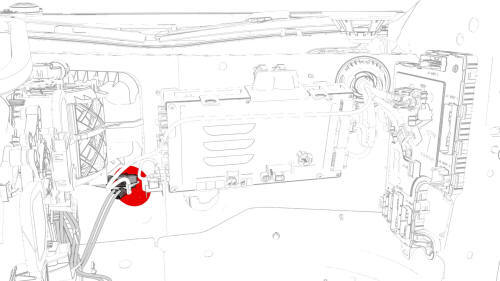
- Disconnect the HV harness connector from the PTC heater.
- Release the clips that attach the PTC heater electrical connector to the
body.
.jpg)
- Fully release the rear park brake calipers. See Parking Brake - Caliper - Rear - LH (Release).
- Lower the vehicle partially.
- Install the LH front wheel, but do not fully tighten the lug nut at this time.
- With an assistant, push the vehicle away from the lift.
Note: Secure the vehicle with wheel chocks.
- Perform step 8-12 for the removal of the driver and front passenger seats. See Seat - Driver (Remove and Replace).
- Remove the driver knee airbag. See Airbag - Knee - Driver (Remove and Install).
- Remove the LH footwell duct. See Duct - Footwell - LH (Remove and Replace).
- Remove the center console. See Center Console (Remove and Install).
- Remove the front passenger knee airbag. See Airbag - Knee - Front Passenger (Remove and Replace).
- Remove the LH and RH air wave end cap. See End Cap - Air Wave - LH (Remove and Replace).
- Remove the main instrument panel decor trim. See Decor Trim - Instrument Panel - Main (Remove and Replace).
- Remove the glove box. See Glove Box (LHD) (Remove and Replace).
- Remove the RH footwell duct. See Duct - Footwell - LH (Remove and Replace).
- Remove the RH air wave duct. See Duct - Air Wave - RH (Remove and Replace).
- Remove the driver air bag. See Airbag - Driver (Remove and Replace)
- Remove the steering wheel. See Steering Wheel (Remove and Install).
- Remove the steering column control module. See Module - Steering Column Control (Remove and Replace).
- Remove the touchscreen. See Touchscreen (Remove and Replace).
- Remove the LH front vent. See Vent - Front - LH (Remove and Replace).
- Remove the RH front vent. See Vent - Front - RH (Remove and Replace).
- Remove the RH air wave duct. See Duct - Air Wave - RH (Remove and Replace).
- Remove the LH, center, and RH dash speakers. See Speaker - Dash - LH (Remove and Replace).
- Remove the front passenger airbag. See Airbag - Front Passenger (Remove and Install).
- Remove the IP carrier. See IP Carrier (Remove and Install).
- Remove the LH air wave duct. See Duct - Air Wave - LH (Remove and Replace).
- Remove the LH front carpet. See Carpet - Front - LH (Remove and Replace).
- Remove the RH front carpet. See Carpet - Front - RH (Remove and Replace)
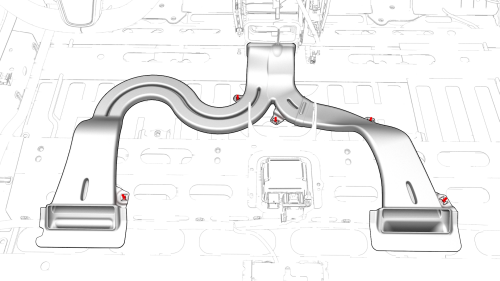
- Remove the cross car beam. See Beam - Cross Car (Remove and Replace).
- Release the clips that attach the RH and LH floor ducting to the floor, and remove the ducting.
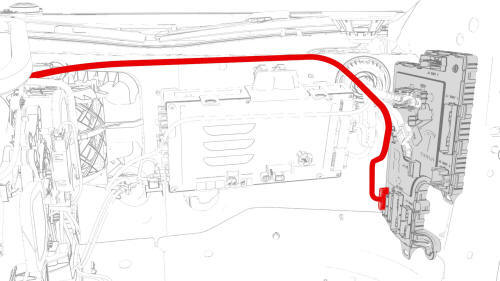
- Disconnect the HVAC harness connector from the RH body controller.
- Remove the TXV valve. See TXV Valve - Evaporator (Remove and Replace).
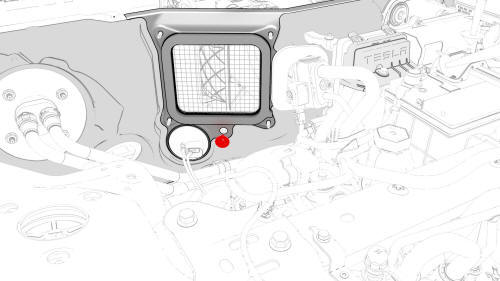
- Remove the bolt that attaches the HVAC module to the body.
.png) Torque 5.5 Nm
Torque 5.5 Nm
- Remove the grommet and pull the PTC heater harness through the bulkhead.
- Remove the bolt that attaches the lower LH side of the HVAC assembly to
the vehicle.
Torque 5.5 Nm
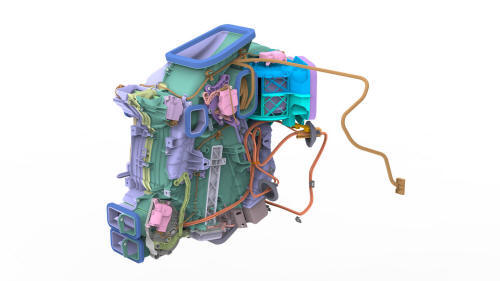
- With assistance, remove the HVAC assembly from the vehicle.
READ NEXT:
 HVAC Assembly- Install
Install
With an assistant, position the HVAC assembly into the vehicle.
Note: Align the drain hose and TXV housing.
Install the bolt that attaches the lower LH side HVAC assembly to the
vehicle
Blower Motor - HVAC (Remove and Replace)
Remove
Remove the HVAC assembly. See
HVAC Assembly (Remove and Replace).
Remove the screws that attach the HVAC fan motor to the HVAC assembly,
and then remove the motor from the HVAC asse
Sensor - Ambient Air Temperature (Remove and Replace)
Remove
Remove the front fascia. See
Fascia - Front (Remove and Install).
Disconnect the electrical harness from the ambient air temperature
sensor connector.
Release the clip that attac
SEE MORE:
Cover - Airbag - Knee - Driver (Remove and Replace)
Note:
This procedure was formulated using a release candidate or production
model. Follow safety requirements and use extreme caution when working on or
near high-voltage systems and components.
Remove
Remove the driver knee airbag.
Use a flat head screwdriver to apply pressure along t
Trim - Package Tray (Remove and Install) - Remove
Remove
Remove the 2nd row lower seat cushion. See
Seat Cushion - Lower - 2nd Row (Remove and Replace).
Remove the LH 2nd row seat side bolster. See
Bolster - Side - Seat - 2nd Row - LH (Remove and Replace).
Remove the LH side rail trim. See
Trim - Side Rail - LH (Remove and Replace).
Remo
© 2019-2024 Copyright www.tmodel3.com
