Tesla Model 3: Light - Fog - Front (Adjust)
Procedure
Special tools required for this procedure:
SPECIAL TOOLS
Pliers, Clip Removal (1133569-00-A)
- On a wall, measure 14.5 in (36.8 cm) from the floor, and then apply a
length of 1-inch masking tape horizontally to the wall to mark the
measurement.
- Measure 25 ft (7.62 m) from the wall, and then apply a short length of
1-inch masking tape to the floor to mark the measurement.
- Position the vehicle perpendicular to the wall, aligning the vehicle
front facia with the masking tape on the floor.
- Make sure that all 4 tires are inflated to their recommended settings.
See Tire Pressures.
Note: Do not sit in the vehicle, as this will affect fog light
height.
- Ensure that the vehicle is powered up and that the exterior lights are
set to "On" or "Auto" by touching the vehicle center display: Controls >
Quick Controls > Exterior Lights.
- Turn on the fog lights by touching the vehicle center display: Controls
> Quick Controls > Fog Lamp.

- Release the push clips (x3) that attach the LH front wheel arch liner to
the vehicle.
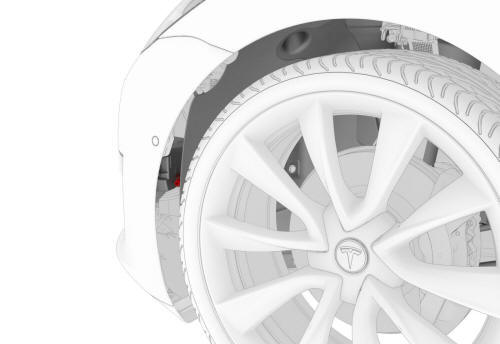
- Open the wheel liner to access the LH fog light adjuster.
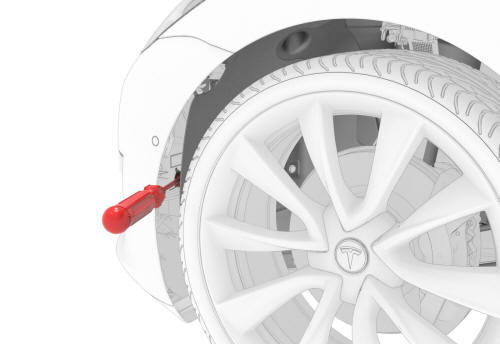
- Insert a #2 Phillips head (100 mm/4 in) screwdriver into the adjuster,
and adjust the fog light vertically to specification.
Wall target: max -3.0" @ 25 ft, min - 4.5 " @ 25ft, ECE and SAE target: max -
0.60 deg, min - 0.85 deg.
- Repeat steps 7-8 on the RH fog light.
- Reinstall the push clips (x3) that hold the LH and RH front wheel liners
to the fascia.
- Use the vehicle center display to turn off the fog lights: Controls >
Quick Controls > Fog Lamp.
Adjust Fog Lights Using a Headlight Tester
Special tools required for this procedure:
SPECIAL TOOLS
Pliers, Clip Removal (1133569-00-A)
Headlight Tester, Beissbarth, Model 815 (1133367-00-A)
Fog lights can be tested and adjusted during the headlight adjustment
procedure using the headlight tester tool. Refer to the headlight adjustment
procedure for the vehicle: 17400100Headlights - Adjust - NA (Wall Method)
- Park the vehicle on a level surface.
- Make sure that all 4 tires are inflated to their recommended settings.
See Tire Pressures.
Note: Do not sit in the vehicle, as this will affect fog light
height.
- Open the vehicle LH front door.
- Release the vehicle front trunk hood by touching the associated OPEN
button on the touchscreen, or touch the front trunk button on the mobile
app.
- Release the push clips (x3) that attach the LH front wheel arch liner to
the vehicle.
- Ensure that the vehicle is powered up and that the exterior lights are
set to "On" or "Auto" by touching the vehicle center display: Controls >
Quick Controls > Exterior Lights.
- Turn on the fog lights by touching the vehicle center display: Controls
> Quick Controls > Fog Lamp.
- Set up the Headlight Tester, Beissbarth, Model 815 (1133367-00-A). See
Headlights - Adjust - NA (Wall Method).
Note: Use the knobs on the base of the headlight tester tool to
level the tool. The bubble must be entirely inside of the center ring to level
the tool.
- Click OK.
- On the headlight tester tool Settings2 Fog Light screen, select Yes to
set up the fog light test.
- On the headlight tester tool Settings2 Fog Light screen, select LED.
- Click OK.
- Perform the headlight test, if necessary. See Headlights - Adjust - NA
(Wall Method).
- On the headlight tester tool, select the Laser icon in the lower right
corner of the screen.
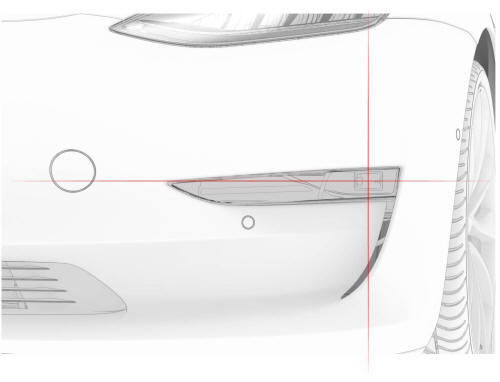
- Adjust the headlight tester tool horizontal and vertical position to
place the headlight laser guide crosshair over the center of the LH fog
light.
Note: The headlight tester tool should be positioned ~300 mm from
surface of LH fog light lens. Adjust the headlight tester tool height as
necessary to match the center point of the fog light. Operating range for the
tester is 200-500 mm.
- Turn off the laser guide.
- To begin the fog light test, select the LH fog light icon on the
headlight tester tool touchscreen, and then select the fog light button at
the bottom of the screen.
- Open the wheel liner to access the LH fog light adjuster.
- Insert a #2 Phillips head (100 mm/4 inch) screwdriver into the adjuster,
and then adjust the fog light vertically to specification.
- On the headlight tester tool, select Save to record the results.
- Roll the headlight tester tool to the RH fog light and repeat step 14
through step 20.
- When both fog lights have been tested, on the headlight tester tool
select the Save icon again to view the test results.
- Reinstall the push clips (x3) that hold the LH and RH front wheel liners
to the fascia.
- Use the vehicle center display to turn off the fog lights: Controls >
Quick Controls > Fog Lamp.
- Close the front trunk hood.
- Close the LH front door.
READ NEXT:
Remove
Remove the trunk lid trim. See Trim - Lid - Trunk (Remove and Replace).
Disconnect the electrical wiring harness connector from the LH rear fog/reverse
light.
Remove the nut tha
SEE MORE:
Opening
To open the rear trunk, ensure the vehicle is in
Park then do one of the following then pull the
rear trunk open:
Touch the associated OPEN button on the
touchscreen.
Double-click the rear trunk button on the
key fob accessory.
Touch the trunk button on the mobile app.
With
Opening the Charge Port
The charge port is located on the left side of
Model 3, behind a door that is part of the rear
tail light assembly. Before charging, park
Model 3 to ensure that the charge cable easily
reaches the charge port.
With Model 3 unlocked (or an authenticated
phone is within
 Light - Fog / Reverse - Rear - LH (Remove and Replace)
