Tesla Model 3: Module - HomeLink Transmitter (Remove and Replace)
Tesla Model 3 2017-2026 Service Manual / Electrical / Electronic Control Modules / Module - HomeLink Transmitter (Remove and Replace)
Remove
- Remove the front fascia. See Fascia - Front (Remove and Install).

- Disconnect the electrical connector from the HomeLink transmitter module.
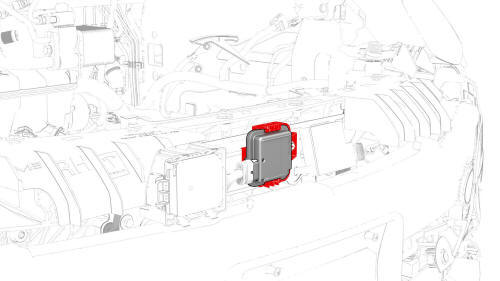
-
Release the tab, and then slide the HomeLink transmitter module to the right to remove it from the vehicle.
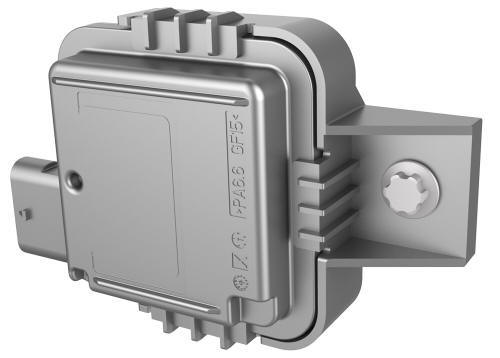
Install
- Install the HomeLink transmitter module on the bracket.
- Connect the electrical connector to the HomeLink transmitter module.
- Install the front fascia. See Fascia - Front (Remove and Install).
- Update the vehicle firmware.
- Connect a laptop with Toolbox to the vehicle.
- In Toolbox, type "HOMELINK" in the search field, click on "TEST-SELF_ VCFRONT_X_HOMELINK," and then select Run.
- Disconnect the laptop from the vehicle.
READ NEXT:
 Sensor - Radar - Front (Calibration)
Calibrate
Perform a 4-wheel alignment. See Four Wheel Alignment (Check and Adjust).
Connect a laptop with Toolbox to the vehicle.
With an assistant, use Toolbox to perform a radar drive cycle
Sensor - Radar - Front (Remove and Replace)
Remove
Remove the front fascia. See Fascia - Front (Remove and Install).
Release the clip that attaches the front radar sensor wiring harness to
the front end carrier.
Disconnect the e
SEE MORE:
Link - Lateral - Lower - Front - LH (Remove and Replace)
Remove
Raise and support the vehicle. See
Raise Vehicle - 2 Post Lift.
Remove the LH front wheel. See
Wheel (Remove and Install).
Remove and discard the nut that attaches the LH front lower lateral link
to the knuckle.
Raise the vehicle fully.
Remove the front aero shield. See
Panel
Car Status
Overview
The touchscreen displays the status of Model
3 at all times. What you see depends on
whether the vehicle is:
Parked (shown below).
Driving
Charging
When Model 3 is parked, the status area
shows the gear, estimated range, and an
overhead view of the car with buttons you can
t
© 2019-2026 Copyright www.tmodel3.com
