Tesla Model 3: Pressure Transducer - High Pressure (Remove and Replace)
Tesla Model 3 2017-2026 Service Manual / Thermal Management / Refrigerant System / Pressure Transducer - High Pressure (Remove and Replace)
Remove
- Remove the underhood storage unit. See Underhood Storage Unit (Remove and Replace).
- Perform the A/C refrigerant recovery. See A/C Refrigerant (Recovery and Recharge).
- Remove the outer HVAC plenum duct. See Duct - HVAC Plenum - Outer (Remove and Replace).
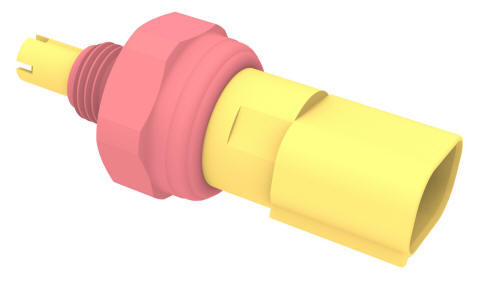
- Disconnect the electrical harness from the high pressure transducer connector.
.png)
- Remove the high pressure transducer from the discharge pipe.
.png) Torque 7 Nm
Torque 7 Nm
Install
Installation procedure is the reverse of removal, except for the following: Perform the A/C refrigerant recharge. See A/C Refrigerant (Recovery and Recharge).
READ NEXT:
 Pressure Transducer - Low Pressure (Remove and Replace)
Remove
Recover the A/C refrigerant. See A/C Refrigerant (Recovery and Recharge).
Note: Completely recover the refrigerant before continuing this
procedure.
Disconnect 12V power. See 12V Power
Receiver Dryer and Desiccant (Remove and Replace)
Receiver Dryer and Desiccant- Remove
SPECIAL TOOLS
Remove
Perform the A/C refrigerant recovery. See A/C Refrigerant (Recovery and
Recharge).
Remove the bolts (x2) that attach the underhood
SEE MORE:
Connecting to Wi-Fi
Wi-Fi is available as a data connection method
and is often faster than cellular data networks.
Connecting to Wi-Fi is especially useful in
areas with limited or no cellular connectivity.
To ensure fast, reliable delivery of software
and map updates, Tesla recommends leaving
your vehicle c
Carpet - Side Panel - Center Console - LH (Remove and Replace)
Remove
Note: Although the LH side is described, the procedure is the same
for the RH side.
Move the front LH front seat fully rearward.
Remove the front LH floormat from the vehicle.
Release the clips and tabs that attach the center console side panel
carpet to the center console, and
© 2019-2026 Copyright www.tmodel3.com
