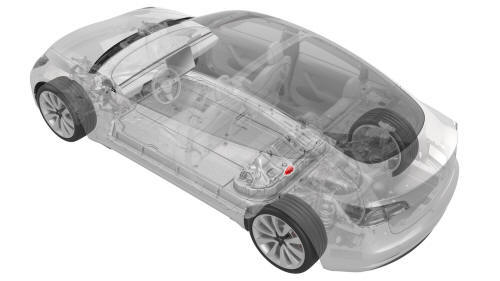
Tesla Model 3: Pyrotechnic Battery Disconnect- Remove
SPECIAL TOOLS
Ratchet, 1/4" Sq Dr, HV Insulated (1057602-00-A)
Ext Bar, Wobble, 1/4" Dr, HV Insulated (1057603-00-A)
Skt, 1/4" Sq Dr, 13mm, HV Insulated (1057606-00-A)
Magnet, Flexible, HV Insulated, 18" (1057607-00-A)
Asy, Service Cover, Penthouse, Model 3 (1127845-00-A)
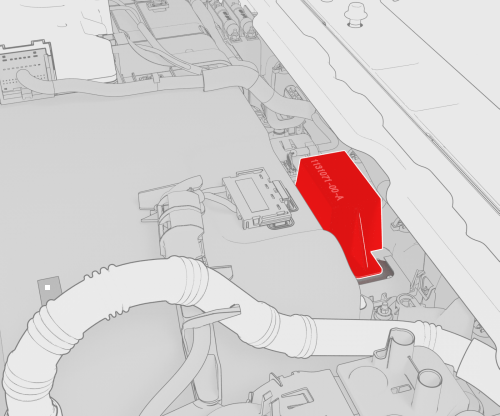
Dummy Disconnect, Pyro, Safety (1131071-00-A)
Kit, HV Pyro-disconnect Replacement, BRP (1133602-00-A )
Cap, Logic Conn, Inv, 3DU (1108272-00-B)
Resistance meter, microohm, Hioki RM 3548 (1076927-00-A)
Warning: Remove all jewelry (watches, bracelets, rings, necklaces, earrings, ID tags, piercings, etc.) from your person, and all objects (keys, coins, pens, pencils, tools, fasteners, etc.) from your pockets before performing any procedure that exposes you to high voltage.
Warning: If corrective eyewear is necessary to safely perform any procedure, make sure that the eyewear is securely restrained to the head and cannot fall off.
Warning:Only technicians who have been trained in High Voltage Awareness are permitted to perform this procedure. Proper personal protective equipment (PPE) and insulating HV gloves with a minimum rating of class 0 (1000V) must be worn at all times a high voltage cable, busbar, or fitting is handled. Refer to Tech Note TN-15-92-003, "High Voltage Awareness Care Points" for additional safety information.
Remove
- Remove the penthouse cover. See Cover - Penthouse (Remove and Replace).
Warning: HV insulating gloves and leather glove protectors must be worn throughout the remainder of this procedure. Do not remove gloves or protectors until otherwise noted.
- If the logic connector cap is installed on the high voltage controller connector, remove it.
- Set the penthouse service cover over the penthouse.
 1st Generation
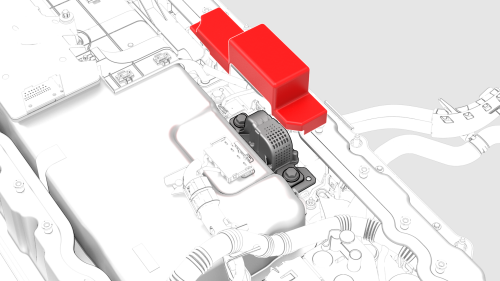
- Remove the pyrotechnic battery disconnect shunt insulator(s).
.png) 2nd Generation
2nd Generation

- Remove and discard the bolts that attach the pyrotechnic battery
disconnect to the HV battery, and then remove the pyrotechnic battery
disconnect from the vehicle.
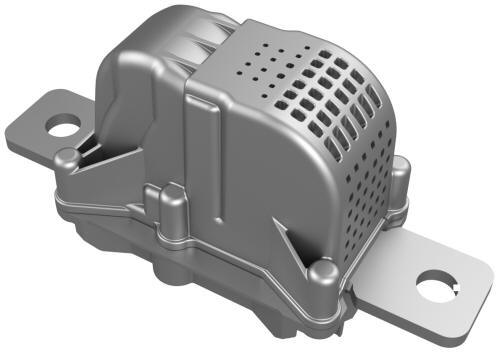
- Install the dummy disconnect where the pyrotechnic battery disconnect was removed.
READ NEXT:
 Pyrotechnic Battery Disconnect- Install
Install
Remove the dummy disconnect from where the pyrotechnic battery
disconnect will install.
Use an IPA wipe to clean the HV mating surfaces of the shunt, busbar,
and the pryotechnic batte
Shunt - HV Battery (Remove and Replace)
SPECIAL TOOLS
Ratchet, 1/4" Sq Dr, HV Insulated (1057602-00-A)
Ext Bar, Wobble, 1/4" Dr, HV Insulated (1057603-00-A)
Skt, 1/4" Sq Dr, 13mm, HV Insulated (1057606-00-A)
Resistance meter, microohm, Hi
SEE MORE:
Front Upper Control Arm (FUCA) Mount - LH - Install
Install
Install the front upper control arm mount onto the LH front spring and
damper assembly, and then install the nuts that attach the mount to the
damper assembly.
Torque 23 Nm
Install the LH front upper control arm into the front upper control arm
mount, and then install and h
Inverter - Rear Drive Unit - Remove
SPECIAL TOOLS
Skt, 3/8in Dr, 10EP Torx Plus External (1130479-00-A)
Caution:
This procedure must not be used for replacement of a
defective inverter. For inverter re
