Tesla Model 3: SD Card - Car Computer (Remove and Replace)
Tesla Model 3 2017-2026 Service Manual / Infotainment / Car Computer / SD Card - Car Computer (Remove and Replace)
Remove
- Remove the 2nd row lower seat cushion. See Seat Cushion - Lower - 2nd Row (Remove and Replace).
- Remove the rear underhood apron. See Underhood Apron - Rear (Remove and Replace).
- Remove the cabin intake duct. See Duct - Cabin Intake (Remove and Replace)
- Disconnect 12V power. See 12V Power (Disconnect and Connect).
- Remove the underhood storage unit. See Underhood Storage Unit (Remove and Replace).
- Remove the Outer HVAC plenum duct. See Duct - HVAC Plenum - Outer (Remove and Replace)
- Remove the RH lower A-pillar trim. See Trim - A-Pillar - Lower - LH (Remove and Replace).
- Remove the RH center console side panel carpet. See Carpet - Side Panel - Center Console - LH (Remove and Replace).
- Remove the RH footwell duct. See Duct - Footwell - RH (Remove and Replace).
- Remove the car computer. See #GUID-122A40DB-2F41-432F-B59E-BF78921DEC16
- Remove the car computer connectivity board. See Connectivity Board - Car Computer (Remove and Replace).
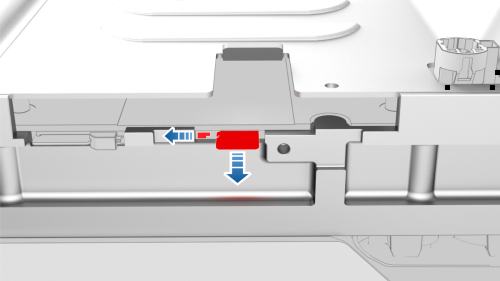
- Use a trim tool to slide the SD card retaining tab over, and then use plastic tweezers to remove the SD card from the computer.
Install
Installation procedure is the reverse of removal.
READ NEXT:
 SIM Card - Car Computer (Remove and Replace)
DRAFT
Warning:
This procedure was derived from pre-production computer models, and
might not reflect the real-world situation. Warnings and cautions might be
missing. Follow safety requirements a
Amplifier - Audio - External (Remove and Replace)
Remove
Remove the subwoofer. See Subwoofer (Remove and Replace).
Remove the screws that attach the audio amplifier to the subwoofer
assembly, and remove the amplifier from the subwoofer.
To
SEE MORE:
Carpet - Rear (Remove and Replace)
Remove
Open all doors.
Fully lower all windows.
Move the driver and front passenger seats fully forward.
Remove the 2nd row floor mat from the vehicle.
Remove the 2nd row lower seat cushion. See
Seat Cushion - Lower - 2nd Row (Remove and Replace).
Open the hood.
Remove the rear underhood
Motor Assembly - Rear (Remove and Replace)
Remove
Remove the rear drive unit. See Drive Unit - Rear
(Remove and Replace).
Remove the rear drive unit inverter. See Inverter -
Rear Drive Unit (Remove and Install).
Position
© 2019-2026 Copyright www.tmodel3.com
