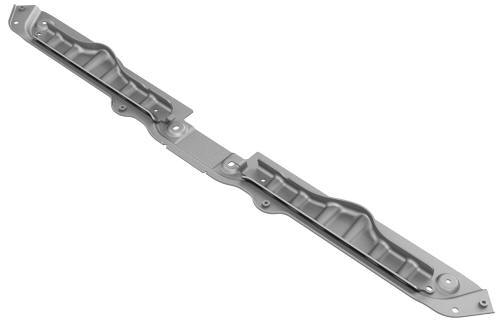
Tesla Model 3: Skid Plate - HV Battery - Front (Remove and Replace)
Tesla Model 3 2017-2026 Service Manual / Battery System / HV Battery Enclosure / Skid Plate - HV Battery - Front (Remove and Replace)
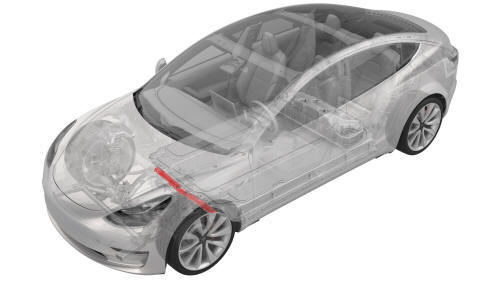
Remove
- Remove the front aero shield. See Panel - Aero Shield - Front (Remove and Replace).

- Remove the bolts and clips that attach the skid plate to the battery,
and then remove the plate from the battery.
Install
Installation procedure is the reverse of removal.
READ NEXT:
 Skid Plate - HV Battery - Rear (Remove and Replace)
DRAFT
Warning:
This procedure was derived from pre-production computer models, and
might not reflect the real-world situation. Warnings and cautions might be
missing. Follow safety requirements a
Vent Assembly - HV Battery - LH (Remove and Replace)
Vent Assembly - HV Battery - LH- Remove
Remove
Use Toolbox to put the vehicle into Factory Mode.
Invoke diagnostics on the touchscreen.
Inspect the Notifications for either a BMS_a123 or a BMS_W12
Vent Assembly - HV Battery - RH (Remove and Replace)
Remove
Use Toolbox to put the vehicle into Factory Mode.
Invoke diagnostics on the touchscreen.
Inspect the Notifications for either a BMS_a123 or a BMS_W123 alert.
If:
Either alert is present
SEE MORE:
Stabilizer Bar - Rear (Remove and Replace)
Remove
Raise and support the vehicle. See Raise Vehicle - 2
Post Lift.
Remove the mid aero shield panel. See Panel - Aero
Shield - Mid (Remove and Replace).
Trim - C-Pillar - Rear - LH (Remove and Replace)
Trim - C-Pillar - Rear - LH (Remove and Replace) - Remove
Remove
Remove the 2nd row lower seat cushion. See
Seat Cushion - Lower - 2nd Row (Remove and Replace).
Remove the LH 2nd row seat side bolster. See
Bolster - Side - Seat - 2nd Row - LH (Remove and Replace).
Remove the LH side rail tr
© 2019-2026 Copyright www.tmodel3.com
