Tesla Model 3: Duct - Footwell - LH (Remove and Replace)
Tesla Model 3 2017-2026 Service Manual / Thermal Management / Cabin HVAC / Duct - Footwell - LH (Remove and Replace)

Remove
- Remove the LH center console side panel carpet. See Carpet - Side Panel - Center Console - LH (Remove and Replace).
- Disconnect 12V power. See 12V Power (Disconnect and Connect).
- Remove the driver footwell cover. See Cover - Footwell - Driver (Remove and Replace).
- Remove the driver knee airbag. See Airbag - Knee - Driver (Remove and Install).
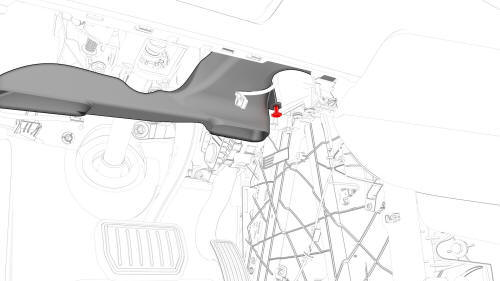
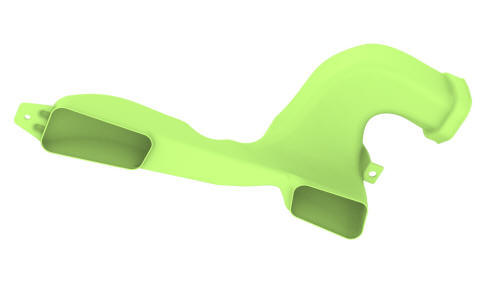
- Release the clip that attaches the LH footwell duct to the HVAC module,
and remove the LH footwell duct.
Install
Installation procedure is the reverse of removal.
READ NEXT:
 Duct - Footwell - RH (Remove and Replace)
DRAFT
Warning:
This procedure was derived from pre-production computer models, and
might not reflect the real-world situation. Warnings and cautions might be
missing. Follow safety requirements a
Duct - HVAC Plenum - Inner (Remove and Replace)
Remove
Remove the rear underhood apron. See
Underhood Apron - Rear (Remove and Replace).
Remove the outer HVAC plenum. See
Duct - HVAC Plenum - Outer (Remove and Replace).
Remove the hood latc
Duct - HVAC Plenum - Outer (Remove and Replace)
Remove
Remove the rear underhood apron. See
Underhood Apron - Rear (Remove and Replace).
Remove the cabin intake duct. See
Duct - Cabin Intake (Remove and Replace).
Release the clips that
SEE MORE:
Flood Ports - 2nd Generation (Remove and Replace)
Flood Ports - 2nd Generation (Remove and Replace) - Remove
Remove
Connect a laptop with Toolbox 3 to the vehicle.
In Toolbox, click in the Search field, and then click Tools.
From the Tools menu, click Active Alerts.
Click Read Alerts and check for a BMS_a123, BMS_a151, or a BMS_a035
alert
Bracket - Rear Wing - LH (Remove and Replace)
Remove
LH shown, RH similar
Remove the 2nd row lower seat cushion.
Open the trunk, and then remove the LH and RH trunk stops.
Remove the trunk floor trim.
Remove the trunk sill trim.
Remove the LH 2nd row seat side bolster.
Remove the LH 2nd row seatback.
Remove the RH 2nd row seat si
© 2019-2026 Copyright www.tmodel3.com
