Tesla Model 3: Spring - Rear Suspension - LH - Install
Tesla Model 3 2017-2024 Service Manual / Suspension / Coil Suspension System / Spring - Rear Suspension - LH (Remove and Replace) / Spring - Rear Suspension - LH - Install
Install
- With an assistant, install the spring compressor onto the new LH rear suspension spring, and then compress the spring.
- Install the new LH rear suspension spring into position while raising the support stand until the LH lower rear control arm is supported. Note: The LH rear suspension spring might need to be compressed further until the LH lower rear control arm and knuckle holes align.
- Hand-tighten the bolt and nut that attach the LH lower rear control arm to the knuckle.
- Hand-tighten the bolt and nut that attach the LH lower rear control arm to the damper.
- Hand-tighten the bolt and nut that attach the LH lower rear control arm to the subframe.
.png)
- Position a support stand underneath the LH lower rear control arm, and then raise the support stand to simulate vehicle at ride height. Note: Make sure that the support stand does not block to the adjustment of the spring compressor or the LH rear suspension bolts. Note: Use the rear ride height torque gauge to verify that the rear suspension is set to ride height specifications and adjust the support stand or spring compressor tool , if necessary.
- Measure the distance between the bottom of the quarter panel to the center of the rear axle to make sure that the rear suspension is set to ride height: The distance should measure 378 mm.
.jpg)
- Tighten the bolt and nut that attach the LH lower
rear control arm to the knuckle, and then mark the bolt
and nut with a paint pen.
.jpg) Torque 115 Nm
Torque 115 Nm
.jpg) Torque 115 Nm
Torque 115 Nm
.jpg)
- Tighten the bolt and nut that attach the LH lower
rear control arm to the damper, and then mark the bolt
and nut with a paint pen.
.jpg) Torque 115 Nm
Torque 115 Nm
.jpg) Torque 115 Nm
Torque 115 Nm
.jpg)
- Tighten the bolt and nut that attach the LH lower
rear control arm to the subframe, and then mark the bolt
and nut with a paint pen.
.jpg) Torque 115 Nm
Torque 115 Nm
Torque 115 Nm
Torque 115 Nm - Remove the support stand from underneath the vehicle.
- Remove the spring compressor from the LH rear suspension spring.

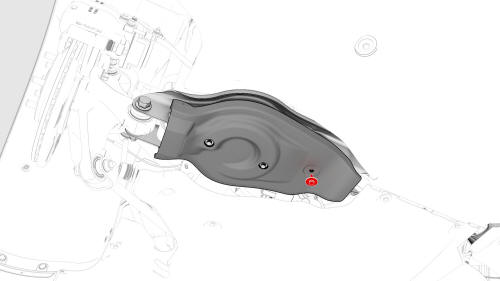
- Install the bolt that attaches the lower control arm cover to the LH lower rear control arm. Torque 6 Nm
- Install the LH rear wheel. See Wheel (Remove and Install).
- Perform a four wheel alignment adjustment. See Four Wheel Alignment (Check and Adjust).
READ NEXT:
 Spring and Damper Assembly - Front - LH - Remove
Remove
Raise and support the vehicle. See Raise Vehicle - 2
Post Lift.
Remove the LH front wheel. S
 Spring and Damper Assembly - Front - LH -
Install
Install
Install the nuts that attach the FUCA mount to the LH
SEE MORE:
 Taillight - LH - Install
Install
If the taillight is to be reinstalled, replace the gaskets from around
each taillight mounting bolt (x2) and the taillight electrical connector
(x1).
Install new grommets onto the vehicle.
Position the LH taillight studs into the grommets, and then install the
taillight onto th
 Harness - Thermal Beam- Remove
Remove the underhood storage unit. See Underhood Storage Unit (Remove
and Replace).
Disconnect 12V power. See 12V Power (Disconnect and Connect).
Release the clips that attach the HVAC plenum outer duct to the HVAC
plenum inner duct, and then remove the outer duct.
Remove the bolt t
© 2019-2024 Copyright www.tmodel3.com

