Tesla Model 3: Subframe Assembly - Front (RWD) (Remove and Replace)
.png)
Caution:
Vehicles built before March 25th, 2019 have 1st generation front subframes. Vehicles built on March 25th, 2019 and after have 2nd generation front subframes. When a 1st generation subframe is replaced with a 2nd generation subframe, the 1st generation (discontinued) steering rack, if installed, must be replaced with a 2nd generation (currently available) steering rack. Refer to the Electronic Parts Catalog for the latest information.
Remove
- Remove the front subframe assembly. See Subframe Assembly - Front (RWD) (Remove and Install).
- Remove the steering rack. See Steering Rack (RWD) (Remove and Replace).
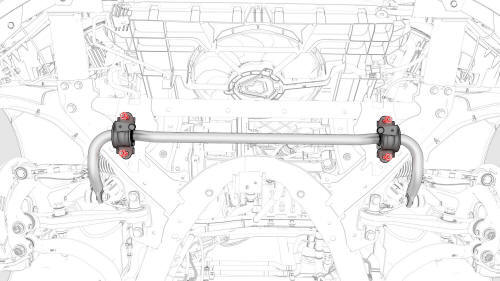
- With an assistant, remove and discard the nuts that attach the front stabilizer bar to the front subframe, and then remove the stabilizer bar from the subframe.
LH Shown, RH similar
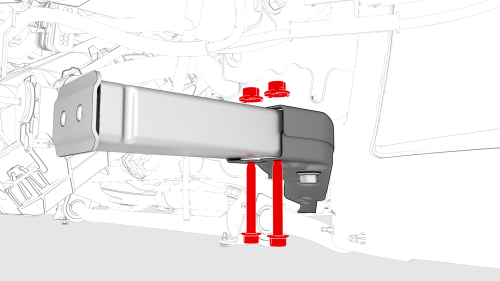
- Remove the bolts and nuts that attach the LH and RH crash can brackets to the front subframe, and remove the brackets from the subframe.
- With an assistant, unlatch the front subframe from the subframe lifting
tool, and the remove the front subframe from the subframe lifting tool.
.png)
Install
LH Shown, RH similar
- Hand-tighten the bolts that attach the LH and RH crash can brackets to the front subframe.
Note: The tightening of the LH and RH crash can brackets occurs later during the installation of the front subframe assembly (remove and install).
- With an assistant, put the front stabilizer bar onto the front subframe,
and then install new nuts to attach the front stabilizer bar to the front
subframe.
.jpg) Torque 55 Nm
Torque 55 Nm - Install the steering rack. See Steering Rack (RWD) (Remove and Replace).
Caution: 2nd generation front subframes cannot accommodate 1st generation (discontinued) steering racks. A 2nd generation (currently available) steering rack must be installed.
- Position the subframe lifting tool and front subframe underneath the vehicle for installation.
- Install the front subframe assembly into the vehicle. See Subframe Assembly - Front (RWD) (Remove and Install).
READ NEXT:
 Subframe Assembly - Rear - Remove
SPECIAL TOOLS
Kit, EPB Release, Handheld (1134520-00-A)
XP-10 Power Supply, XP-10 (1129348-00-A)
Fixture, Subframe, Model 3 (1099645-00-B)
Lever Lock, HV Connector, Model 3 (1140311-00-A)
Remove
U
Subframe Assembly - Rear - Install
Install
Position the subframe lifting tool and subframe underneath the vehicle.
Connect the air line to the subframe lifting tool.
With an assistant, slowly raise the rear drive unit and subframe
SEE MORE:
Module - TPMS (Remove and Replace)
Remove
Remove the 2nd row lower seat cushion. See Seat
Cushion - Lower - 2nd Row (Remove and Replace).
Remove the LH 2nd row seat side bolster. See Bolster
- Side - Seat - 2nd Row - LH (Remove and Re
Brake Fluid Check
SPECIAL TOOLS
BrakeStrip 100 Brake Fluid Test Strips
(1510075-00-A)
Procedure
Caution:
Brake fluid dissolves paint. Have clean towels and plenty of
water standing by
