Tesla Model 3: Subframe Assembly - Rear - Install
Tesla Model 3 2017-2026 Service Manual / Chassis / Subframe Assembly - Rear (Remove and Replace) / Subframe Assembly - Rear - Install
Install
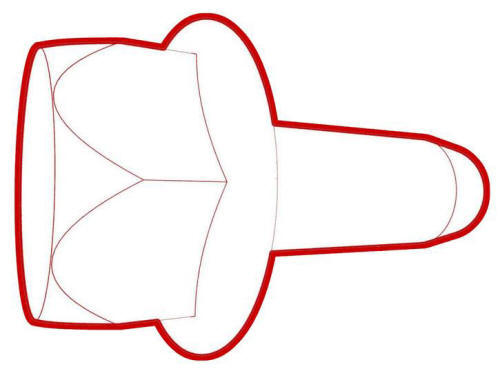
- With an assistant, install the new rear subframe onto the subframe lifting tool, and then attach the straps.
.jpg)
Top view of the rear subframe
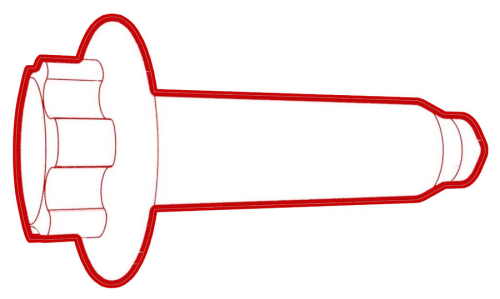
- Install the clips that attach the electrical harness to the rear subframe.
.jpg)
Bottom view of the rear subframe
- With an assistant, position the rear drive unit above the rear subframe, and then lower the drive unit sling tool to install the rear drive unit into the rear subframe.
.jpg)
- Install and hand-tighten the bolt and nut that attach the rear bushing of the rear drive unit to the subframe.
.png)
.png)
- Install and hand-tighten the bolt and nut that attach the RH bushing of the rear drive unit to the subframe.
.png)
.png)
- Install and hand-tighten the bolt and nut that attach the LH mount of the rear drive unit to the subframe.
- Lower the drive unit sling tool to release the tension on the cables.
- Remove the drive unit sling tool from the gantry.
- Remove the drive unit sling tool from the rear drive unit.
- Tighten the bolts and nuts that attach the rear bushing, RH bushing, and LH mount of the rear drive unit to the rear subframe. Torque 70 Nm
.png)
- Connect the electrical harness to the oil pump connector.
.jpg)
- Connect the electrical harness to the resolver connector.
- Fasten the clip that attaches the rear drive unit ground harness to the rear subframe.
.jpg)
- Install the LH lower aft link to the rear subframe, and then install and hand-tighten the nut and bolt that attach the LH lower aft link to the rear subframe.
- Remove the halfshaft plug from the gearbox, and then install the LH halfshaft to the rear drive unit.
Note: Set the LH halfshaft temporarily on the lower aft link.
- With an assistant, install the halfshaft into the LH hub and knuckle assembly.
Note: Make sure that the splines for the halfshaft line up.
.jpg)
- With an assistant, install and hand-tighten the bolt and nut that attach the LH upper fore link to the rear subframe.
.jpg)
- With an assistant, install and hand-tighten the nut and bolt that attach the LH toe link to the rear subframe.
.jpg)
- With an assistant, install and hand-tighten the nut and bolt that attach the LH upper aft link to the rear subframe.
.png)
- With an assistant, install and hand-tighten the bolt and nut that attach the LH lower fore link to the rear subframe.
.jpg)
- With an assistant, install and hand-tighten the bolt and nut that attach the LH lower aft link to the knuckle.
.jpg)
- With an assistant, install and hand-tighten the bolt and nut that attach the LH rear damper to the lower aft link.
.jpg)
- Install the washer, and install a new nut to attach the halfshaft to the LH rear hub. Torque 245 Nm
.jpg)
- Install the rear LH ABS wheel speed sensor to the LH rear knuckle, and
then install a new bolt to secure the sensor to the knuckle.
 Torque 5 Nm
.jpg)
- Install the grommet and fasten the clip that attach the rear LH ABS wheel speed sensor cable to the rear LH knuckle and subframe bracket.
.jpg)
- Connect the subframe electrical harness to the LH rear ABS wheel speed sensor connector, and then fasten the clip that attaches the sensor connector to the subframe.
- Repeat step 14 through step 26 for the RH side of the rear subframe.
- Install the LH and RH coil springs onto the rear lower aft links.
- Fully raise the handle on the rear drive unit HV electrical harness.
.png)
- Attach the HV connector lever lock onto the back of the HV electrical harness.
- Firmly connect the HV electrical harness to the inverter connector.
Caution:
Make sure that the harness fits the connector squarely and tightly.
- While pressing the harness to the connector, remove the HV connector lever lock.
.png)
- While pressing the harness to the connector, fully lower the handle.
.png)
- Slide the release to lock the HV electrical harness.
.png)
- Install the bolt that attaches the HV harness bracket to the inverter.
 Torque 6 Nm
.png)
- Connect the rear drive unit inlet hose to the inverter coolant inlet, and then fasten the clip.
.jpg)
- Fasten the clip that attaches the rear drive unit inlet hose to the HV harness bracket.
.png)
- Connect the electrical harness to the inverter low voltage connector.
.jpg)
- Fasten the clip that attaches the low voltage electrical harness to the inverter.
- Install the rear subframe to the vehicle. See Subframe Assembly - Rear (Remove and Install).
READ NEXT:
 Four Wheel Alignment (Check)
SPECIAL TOOLS
SEAT COVER (1096767-00-A)
Ballast Bag, 25lb (1145158-00-A)
CHASSIS HEIGHT MEASURING TOOL (1071271-00-A)
STEERING WHEEL LEVEL (1049463-00-A)
Procedure
Make sure the tire pressures are t
SEE MORE:
Brake Pad Kit - Rear (Sport Brakes) (Remove and Replace)
Brake Pad Kit - Rear (Sport Brakes) - Remove
Remove
Raise and support the vehicle. See Raise Vehicle - 2
Post Lift.
Remove the LH and RH rear wheels. See Wheel (Remove
and Install).
Use Toolbox to place the vehicle into EPB Service
Antenna - Wi-Fi
Antenna - Wi-Fi (Remove and Replace)
Remove
Remove the LH and RH side rail trims. See Trim - Side Rail - LH (Remove
and Install).
Open the LH and RH hook covers, and then release the clips that attach
the screw covers to the LH and RH coat hooks.
Remove the screws that attach the LH
© 2019-2026 Copyright www.tmodel3.com
