Tesla Model 3: Taillight - LH (Remove and Replace)
Taillight - LH- Remove
SPECIAL TOOLS
SKT, BUMP STOP, MDL 3 (1460222-00-B)
Remove
- Remove the 2nd row lower seat cushion. See
Seat Cushion - Lower - 2nd Row (Remove and Replace).
.jpg)
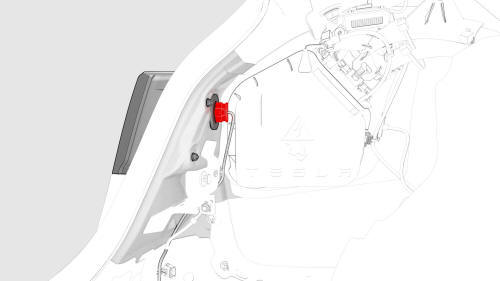
- Open the trunk, and then use the bump stop removal tool to remove the LH
trunk stop.
Caution: Do not use other tools to pry at the trunk stop as this
could damage the taillight or trunk stop.
- Remove the trunk floor trim. See
Trim - Floor - Trunk (Remove and Replace).
- Remove the trunk sill trim. See
Trim - Sill - Trunk (Remove and Replace).
- Remove the LH 2nd row seat side bolster. See
Bolster - Side - Seat - 2nd Row - LH (Remove and Replace).
- Remove the LH 2nd row seatback. See
Seat Back - 2nd Row - LH (Remove and Install).
- Remove the trunk side trim.
- For the LH side, see
Trim - Side - Trunk - LH (Remove and Replace).
- For the RH side, see
Trim - Side - Trunk - RH (Remove and Replace).
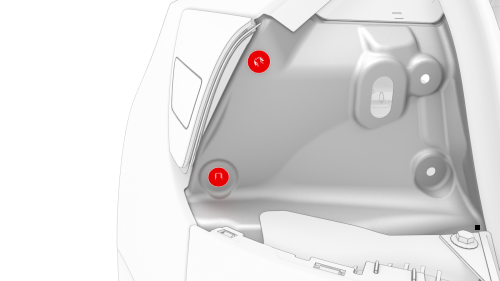
- Disconnect the electrical harness from the taillight connector.

- Remove the nuts that attach the taillight to the vehicle.
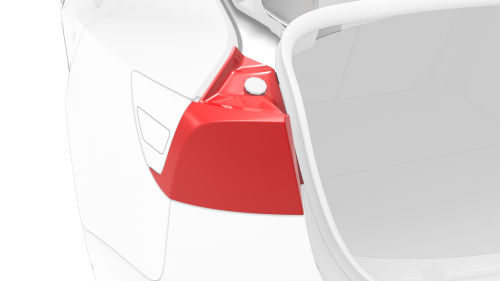
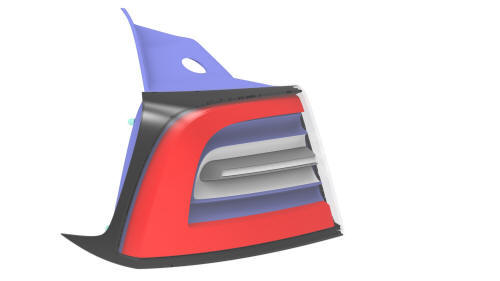
- Remove the taillight assembly from the vehicle.
Tip: Lift the trunk seal for better clearance.
- Remove and discard the grommets from the vehicle.
Taillight - LH - Install
Install
- If the taillight is to be reinstalled, replace the gaskets from around
each taillight mounting bolt (x2) and the taillight electrical connector
(x1).
- Install new grommets onto the vehicle.
- Position the LH taillight studs into the grommets, and then install the
taillight onto the vehicle.
Note: Reseat the trunk seal over the LH taillight.
- Install the nuts that attach the taillight to the vehicle.
 Torque 3.2 Nm
- Connect the electrical harness to the taillight connector.
- Install the trunk side trim.
- For the LH side, see
Trim - Side - Trunk - LH (Remove and Replace).
- For the RH side, see
Trim - Side - Trunk - RH (Remove and Replace).
- Install the trunk sill trim. See
Trim - Sill - Trunk (Remove and Replace).
- Install the LH 2nd row seatback. See
Seat Back - 2nd Row - LH (Remove and Install).
- Install the LH 2nd row seat side bolster. See
Bolster - Side - Seat - 2nd Row - LH (Remove and Replace).
- Install the 2nd row lower seat cushion. See
Seat Cushion - Lower - 2nd Row (Remove and Replace).
- Install the trunk floor trim. See
Trim - Floor - Trunk (Remove and Replace).
- Use the bump stop removal tool to install the LH trunk stop.
READ NEXT:
Remove
Note: This procedure applies only to the RH side. The LH rear
reflex lens is part of the charge port.
Apply masking around the RH rear reflex lens.
Use a plastic trim tool to release th
SEE MORE:
Wearing Seat Belts
Using seat belts and child safety seats is the
most effective way to protect occupants if a
collision occurs. Therefore, wearing a seat belt
is required by law in most jurisdictions.
Both the driver and passenger seats are
equipped with three-point inertia reel seat
belts.
Warning:
Only technicians who have been trained in High Voltage Awareness are
permitted to perform this procedure. Proper personal protective equipment (PPE)
and insulating HV gloves with a minimum rating of class 0 (1000V) must be worn
at all times a high voltage cable, busbar, or fitting is ha
 Reflex Lens - Rear - RH (Remove and Replace)
