Tesla Model 3: Topping Up Windshield Washer Fluid
The only reservoir into which you can add fluid is the windshield washer fluid reservoir, which is located behind the front trunk. When the level is low, a message displays on the touchscreen.
To top up the washer fluid:
- Open the hood.
- Clean around the filler cap before opening it to prevent dirt from entering the reservoir.
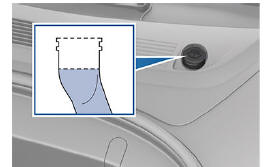
- Open the filler cap.
- While avoiding spilling, fill the reservoir until the fluid level is visible just below the filler neck. The reservoir has a capacity of 3.2 liters.
- Wipe up any spills immediately and wash the affected area with water.
- Replace the filler cap.
Note: Some national or local regulations restrict the use of Volatile Organic Compounds (VOCs). VOCs are commonly used as antifreeze in washer fluid. Use a washer fluid with limited VOC content only if it provides adequate freeze resistance for all climates in which you drive Model 3.
Caution: Do not add formulated washer fluids that contain water repellent or bug wash. These fluids can cause streaking, smearing, and squeaking or other noises.
Warning: In temperatures below 40Вє F (4Вє C), use a washer fluid with antifreeze. In cold weather, using a washer fluid without antifreeze can impair visibility through the windshield.
Warning: Windshield washer fluid can irritate eyes and skin. Read and observe the instructions provided by the washer fluid manufacturer.
READ NEXT:
 Jacking and Lifting
Follow the steps below to lift Model 3. Ensure
that any non-Tesla repair facility is aware of
these lifting points.
Position Model 3 centrally between the lift
posts.
Position the lift arm p
Parts, Accessories, and
Modifications
Use only genuine Tesla parts and accessories.
Tesla performs rigorous testing on parts to
ensure their suitability, safety, and reliability.
Purchase these parts from Tesla, where they
are pro
SEE MORE:
Sensor - Temperature - LH (Remove and Replace)
Remove
Remove the driver floormat.
Remove the center console LH side carpet. See
Carpet - Side Panel - Center Console - LH (Remove and Replace).
Disconnect the LH temperature sensor electrical connector.
Release the tabs that attach the LH temperature sensor inside the HVAC
assembl
Understanding Tire Markings
Laws require tire manufacturers to place standardized information on the
sidewall of all tires. This
information identifies and describes the fundamental characteristics of the tire.
It also provides
the tire identification number (TIN) for certification of safety standards, and
in case of a
