Tesla Model 3: Beam - Cross Car (Remove and Replace) - Install
Tesla Model 3 2017-2026 Service Manual / Instrument Panel / Beam - Cross Car (Remove and Replace) / Beam - Cross Car (Remove and Replace) - Install
Install
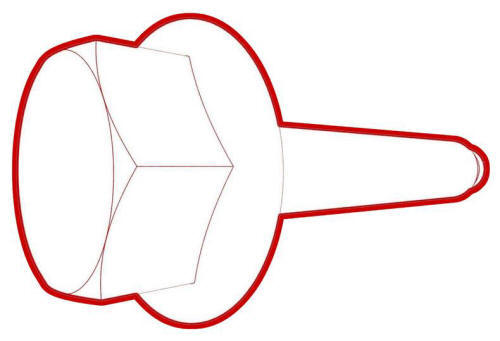
- With an assistant, position the cross car beam in the vehicle for installation.
Caution:
Do not damage the interior when installing the cross car beam in the vehicle.
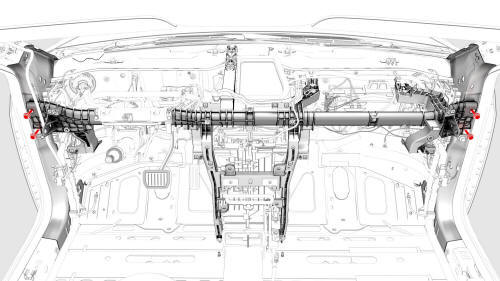
- Hand-tighten the bolts that attach the LH and RH corners of the cross car beam to the body.
- Hand-tighten the bolts that attach the LH cross car beam to the body
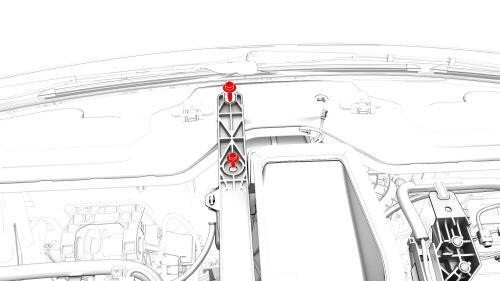
- Hand-tighten the bolts that attach the cross car beam to the upper side of the cowl.
- Hand-tighten the bolts that attach the cross car beam to the HVAC assembly.
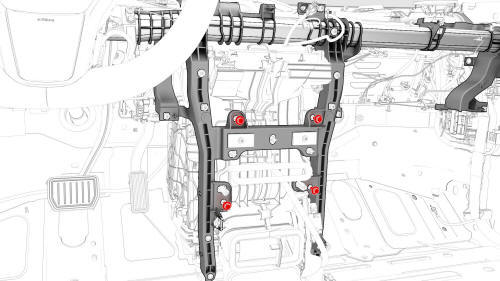
- Hand-tighten the fasteners that attach the RH cross car beam bracket.
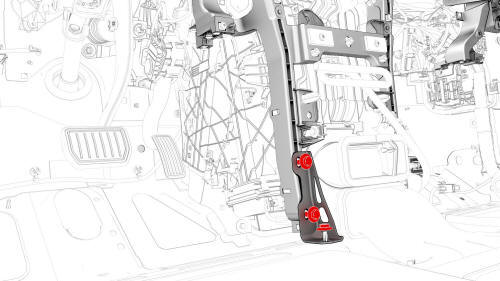
- Hand-tighten the fasteners that attach the LH cross car beam bracket to
the cross car beam, and then tighten the fasteners to specifications.
 Torque 25 Nm
 Torque 25 Nm
- Tighten the fasteners that attach the RH cross car beam bracket.
Torque 25 Nm
Torque 25 Nm
.jpg)
- Tighten the bolts that attach the cross car beam to the HVAC assembly.
 Torque 5.5 Nm
.jpg)
- Tighten the bolts that attach the cross car beam to the upper side of
the cowl.
.jpg) Torque 25 Nm
Torque 25 Nm
.jpg)
- Tighten the bolts that attach the LH and RH corners of the cross car
beam to the body.
 Torque 29 Nm
.jpg)
- Install the clips that attach the bleeder duct adapter to the HVAC assembly.
.jpg)
- Install the bolts that attach the touchscreen brackets.
 Torque 12 Nm
 - Position the steering column in the vehicle for installation.
.jpg)
- Install the nuts that attach the steering column to the cross car beam.
 Torque 15 Nm
.jpg)
- Install the bolts that attach the steering column to the body.
 Torque 25 Nm
 - Position the instrument panel electrical harness onto the cross car beam and center console for installation.
.jpg)
- Connect the instrument panel electrical harness onto the RH body controller module connectors.
.jpg)
- Connect the instrument panel electrical harness onto the car computer connectors.
.jpg)
- Install the clips that attach the HVAC electrical harness to the instrument panel electrical harness.
.png)
- Install the clips that attach the instrument panel electrical harness to the body.
.png)
- Connect the instrument panel electrical harness to the passive safety restraint module (RCM) connector.
.png)
- Install a new bolt to attach the instrument panel electrical harness
ground strap to the body.
 Torque 8 Nm
.jpg)
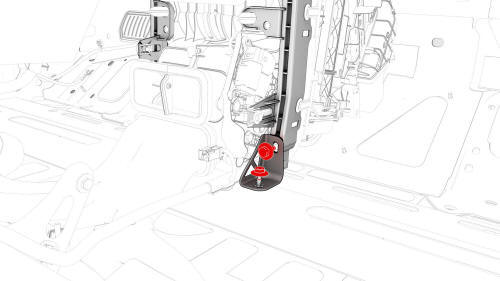
- Install the nut that attaches the instrument panel electrical harness ground strap near the PTC heater. Torque 5 Nm
.jpg)
- Install the clips that attaches the instrument panel electrical harness to the RH side of the HVAC assembly.
.jpg)
- Install the clips and the harness holder that attach the instrument panel electrical harness to the top portion of the cross car beam.
.jpg)
- Install the clip that attaches the instrument panel electrical harness to the PTC heater.
.jpg)
- Connect the instrument panel electrical harness to the PTC heater connector.
.jpg)
- Connect the instrument panel electrical harness to the HVAC fan assembly motor connector.
.jpg)
- Install the clips (x2) that attach the instrument panel electrical harness to the HVAC fan assembly.
.jpg)
- Install the clips that attach the electrical harness to the steering column.
.jpg)
- Connect the electrical harness to the steering column control module connector.
.jpg)
- Connect the instrument panel electrical harness to the LH body controller module connectors.
.jpg)
- Install the clips that attach the headliner electrical harness to the body.
.jpg)
- Connect the headliner electrical harness to the LH body controller module connector.
.jpg)
- Install the clips that attach the LH side of the main carpet to the footwell area.
- Install the LH air wave duct. See Duct - Air Wave - LH (Remove and Replace).
- Install the LH footwell duct. See Duct - Footwell - LH (Remove and Replace).
.png)
- Install the clips that attach the RH side of the main carpet to the footwell area.
- Install the IP carrier. See IP Carrier (Remove and Install).
READ NEXT:
 Cover - Airbag - Knee - Driver (Remove and Replace)
Note:
This procedure was formulated using a release candidate or production
model. Follow safety requirements and use extreme caution when working on or
near high-voltage systems and components.
Cover - Airbag - Knee - Front Passenger (Remove and Replace) - Remove
Remove
Disconnect 12V power. See
12V Power (Disconnect and Connect).
Remove the passenger footwell cover. See
Cover - Footwell - Passenger (LHD) (Remove and Replace).
Remove the T20 bolt
SEE MORE:
Glove Box (LHD) (Remove and Replace) - Install
Install
Glove box harness connectors
Bring the glove box into the vehicle, and then connect the electrical
harness to the glove box solenoid connector, the damper connector, and the
puddle light connector
Note: 2 of the electrical connectors are accessed from the bottom
of the instrument
Overhead Console - Front (Remove and Replace)
Remove
Release the clips (x2) that attach the front overhead console to the
headliner, and then lower the console from the headliner.
Caution:
To avoid damaging the headliner, do not pry against the headliner.
Insert a 90 degree trim tool near the dome light and pull downwards to releas
© 2019-2026 Copyright www.tmodel3.com
