Tesla Model 3: Cap - Penthouse 12V (Remove and Replace)
Tesla Model 3 2017-2026 Service Manual / Seats / 2nd Row Seat Assemblies and Hardware / Cap - Penthouse 12V (Remove and Replace)
Remove
- Remove the 2nd row lower seat cushion. See Seat Cushion - Lower - 2nd Row (Remove and Replace)
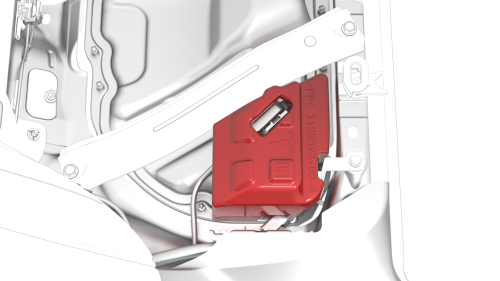
- Lift the 12V cap straight up from over the high voltage controller connector on the RH side of the penthouse, and then remove the 12V cap from the vehicle.
Install
Installation procedure is the reverse of removal.
READ NEXT:
 Cap - Penthouse HV (Remove and Replace)
Remove
Remove the 2nd row lower seat cushion. See
Seat Cushion - Lower - 2nd Row (Remove and Replace).
Lift the HV cap straight up from over the DC input connector on the LH
side of the pen
Closeout - Armrest - 2nd Row (Remove and Replace)
Remove
Remove the 2nd row armrest. See
Armrest - 2nd Row (Remove and Replace).
Release the clips and tabs that attach the 2nd row armrest closeout to
the 2nd row seat, and then remove th
Frame - Seat Back - 2nd Row - LH (Remove and Replace)
Remove
Remove the 2nd row lower seat cushion. See
Seat Cushion - Lower - 2nd Row (Remove and Replace).
Remove the LH 2nd row seat side bolster. See
Bolster - Side - Seat - 2nd Row - LH (Remove
SEE MORE:
Repairs and Replacements
Only use Tesla recommended parts.
Warning: Non-Tesla recommended parts might adversely affect
safety features and corrosion prevention treatments.
Warning: Always use the correct torque values as given in
this Manual.
Warning: Locking devices, where specified, must be fitted. If the
efficiency
Compressor (Remove and Replace)
Compressor- Remove
Warning:
Only technicians who have been trained in High Voltage Awareness are
permitted to perform this procedure. Proper personal protective equipment (PPE)
and insulating HV gloves with a minimum rating of class 0 (1000V) must be worn
at all times a high voltage cable, bus
© 2019-2026 Copyright www.tmodel3.com
