Tesla Model 3: Cap - Penthouse HV (Remove and Replace)
Tesla Model 3 2017-2026 Service Manual / Seats / 2nd Row Seat Assemblies and Hardware / Cap - Penthouse HV (Remove and Replace)
Remove
- Remove the 2nd row lower seat cushion. See Seat Cushion - Lower - 2nd Row (Remove and Replace).
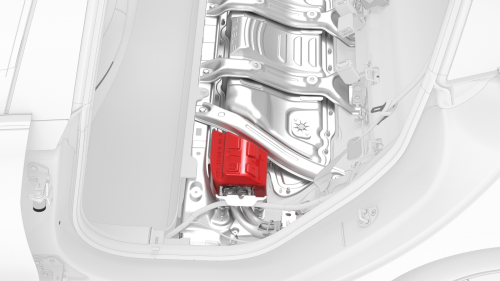
- Lift the HV cap straight up from over the DC input connector on the LH side of the penthouse, and then remove the HV cap from the vehicle.
Install
Installation procedure is the reverse of removal.
READ NEXT:
 Closeout - Armrest - 2nd Row (Remove and Replace)
Remove
Remove the 2nd row armrest. See
Armrest - 2nd Row (Remove and Replace).
Release the clips and tabs that attach the 2nd row armrest closeout to
the 2nd row seat, and then remove th
Frame - Seat Back - 2nd Row - LH (Remove and Replace)
Remove
Remove the 2nd row lower seat cushion. See
Seat Cushion - Lower - 2nd Row (Remove and Replace).
Remove the LH 2nd row seat side bolster. See
Bolster - Side - Seat - 2nd Row - LH (Remove
Handle - Seat Back - 2nd Row - LH (Remove and Replace)
Remove
Remove the 2nd row lower seat cushion. See
Seat Cushion - Lower - 2nd Row (Remove and Replace).
Remove the rear underhood apron. See
Underhood Apron - Rear (Remove and Replace).
Discon
SEE MORE:
Specifications
Identification Labels
Vehicle Identification Number
You can find the VIN at the following
locations:
Touch the Tesla "T" at the top center of
the touchscreen. The popup window
displays the VIN.
Stamped on a plate located at the top of
the dashboard. Can be seen by looking
Module - TPMS (Sensor ID Learn)
SPECIAL TOOLS
TOOL, TPMS SERVICE,
ATEQ VT30 (1050759-00-A)
TOOL, TPMS SERVICE,
ATEQ VT36 (1050759-00-B)
Procedure
Review the TPMS
serv
© 2019-2026 Copyright www.tmodel3.com
