Tesla Model 3: Handle - Seat Back - 2nd Row - LH (Remove and Replace)
Tesla Model 3 2017-2026 Service Manual / Seats / 2nd Row Seat Assemblies and Hardware / Handle - Seat Back - 2nd Row - LH (Remove and Replace)
Remove
- Remove the 2nd row lower seat cushion. See Seat Cushion - Lower - 2nd Row (Remove and Replace).
- Remove the rear underhood apron. See Underhood Apron - Rear (Remove and Replace).
- Disconnect 12V power. See 12V Power (Disconnect and Connect).
- Remove the LH 2nd row buckle. See Buckle - 2nd Row - LH (Remove and Replace).
- Remove the LH 2nd row seat side bolster. See Bolster - Side - Seat - 2nd Row - LH (Remove and Replace).
- Remove the 2nd row LH seat back hinge bracket. See Bracket - Hinge - Seat Back - 2nd Row - LH (Remove and Replace).
- Remove the 2nd row center seatbelt assembly. See Seatbelt - 2nd Row - Center (Remove and Replace).
- Remove the LH 2nd row seat back latch. See Latch - Seat Back - 2nd Row - LH (Remove and Replace).
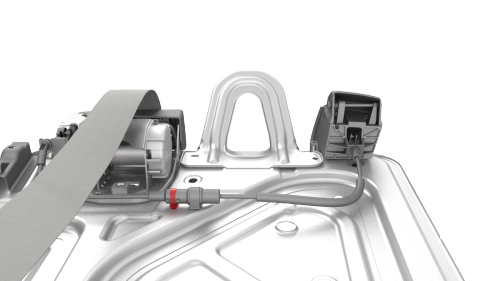
- Release the clip that attaches the LH 2nd row seat back latch control cable to the LH 2nd row seat backplate.
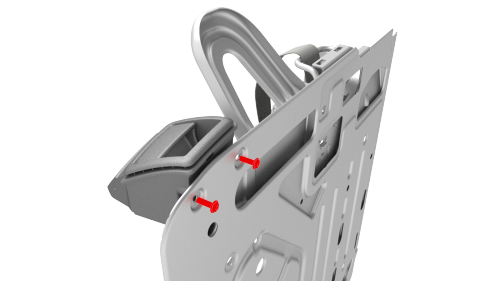
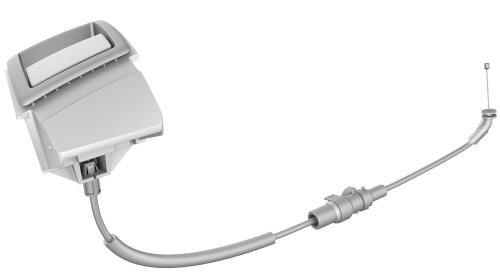
- Remove the bolts that attach the LH 2nd row seat back handle assembly to
the backplate, and then slide the handle assembly from the backplate.
Install
- Slide the LH 2nd row seat back handle assembly onto the LH 2nd row seat
backplate, and then install the bolts that attach the handle assembly to the
backplate.
 Torque 2 Nm
- Fasten the clip that attaches the LH 2nd row seat back latch control cable to the LH 2nd row seat backplate.
- Install the LH 2nd row seat back latch. See Latch - Seat Back - 2nd Row - LH (Remove and Replace).
- Install the 2nd row center seatbelt assembly. See Seatbelt - 2nd Row - Center (Remove and Replace).
- Install the 2nd row LH seat back hinge bracket. See Bracket - Hinge - Seat Back - 2nd Row - LH (Remove and Replace).
- Install the LH 2nd row seat side bolster. See Bolster - Side - Seat - 2nd Row - LH (Remove and Replace).
- Install the LH 2nd row buckle. See Buckle - 2nd Row - LH (Remove and Replace).
- Connect 12V power. See 12V Power (Disconnect and Connect).
- Install the rear underhood apron. See Underhood Apron - Rear (Remove and Replace).
- Install the 2nd row lower seat cushion. See Seat Cushion - Lower - 2nd Row (Remove and Replace).
READ NEXT:
 Headrest - 2nd Row - Center (Remove and Replace)
SPECIAL TOOLS
M3 1R Headrest Removal Tool (1132841-00-A)
Remove
Release the RH and LH center headrest clips simultaneously, and then pull the
headrest upwards to remove it.
Note: Use a pocket scr
Latch - Seat Back - 2nd Row - LH (Remove and Replace)
Remove
Remove the 2nd row center seatbelt assembly. See
Seatbelt - 2nd Row - Center (Remove and Replace).
Release the cable clip that attaches the latch bracket to the seat back.
Rele
Pivot Sleeve - Seat Back - 2nd Row - LH (Remove and Replace)
Remove
Remove the 2nd row LH seat back assembly. See
Seat Back - 2nd Row - LH (Remove and Install).
Release the tabs that attach the pivot sleeve to the seat back assembly
pivot pin, and
SEE MORE:
Vent Assembly - HV Battery - RH (Remove and Replace)
Remove
Use Toolbox to put the vehicle into Factory Mode.
Invoke diagnostics on the touchscreen.
Inspect the Notifications for either a BMS_a123 or a BMS_W123 alert.
If:
Either alert is present - Contact Service Engineering. Do not perform
this procedure.
Neither alert is present - Continu
Parts and Accessories
Parts, Accessories, and
Modifications
Use only genuine Tesla parts and accessories.
Tesla performs rigorous testing on parts to
ensure their suitability, safety, and reliability.
Purchase these parts from Tesla, where they
are professionally installed and where you can
receive expert advic
© 2019-2026 Copyright www.tmodel3.com
