Tesla Model 3: Charge Port - Manual Release of Cable
Tesla Model 3 2017-2026 Service Manual / High Voltage System / Charge System Inlet / Charge Port - Manual Release of Cable
DRAFT
Warning:
This procedure was derived from pre-production computer models, and might not reflect the real-world situation. Warnings and cautions might be missing. Follow safety requirements and use extreme caution when working on or near high voltage systems and components
Procedure
- Ensure the vehicle is not actively charging.
Warning: Do not perform this procedure while the vehicle is charging.
- Open the trunk.
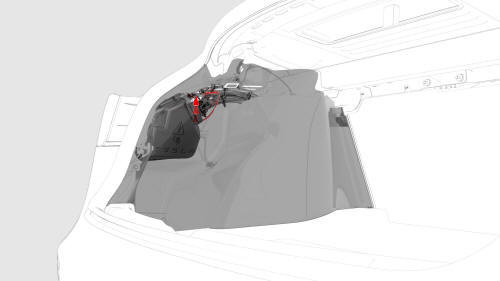
- Pull the tag down through the LH trunk wall opening to release the charging cable from the charge port.
- Remove the charging cable from the charge port.
Warning: Do not attempt to remove the charge cable while simultaneously pulling the release cable. Always pull the release cable before attempting to remove the charge cable from the charge port.
- Close the trunk.
READ NEXT:
 Charge Port Voltage Check
Procedure (Single - Phase)
SPECIAL TOOLS
Insulation Multimeter, Fluke 1507 (NA)
(1076921-00-B)
SEE MORE:
Sensor - Temperature - RH (Remove and Replace)
Remove
Remove the RH center console side panel carpet. See
Carpet - Side Panel - Center Console - LH (Remove and Replace).
Disconnect the electrical wiring harness conector from the RH
temperature sensor.
Release the tabs that attach the RH temperature sensor to the HVAC
module,
Bracket - Fascia Side to Fender - LH (Remove and Replace)
Remove
LH shown, RH similar; one clip is behind the
knuckle
Remove the LH and RH front wheels.
Release the clips (x9) that attach the front portion of the LH wheel
arch liner to the vehicle, and then move the liner aside to perform the
following steps.
LH shown, RH similar
Loosen th
© 2019-2026 Copyright www.tmodel3.com
