
Tesla Model 3: Cover - Front - Seat Track - 1st Row Seat (Remove and Replace)
Tesla Model 3 2017-2026 Service Manual / Seats / Front Seat Tracks and Motors / Cover - Front - Seat Track - 1st Row Seat (Remove and Replace)
Remove
- Move the seat fully rearward.
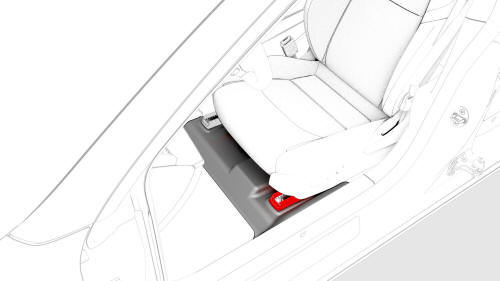
- Release the clips at the rear of the seat track front cover that attach the cover to the seat track, and then slide the cover forward off the track.
Install
- Slide the seat track front cover rearward over the seat track, and then fasten the clips that attach the cover to the seat track.
- Return the seat to the original position.
READ NEXT:
 Cover - Rear - Seat Track - 1st Row Seat (Remove and Replace)
Correction code 13011822
Remove
Move the seat fully forward.
Release the clips at the front of the seat track rear cover that attach
the cover to the seat track, and then slide the cover rea
Motor - Recliner - Backrest - Driver Seat (Remove and Replace)
Remove
Remove the lumbar support assembly from the driver's seat back. See
Lumbar Support - Backrest - Driver Seat (Remove and Replace).
Remove and discard the clip that attaches the recli
Motor - Seat Height - Driver Seat (Remove and Replace)
Remove
Remove the 2nd row lower seat cushion. See
Seat Cushion - Lower - 2nd Row (Remove and Replace).
Remove the rear underhood apron. See
Underhood Apron - Rear (Remove and Replace).
Remove
SEE MORE:
Shunt - HV Battery (Remove and Replace)
SPECIAL TOOLS
Ratchet, 1/4" Sq Dr, HV Insulated (1057602-00-A)
Ext Bar, Wobble, 1/4" Dr, HV Insulated (1057603-00-A)
Skt, 1/4" Sq Dr, 13mm, HV Insulated (1057606-00-A)
Resistance meter, microohm, Hioki RM 3548 (1076927-00-A)
Warning: Only technicians who have been trained in High Voltage
Awarenes
Traffic-Aware Cruise Control
Note: Traffic-Aware Cruise Control is a BETA
feature.
Note: If your vehicle is not equipped with an
optional Autopilot package, refer to the
owner's manual on your vehicle's touchscreen
for instructions on how to use Cruise Control.
Traffic-Aware Cruise Control (if equipped)
uses the
© 2019-2026 Copyright www.tmodel3.com
