Tesla Model 3: End Panel - Center Console (Remove and Replace)
Tesla Model 3 2017-2026 Service Manual / Interior Trim / Center Console / End Panel - Center Console (Remove and Replace)
Remove
- Remove the center console lower rear panel. See Panel - Lower Rear - Center Console (Remove and Replace).
- Remove the center console air vent panel. See Panel - Air Vent - Center Console (Remove and Replace).
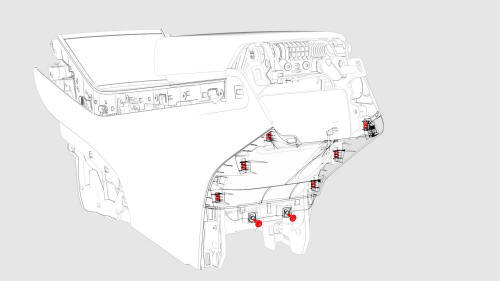
- Remove the bolts (x2) and release the clips (x6) that attach the center
console end panel to the center console, and then remove the end panel from
the console.
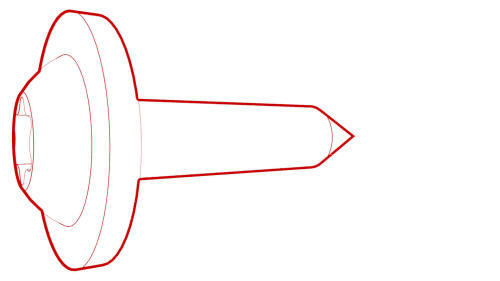 Torque 1.1 Nm
Install
Installation procedure is the reverse of removal.
READ NEXT:
 Insert - Front Bin - Center Console (Remove and Replace)
Remove
Remove the LH front floormat.
Remove the center console. See
Center Console (Remove and Install)
Raise the center console armrest for access.
Remove the LH and RH center console decor
Panel - Air Vent - Center Console (Remove and Replace)
Remove
Move the driver seat and front passenger seat forward.
Release the clips (x4) that attach the center console air vent panel to
the center console, and separate the panel from th
Panel - Lower Rear - Center Console (Remove and Replace)
Remove
Move the driver seat and front passenger seat fully forward.
Note: Notice the location of the driver seat and front passenger
seat prior to moving them forward to help restore the seats
SEE MORE:
Speaker - Dash - LH (Remove and Replace)
Remove
Remove the LH and RH instrument panel end caps. See End Cap - Instrument
Panel - LH (Remove and Replace).
Remove the LH and RH middle A-pillar trims. See Trim - A-Pillar - Middle
- LH (Remove and Replace).
Remove the LH and RH upper A-pillar trims. See Trim - A-Pillar - Upper -
LH
Halfshaft - Front Drive Unit - LH (Remove and Replace)
Halfshaft - Front Drive Unit - LH - Remove
SPECIAL TOOLS
Tool, Axle Extraction, Model 3 (1133386-00-A)
Tool, Hub Puller, Hydraulic (1096075-00-A)
© 2019-2026 Copyright www.tmodel3.com
