Tesla Model 3: Glass - Door - LH - Rear (Remove and Replace)
Tesla Model 3 2017-2026 Service Manual / Closures / Door Glass and Regulators / Glass - Door - LH - Rear (Remove and Replace)

SPECIAL TOOLS
Tool, Window Switch Bypass, Model 3 (1135305-00-A)
XP-10 Power Supply, XP-10 (1129348-00-A)
Warning: The side impact airbag deployment depends on the front door sensor's ability to detect a side impact from air pressure. Make sure that there are no uncovered holes in the front door shells. Additionally, always reinstall plugs or tape when servicing or inspecting the front doors and their components.
Remove
- Remove the rear LH door trim panel. See Panel - Door Trim - Rear - LH (Remove and Install).
- Remove the LH rear door inner belt seal from the rear door. See Seal - Inner Belt - Rear Door - LH (Remove and Replace).
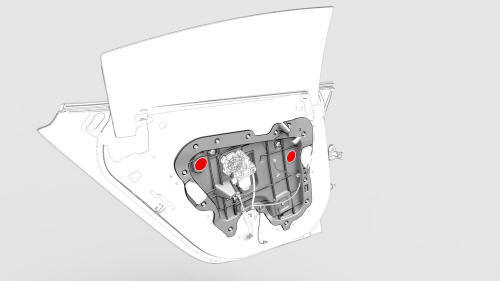
- Remove the plugs that cover the opening in the door for access to the bolts.
- Disconnect the electrical connector from the window motor.
- Connect the window switch special tool and lower the door glass so that the regulator isolator clamp bolts are accessible from the holes.
- Disconnect the window switch special tool.
.jpg)
- Remove and discard the bolts that attach the door glass to the regulator isolator clamps, and then remove the door glass from the door.
Note: Replace the regulator isolator clamps, if damaged.
Install
- Position the door glass into the rear door.
- Install the new bolts that attach the door glass to the regulator isolator clamps. Torque 12 Nm
- Install the inner belt seal to the rear door; attach the inner belt seal with clips.
Tip: Press the inner belt seal down into the rear door.
- Adjust the door glass. See Glass - Door - LH - Rear (Adjust).
- Install the rear door trim panel. See Panel - Door Trim - Rear - LH (Remove and Install).
- Connect a laptop with Toolbox to the vehicle.
- Use Toolbox to perform the LH rear door calibration procedure.
- Press the LH rear window switch down to the second position to activate the auto-lower function, and then raise the window completely to activate the auto-rise function.
READ NEXT:
 Switch - Window - Driver (Remove and Replace)
Remove
Remove the LH front door trim panel. See
Panel - Door Trim - Front - LH (Remove and Install).
Release the clip that attaches the driver window switch electrical
harness to the doo
Switch - Window - Front Passenger (Remove and Replace)
Switch - Window - Front Passenger (Remove and Replace) - Remove
Remove
Remove the RH front door trim panel. See
Panel - Door Trim - Front - LH (Remove and Install).
Remove the puddle light el
SEE MORE:
Sensor - Relative Humidity and Temperature (Remove and Replace)
Remove
Remove the lower quad camera cover. See Quad Camera Cover - Lower
(Remove and Replace).
Remove the rear view mirror. See Mirror - Rear View (Remove and
Replace).
Remove the forward facing camera. See Camera - Forward Facing (Remove
and Replace).
Disconnect the electrical co
Door - Front - LH (Remove and Install)
Note:
This procedure was formulated using a release candidate or production
model. Follow safety requirements and use extreme caution when working on or
near high-voltage systems and components.
Remove
Remove the 2nd row lower seat cushion.
Remove the rear underhood apron.
Disconnect 12V
© 2019-2026 Copyright www.tmodel3.com
