Tesla Model 3: Halfshaft - Front Drive Unit - LH - Install
Install
.jpg)
- Apply approximately 1 gram of Molykote M-77 Lubricant Paste only to the hub mating face on the outboard side of the LH front drive unit halfshaft.
Caution: Do not apply any lubricant to the halfshaft splines. If lubricant is mistakenly applied, wipe the splines clean with a shop towel.
- Remove the halfshaft plug from the gearbox, and then with assistance, install the LH front drive unit halfshaft into the front drive unit.
Note: Move the LH front knuckle assembly aside to provide enough clearance to safely install the LH front drive unit halfshaft.
.png)
- Install the LH front drive unit halfshaft into the LH front hub assembly, and then hand-tighten a new front drive unit halfshaft nut and washers to prevent the halfshaft from falling out of the hub.
Note: The washers are attached to the nut.
.jpg)
- Hand-tighten the bolt and nut that attach the LH strut to the LH front lower lateral link.
.jpg)
- Install the bolt and nut that attach the LH front
upper control arm to the LH front knuckle.
.jpg) Torque 56 Nm
Torque 56 Nm
.jpg)
- Install the new nyloc nut that attaches the LH tie rod end to the LH front knuckle. Torque 180 Nm
.png)
- Install the bolt that attaches the LH front brake
hose bracket to the LH front knuckle.
.png) Torque 5 Nm
Torque 5 Nm

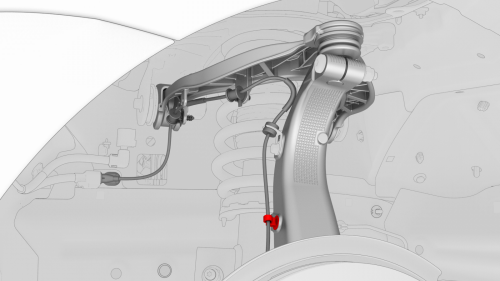
- Install the clip that attaches the LH front ABS wheel speed sensor to the LH front knuckle.
.png)
- Install the new bolt that attaches the LH front ABS
wheel speed sensor to the LH front knuckle.
.jpg) Torque 5 Nm
Torque 5 Nm
- Install the LH front wheel and hand-tighten the wheel lug nuts.
- Lower the vehicle until the tires are touching the ground. See Raise Vehicle - 2 Post Lift.
- Fully tighten the wheel lug nuts. See Wheel (Remove and Install).
.png)
- Fully tighten the new LH front drive unit halfshaft
nut and washers.
.jpg) Torque 245 Nm
Torque 245 Nm
Note: The washers are attached to the nut.
- Install the wheel center cap. See Cap - Wheel (Remove and Replace).
- Remove the vehicle from the lift and drive the vehicle onto an alignment rack.
.jpg)
- Fully tighten the bolt and nut that attach the LH
strut to the LH front lower lateral link, and then mark
the bolt and nut with a paint pen.
.jpg) Torque 106 Nm
Torque 106 Nm
.jpg) Torque 106 Nm
Torque 106 Nm

