Tesla Model 3: Opening Hood with No Power
Tesla Model 3 2017-2024 Owner's Manual / Opening and Closing / Front Trunk / Opening Hood with No Power
In the unlikely event that Model 3 has no 12V power, you will be unable to open the front trunk using the touchscreen, key fob, or mobile app. To open the front trunk in this situation:
Note: The following will not open the front trunk if Model 3 is locked and has 12V power.
- Locate an external 12V power supply (such as a portable jump starter).
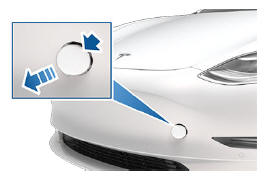
- Release the tow eye cover by pressing
firmly on the top right perimeter of the
cover until it pivots inward, then gently
pulling the raised section toward you.
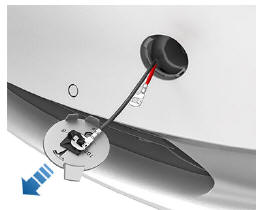
Note: Depending on production date, either the positive or negative terminal may be attached to the tow eye cover.
- Pull the two wires out of the tow eye opening to expose both terminals.
- Connect the 12V power supply's red positive (+) cable to the red positive (+) terminal.
- Connect the 12V power supply's black negative (-) cable to the black negative (-) terminal.
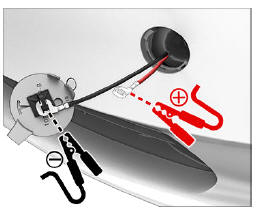
Note: Applying external 12V power to these terminals only releases the hood latches. You cannot charge the 12V battery using these terminals.
- Turn on the external power supply (refer to the manufacturer's instructions). The hood latches are immediately released and you can now open the hood to access the front trunk area.
- Disconnect both cables, beginning with the black negative (-) cable.
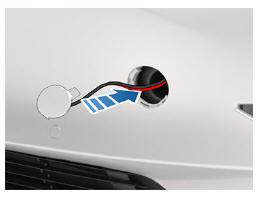
- If pulling Model 3 onto a flatbed truck, do
not replace the tow eye cover yet.
Otherwise, replace the tow eye cover by inserting the wires into the tow eye opening and aligning the tow eye cover into position and turning it into place.
READ NEXT:
 Glovebox
To open the glovebox, touch Controls >
Glovebox on the bottom corner of the
touchscreen. The glovebox automatically
opens and its light turns on.
To close the glovebox, push it upward until i
Installing Phone Charging Cable
To make it easy to connect your phone while
keeping the console free of clutter, you can
install a phone charging cable in Model 3.
Note: The phone dock supports two phones
side-by-side.
To i
SEE MORE:
Sensor - Airbag - Door - Front (Remove and Replace)
Note: This procedure was formulated using a release candidate or
production model. Follow safety requirements and use extreme caution when
working on or near high-voltage systems and components
Remove
Remove the 2nd row lower seat cushion. See Seat Cushion - Lower - 2nd
Row (Remove and Repla
Subframe Assembly - Rear - Remove
SPECIAL TOOLS
Fixture, Subframe, Model 3 (1099645-00-B)
Lifting Sling, Drive Unit, Model 3 (NA, APAC) (1130279-00-A)
Adapter, Subframe, Body Shop, Model 3 (1130481-00-A)
Tool, Hub Puller, Hydraulic (1096075-00-A)
Tool, Axle Extraction, Model 3 (1133386-00-A)
Lever Lock, HV Connector, Model 3 (1140
© 2019-2024 Copyright www.tmodel3.com
