Tesla Model 3: Installing Phone Charging Cable
To make it easy to connect your phone while keeping the console free of clutter, you can install a phone charging cable in Model 3.
Note: The phone dock supports two phones side-by-side.
To install a phone charging cable:
- Open both center console doors in front of the cup holders.
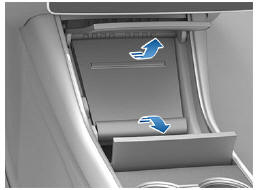
- Remove the rubber mat from the phone dock.
- Lift the phone dock to access the USB ports.
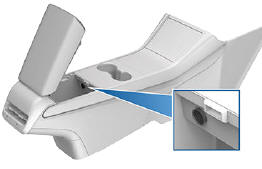
- Release the cover from the base of the phone dock by sliding it to the left.
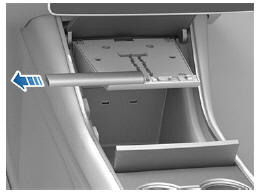
- Plug the USB connector on the phone charging cable into a USB port.
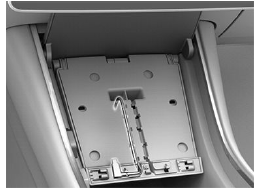
- Insert the phone end of the charging cable through the bottom of the phone dock and route the cable through the securing tabs towards the bottom of the phone dock.
- Reinstall the cover to the base of the phone dock by sliding it to the right.
- Lower the phone dock and reinstall the rubber mat.
12V Power Socket
Your Model 3 has a power socket located in the center console's rear compartment.
The power socket is suitable for accessories requiring up to 12A continuous draw (16A peak).
Note: Power is available whenever the vehicle is considered "awake". The vehicle may be awake for many reasons. For example, when using features such as Summon, or when features such as Cabin Overheat Protection, Keep Climate On, Dog Mode, Sentry Mode, etc. are enabled. The vehicle is also awake whenever the 12V battery is being charged or is in use, during HV charging, when the vehicle is communicating with the mobile app, etc.
Leaving an accessory plugged in does not deplete the 12V battery.
Warning: The power socket and an accessory's connector can become hot.
Warning: To prevent excessive interference with the vehicle's electronics, Tesla recommends that you do not plug any non-Tesla accessories, including power inverters, into the 12V power socket. However, if you do use a non-Tesla accessory and notice any malfunctions or unexpected behavior, such as indicator lights, alert messages, or excessive heat from the accessory, unplug the accessory from the 12V power socket immediately.
Caution: Do not attempt to jump start Model 3 using the 12V power socket.
Doing so can result in damage.
READ NEXT:
 Rear Console
Your Model 3 has a rear console integrated in
the center of the second row seat back. Pull
the console down to access the rear cup
holders, or use it as an armrest.
Coat Hangers
Your Model 3
Seating and Safety Restraints
Important information on seat positioning, seat adjustments, and in-car safety restraints is included in this section.
It offers guidance on how to properly modify the driver's and passengers' seats
SEE MORE:
Consumer Information
There are a lot of crucial facts for owners in this area. It addresses many different subjects, all of which are meant to enhance comprehension of and enjoyment from owning a Model 3.
It starts by exploring consumer rights, including information on warranty coverage, legislation pertaining to lemon
Coolant - HV Battery (Drain and Refill)
SPECIAL TOOLS
Drive Unit Pressure Test Fixture (1053600-00-B)
Adapter, Coolant Reservoir Pressure Test (1130942-00-B)
Kit, Coolant Leak Test Adapters, Model 3 (1132185-00-B)
Kit, Coolant Drain & Fill Adapters, M3 (1133843-00-A)
Kit, Svc Plug, Cooling Hose, Model 3 (1135762-00-A)
Kit, Battery C
