Tesla Model 3: Opening the Charge Port
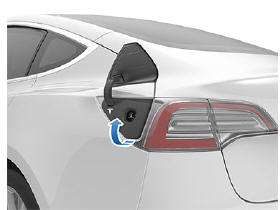
The charge port is located on the left side of Model 3, behind a door that is part of the rear tail light assembly. Before charging, park Model 3 to ensure that the charge cable easily reaches the charge port.
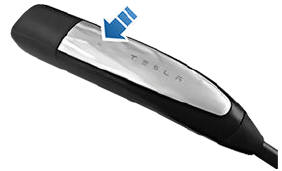
With Model 3 unlocked (or an authenticated phone is within range) and in Park, press and release the button on the Tesla charge cable to open the charge port door.
You can also open the charge port door using any of these methods:
- On the touchscreen, use the app launcher to open the Charging app, then touch Open Charge Port.
- On the car status on the touchscreen, touch the charging icon.
- On the "Cards" area on the touchscreen, touch the charging icon, then press OPEN CHARGE PORT.
- Press the bottom of the charge port door when Model 3 is unlocked or an authenticated phone is nearby.
- On the key fob accessory (sold separately), hold down the rear trunk button for 1-2 seconds.
Note: The following image is provided for demonstration purposes only. Depending on market region, your charge port may be slightly different.
Note: The Tesla "T" lights up white when you open the charge port door. If you do not insert a charge cable into the charge port within a few minutes after opening the charge port door, the charge port door closes. If this happens, use the touchscreen to open the charge port door again
Caution: Do not try to force the charge port door open.
Plugging In
If desired, use the touchscreen to change the charge limit and the charging current
To charge at a public charging station, plug the appropriate adapter into the vehicle's charging port, and then connect the station's charging connector to the adapter. The most commonly used adapter(s) for each market region are provided. Depending on the charging equipment you are using, you may need to start and stop charging using a control on the charging equipment.
If you are using the Mobile Connector, plug it into the power outlet before plugging it into Model 3.
Align the connector to the charge port and insert fully. When the connector is properly inserted, charging begins automatically after Model 3:
- Engages a latch that holds the connector in place;
- Shifts into Park (if it was in any other gear);
- Heats or cools the Battery, if needed. If the Battery requires heating or cooling, you may notice a delay before charging begins.
Note: Whenever Model 3 is plugged in but not actively charging, it draws energy from the wall outlet instead of using energy stored in the Battery. For example, if you are sitting in Model 3 and using the touchscreen while parked and plugged in, Model 3 draws energy from the wall outlet instead of the Battery.
Caution: The connector end of the charge cable can damage the paint if dropped onto the vehicle.
READ NEXT:
 During Charging
During charging, the charge port light (the
Tesla "T" logo) pulses green, and the
touchscreen displays the charging status. The
frequency at which the charge port light
pulses slows down
Charging Status and Settings
The charging screen displays on the
touchscreen whenever the charge port door is
open. To display the charging screen at any
time:
Touch the charging icon on the
"Cards" area on the tou
Scheduled Charging and Scheduled
Departure
There are two ways in which you can schedule
your vehicle's charging:
Scheduled Charging: When you set a
scheduled charging time, Model 3 displays
the set time to begin charging when you
SEE MORE:
Brake Caliper - Front - LH (Remove and Replace)
SPECIAL TOOLS
Skt, 1/2" Dr, E18 Torx
(1133187-00-A)
Skt, 1/2" Dr, E18 Torx
(1133187-XX-A & -01-A)
Remove
Note: This
procedure is applicable to both
Model 3 base and sport
Knuckle - Suspension - Front - LH (RWD) (Remove and Replace)
Remove
Remove the LH front brake dust shield. See
Shield - Dust - Brake - Front - LH (Remove and Replace).
Remove the bolts that attach the LH front ABS wheel speed sensor
electrical harness to the LH front suspension knuckle.
Torque 5 Nm
Release the clip that attaches the LH f
