Tesla Model 3: Pipes - Refrigerant - High / Low Pressure (Remove and Replace)
Tesla Model 3 2017-2026 Service Manual / Thermal Management / Refrigerant System / Pipes - Refrigerant - High / Low Pressure (Remove and Replace)
DRAFT
Warning:
This procedure was derived from pre-production computer models, and might not reflect the real-world situation. Warnings and cautions might be missing. Follow safety requirements and use extreme caution when working on or near high voltage systems and components.
Remove
- Recover the A/C refrigerant. See A/C Refrigerant (Recovery and Recharge).
Note: Completely recover the refrigerant before continuing this procedure.
- Disconnect 12V power. See 12V Power (Disconnect and Connect).
- Remove the front fascia valance. See Valance - Front Fascia (Remove and Replace).
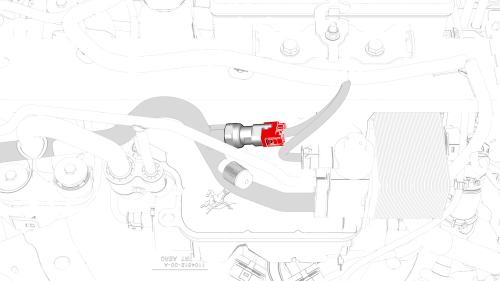
- Remove the nut that attaches the A/C suction line to the condenser fan
module and remove the line.
 Torque 22 Nm
.png)
- Release the clips that attach the outer plenum to the inner plenum, and remove the outer plenum.
.png)
- Remove the nuts that attach the inner plenum to the HVAC assembly, and remove the plenum.
- Remove the nut that attaches the liquid line to the TXV, and remove the
line from the TXV.
Torque 22 Nm
- Remove the nut that attaches the liquid line to the compressor, and
remove the line from the compressor.
Torque 22 Nm
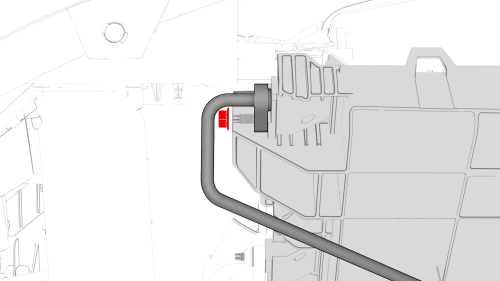
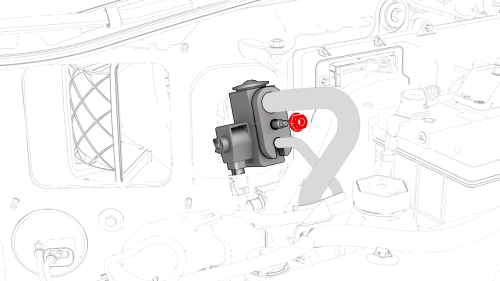
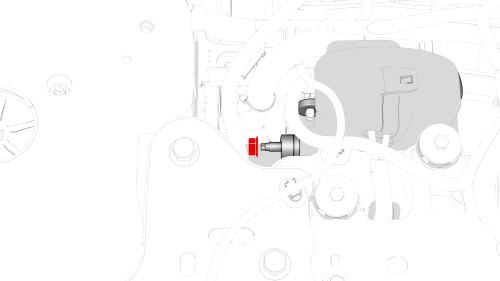
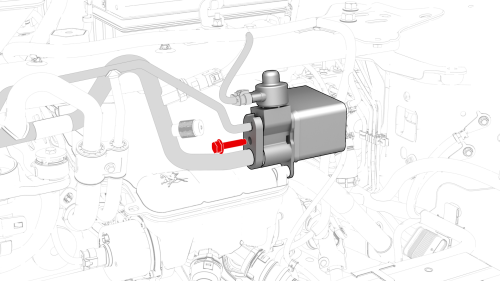
- Disconnect the harness connector from the low pressure transducer.
.png)
- Release the clip that attaches the lines to the superbottle.
.png)
- Remove the bolt that attaches the lines to the shock tower brace.
.png) Torque 5.5 Nm
Torque 5.5 Nm
- Remove the bolt that attaches the liquid line to the EXV chiller
assembly, and remove the line from the EXV.
 Torque 22 Nm
 - Remove the lines from the vehicle.
Install
Installation procedure is the reverse of removal, except for the following: After installing the lines, refill the refrigerant. See A/C Refrigerant (Recovery and Recharge).
READ NEXT:
 Pressure Transducer - High Pressure (Remove and Replace)
Remove
Remove the underhood storage unit. See Underhood Storage Unit (Remove
and Replace).
Perform the A/C refrigerant recovery. See A/C Refrigerant (Recovery and
Recharge).
Remove the outer
Pressure Transducer - Low Pressure (Remove and Replace)
Remove
Recover the A/C refrigerant. See A/C Refrigerant (Recovery and Recharge).
Note: Completely recover the refrigerant before continuing this
procedure.
Disconnect 12V power. See 12V Power
Receiver Dryer and Desiccant (Remove and Replace)
Receiver Dryer and Desiccant- Remove
SPECIAL TOOLS
Remove
Perform the A/C refrigerant recovery. See A/C Refrigerant (Recovery and
Recharge).
Remove the bolts (x2) that attach the underhood
SEE MORE:
ABS Modulator (Remove and Replace)
ABS Modulator - Remove
Remove
Raise and support the vehicle. See Raise Vehicle - 2
Post Lift.
Remove the 2nd row lower seat cushion. See Seat
Cushion - Lower - 2nd Row (Remove and Replace).
Remo
Suspension - Front (Check Torque)
Procedure
Remove the LH and RH front wheels. See
Wheel (Remove and Install).
Remove the front aero shield panel. See
Panel - Aero Shield - Front (Remove and Replace).
Remove the clips (x2) that attach the valance to the front stabilizer
bar brackets.
Check the torque for the nuts th
© 2019-2026 Copyright www.tmodel3.com
