Tesla Model 3: Removing Ice From Door Handle
In severe winter conditions, ice buildup within the door handle can prevent the door handle from opening. The process for freeing a Model 3 door handle is slightly different than other door handles; you can usually remove the ice with a few forceful bumps to the door handle using the bottom of your fist.
Caution: Remove any jewelry or objects that can damage the paint prior to performing the procedure, and do not attempt to use tools or excessive force.
Note: Preemptively applying WD-40 to the door handle pivot pins can help prevent ice buildup inside your door handle.
Perform the following to remove ice from the door handle:
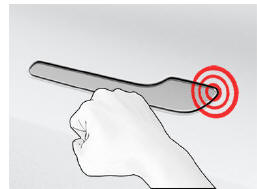
- Forcefully press the rear-most part of the door handle to initially try to open the door handle and release light or moderate ice buildup.
- Working in a circular pattern around the perimeter of the door handle, use the bottom of your fist to forcefully bump the door handle to break and release the ice buildup.
- Aiming for the rearmost end of the wide part of the door handle, use the bottom of your fist to forcefully bump the door handle. Increase the intensity of the bumps as necessary, repeating steps 1 and 2 until the ice is removed and the door handle can be opened.
Caution: Never bump the vehicle so hard as to cause a dent; the force used should be similar to knocking on your neighbor's front door.
- Once the door handle is able to move, open and close it a few more times to release any remaining ice buildup. Make sure the door handle is fully pressed in (retracted) prior to entering the vehicle, and check that the door is fully closed before driving away.
Applying WD-40 to Door Handle Pivot Pins
In severe winter conditions, applying WD-40 to door handle pivot pins can help prevent ice buildup that might immobilize the handle.
Consider applying WD-40 to the door handle pivot pins if you are expecting freezing rain, heavy snow, or icy conditions. Reapply as needed.
Caution: Read and observe the instructions and warnings provided by WD-40 prior to performing this procedure.
- To apply WD-40 to the door handle pivot pin:
- Open the door handle and prop it open using a folded towel or other soft material.
- Attach the provided straw to the nozzle of the WD-40 bottle.
- Put on eye protection.
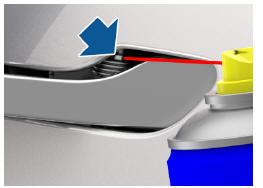
- Place the end of the straw next to the pivot pin and spray it for approximately one second, taking care not to accidentally spray other components.
Note: Rest the end of the straw on the top of the spring around the pivot pin to better aim the spray.
Warning: Make sure eye protection is worn when performing this step.
- Remove the towel or other soft material used to prop the door handle open.
- Pivot the door handle in and out approximately ten times.
- For a second time, place the end of the
straw next to the pivot pin and spray it for
approximately one second, taking care not
to accidentally spray other components.
Note: Rest the end of the straw on the top of the spring around the pivot pin to better aim the spray.
- Remove the towel or other soft material used to prop the door handle open.
- Pivot the door handle in and out approximately ten times.
- Perform this procedure on the other three door handles.
READ NEXT:
 Autopilot
This is a thorough rundown of the Autopilot Advanced Driver Assistance System (ADAS). It discusses autopilot's features and constraints while highlighting how it improves driving safety and comfort.
How It Works
Your Model 3 includes the following Autopilot components that actively
monitor the surrounding
roadway:
A camera is mounted above the rear license plate.
Ultrasonic sensors are located in
SEE MORE:
Sensor - Parking Distance - Rear - Each (Remove and Replace)
Remove
Remove the rear fascia. See Fascia - Rear (Remove and Install).
Disconnect the electrical harness from the rear parking distance sensor
connector.
Release the clips that attach the rear parking distance sensor to the
rear fascia, and then remove the sensor from the rear fasc
Trim - Headrest - Driver (Remove and Replace)
DRAFT
Warning:
This procedure was derived from pre-production computer models, and
might not reflect the real-world situation. Warnings and cautions might be
missing. Follow safety requirements and use extreme caution when working on or
near high voltage systems and components.
Do not redistr
