Tesla Model 3: Sensor - Temperature - Evaporator (Remove and Replace)
Tesla Model 3 2017-2026 Service Manual / Thermal Management / Cabin HVAC / Sensor - Temperature - Evaporator (Remove and Replace)

Remove
- Remove the driver floormat.
- Remove the LH center console side panel carpet. See Carpet - Side Panel - Center Console - LH (Remove and Replace).
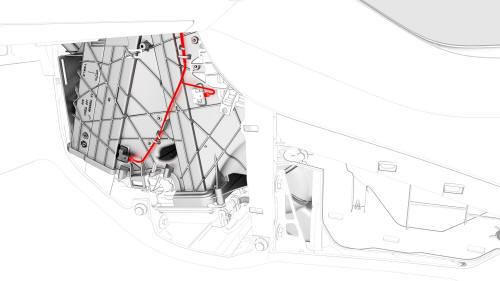
- Disconnect the evaporator temperature sensor electrical connector.
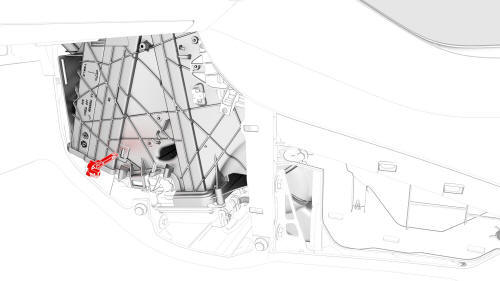
- Release the tabs that attach the evaporator temperature sensor inside the HVAC assembly, and then remove the evaporator sensor from the HVAC assembly.
Note: Use a plastic trim tool to release the tabs, and then pull
the evaporator temperature sensor straight out to remove it from the HVAC
assembly.
Install
- Install the evaporator temperature sensor onto the HVAC assembly, and then secure the sensor with 2 tabs.
- Connect the evaporator temperature sensor electrical connector.
- Install the LH center console side panel carpet. See Carpet - Side Panel - Center Console - LH (Remove and Replace).
- Install the driver floormat.
READ NEXT:
 Sensor - Temperature - LH (Remove and Replace)
Remove
Remove the driver floormat.
Remove the center console LH side carpet. See
Carpet - Side Panel - Center Console - LH (Remove and Replace).
Disconnect the LH temperature sensor electri
Sensor - Temperature - RH (Remove and Replace)
Remove
Remove the RH center console side panel carpet. See
Carpet - Side Panel - Center Console - LH (Remove and Replace).
Disconnect the electrical wiring harness conector from the RH
tem
SEE MORE:
Four Wheel Alignment (Check)
SPECIAL TOOLS
SEAT COVER (1096767-00-A)
Ballast Bag, 25lb (1145158-00-A)
CHASSIS HEIGHT MEASURING TOOL (1071271-00-A)
STEERING WHEEL LEVEL (1049463-00-A)
Procedure
Make sure the tire pressures are to specification.
Note: Use the tire sticker values displayed on the door jam. If
unavailable, use
Headliner (Remove and Replace)
Remove
Remove the headliner. See
Headliner (Remove and Install).
Release the clips that attach the LH and RH headliner tweeter covers to
the headliner, and remove the tweeter covers from the headliner.
Disconnect the electrical harness from the front overhead console
connector.
© 2019-2026 Copyright www.tmodel3.com
