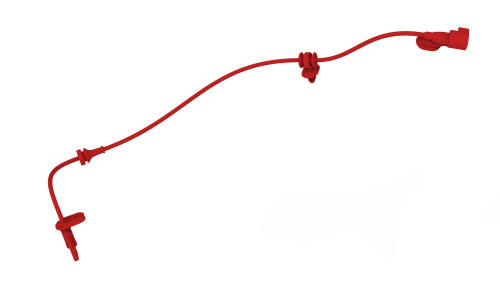
Tesla Model 3: Sensor - Wheel Speed - ABS - Rear - LH (Remove and Replace)
Remove
- Remove the rear LH wheel. See Wheel (Remove and Install).
.jpg)
- Release the clip that attaches the rear ABS wheel speed sensor connector to the subframe, and then disconnect the subframe harness from the connector.
Tip: Use a mechanical pickup tool to hold the connector in place, and then release the connector clip with a screwdriver.
.jpg)
- Release the clip and remove the grommet that attach the rear LH ABS wheel speed sensor cable to the rear knuckle and bracket.
.jpg)
- Remove and discard the bolt that attaches the rear LH ABS wheel speed sensor to the knuckle, and then
remove the sensor from the vehicle.
Install
- Install the rear LH ABS
wheel speed sensor to the
knuckle, and then install a new
bolt to attach the sensor to the
knuckle.
.jpg) Torque 5 Nm
Torque 5 Nm
- Fasten the clip and install the grommet that attach the rear LH ABS wheel speed sensor cable to the rear LH knuckle and bracket.
Caution: Perform a push-pull check on the clip and grommet to make sure they are securely fastened to the knuckle and bracket.
- Connect the subframe harness to the rear ABS wheel speed sensor connector, and then fasten the clip that attaches the connector to the subframe.
- Install the rear LH wheel. See Wheel (Remove and Install).
READ NEXT:
 Booster - Brake - Electromechanical (LHD) (Remove and Replace)
SPECIAL TOOLS
Flare nut crowfoot set (1079041-00-A)
Master Cylinder and Reservoir Assembly (Remove and Replace)
Master Cylinder and Reservoir Assembly - Remove
SPECIAL TOOLS
Flare nut crowfo
SEE MORE:
Actuator - Upper Mode (Remove and Replace)
Actuator - Upper Mode- Remove
Remove
Remove the 2nd lower seat cushion. See
Seat Cushion - Lower - 2nd Row (Remove and Replace).
Remove the rear underhood apron. See
Underhood Apron - Rear (Remove and Replace).
Disconnect 12V power. See
12V Power (Disconnect and Connect).
Remove the LH ins
Manual Release - Door - Rear - LH (Actuate)
Open Rear Door Using Manual Release Cable
Note: This procedure describes how to manually open the rear door
on a vehicle that does not have 12V power.
Remove the bolt that attaches the access panel to the underside of the
armrest.
Torque 6 Nm
Release the clips that attach the acc
