Tesla Model 3: Shield - Dust - Brake - Rear - LH and RH (Retrofit) - Install
Tesla Model 3 2017-2024 Service Manual / Brakes / Brake Discs and Calipers / Shield - Dust - Brake - Rear - LH and RH (Retrofit) / Shield - Dust - Brake - Rear - LH and RH (Retrofit) - Install
Install
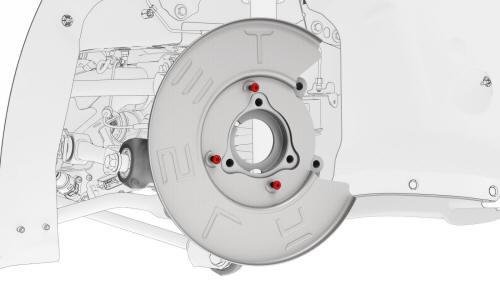
- Install the bolts that attach the LH rear brake dust
shield to the knuckle.
 Torque 8 Nm
 - Use a magnetic field viewing card to check the LH rear hub's tone ring.
.jpg)
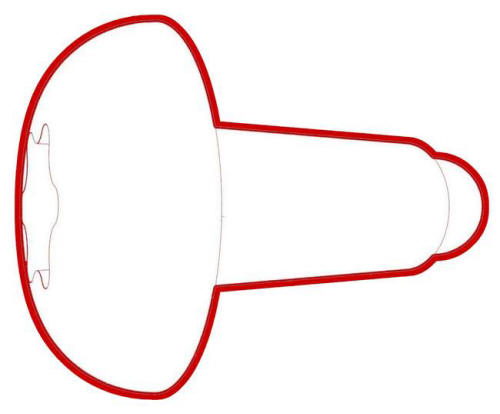
Lubricate the area highlighted red
- Apply approximately 1 gram of Molykote M-77 Lubricant Paste only to the hub mating face on the outboard side of the LH rear drive unit halfshaft.
Caution: Do not apply any lubricant to the halfshaft splines. If lubricant is mistakenly applied, wipe the splines clean with a shop towel.
.png)
Halfshaft hidden for clarity
- Position the LH rear drive unit halfshaft in the LH
rear hub splines, and then install the new bolts that
attach the hub to the knuckle.
.png) Torque 78 Nm
Torque 78 Nm - Hand-tighten a new rear drive unit halfshaft nut on the LH halfshaft.
- Install the LH rear brake rotor, but do not perform any road tests. See Brake Rotor - Rear - LH (Remove and Replace).
- Position the LH rear wheel on the vehicle, and then hand-tighten the LH rear wheel lug nuts.
- Repeat steps 1 to 7 on the RH side of the vehicle.
- Lower the vehicle, and then shift the vehicle into Park (this will disable EPB Service Mode).
- Tighten LH and RH rear wheel lug nuts. See Wheel (Remove and Install).
- Tighten the LH and RH rear drive unit halfshaft
nuts.
.png) Torque 245 Nm
Torque 245 Nm
- Install any wheel caps or covers that were removed.
READ NEXT:
 Brake Fluid Bleed - One Caliper
SPECIAL TOOLS
Brake System Servicing Equipment (1054715-01-A)
Flare nut crowfoot set
Brake Fluid Bleed / Flush
SPECIAL TOOLS
Brake System Servicing Equipment (1054715-01-A)
Flare nut crowfoot s
SEE MORE:
Damper - Rear - LH (Coil Suspension) (Remove and Replace)
Remove
Raise and support the vehicle on a 2 post lift. See
Raise Vehicle - 2 Post Lift.
Remove the LH rear wheel. See Wheel (Remove and
Install).
Electrical Precautions
General
Avoid getting grease on electrical components and connectors. Grease collects
dirt, which can cause electrical tracking (short circuits) or high resistance.
Handle printed circuit boards (PCBs) at an electrostatic discharge (ESD) work
station only. Hold printed circuit boards by the edges
© 2019-2024 Copyright www.tmodel3.com
