Tesla Model 3: Shield - Dust - Brake - Rear - LH and RH (Retrofit) - Remove

SPECIAL TOOLS
Card, Magnetic Field Viewer (1062500-00-A)
Tool, Hub Puller, Hydraulic (1096075-00-A)
Remove
- Remove any wheel caps or covers, and then loosen the LH rear wheel lug nuts. Do not remove the wheel at this time. See Wheel (Remove and Install).
.png)
- Loosen the LH rear drive unit halfshaft nut.
- Raise and support the vehicle. See Raise Vehicle - 2 Post Lift.
- Use Toolbox to place the vehicle into EPB Service Mode. See Release Parking Brake Using Toolbox.
- Remove the LH rear wheel. See Wheel (Remove and Install).
.jpg)
- Remove and discard the LH rear drive unit halfshaft nut.
- Remove the LH rear brake rotor. See Brake Rotor - Rear - LH (Remove and Replace).
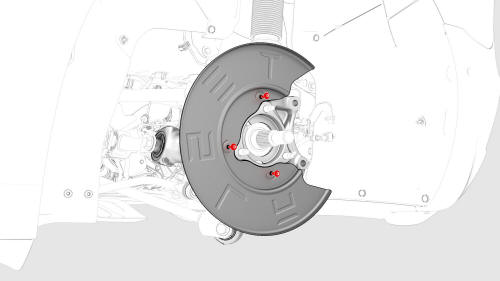
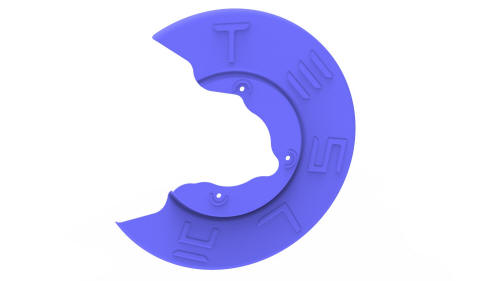
- Remove the bolts that attach the LH rear brake dust shield to the knuckle, and then remove the dust shield from the vehicle.
- Position the hub puller tool on the LH rear wheel studs, and then hand-tighten the wheel lug nuts (x5).
- Use the hub puller to separate the halfshaft from the hub splines.
Tip: While holding the hub in position, turn the hydraulic hub puller tool handle clockwise to separate the LH rear drive unit halfshaft from the hub splines.
.png)
Halfshaft hidden for clarity
- Remove and discard the bolts that attach the LH rear hub to the knuckle, and then remove the hub from the vehicle.
Repeat steps 1 to 11 on the RH side of the vehicle.
READ NEXT:
 Shield - Dust - Brake - Rear - LH and RH (Retrofit) - Install
Install
Install the bolts that attach the LH rear brake dust
sh
Brake Fluid Bleed - One Caliper
SPECIAL TOOLS
Brake System Servicing Equipment (1054715-01-A)
Flare nut crowfoot set
SEE MORE:
Bushing - Gearbox - Front Drive Unit - Install
Install
Set up the bushing tool to press in the new
bushing.
Note: Use cups "L", "H", and "D" when assembling
the special tool, as shown.
Driving
This section illustrates a number of driving-related topics. The first section goes over how to operate the different controls, including the parking brake, gas and brake pedals, steering wheel, and gear selector.
It also examines the many driving modes that the Model 3 offers, including Sport mode
