Tesla Model 3: Suspension - Front (Check Torque)
Tesla Model 3 2017-2026 Service Manual / Suspension / Front Suspension (Including Hubs) / Suspension - Front (Check Torque)
Procedure
- Remove the LH and RH front wheels. See Wheel (Remove and Install).
- Remove the front aero shield panel. See Panel - Aero Shield - Front (Remove and Replace).
.png)
- Remove the clips (x2) that attach the valance to the front stabilizer bar brackets.
.jpg)
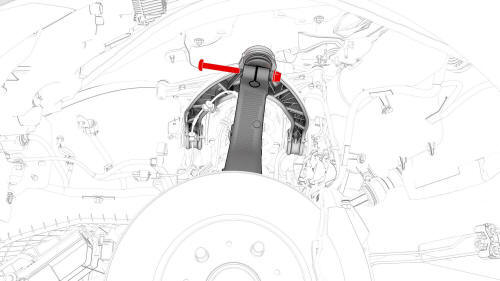
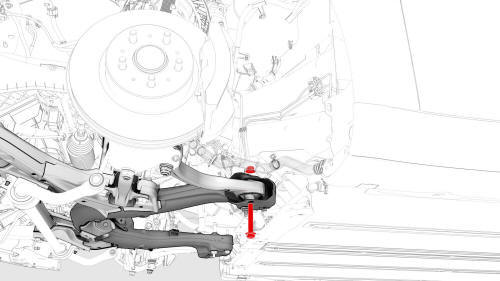
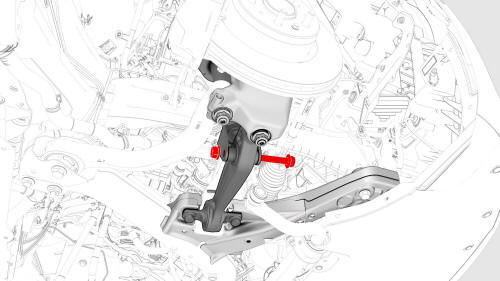
- Check the torque for the nuts that attach the front stabilizer bar to
the front subframe, and then mark the nuts with a paint pen.
.png) Torque 35 Nm
Torque 35 Nm
.jpg)
.jpg)
- Check the torque for the nut that attaches the LH front stabilizer bar
link to the LH front spring and damper assembly, and then mark the nut with
a paint pen.
 Torque 98 Nm
.jpg)
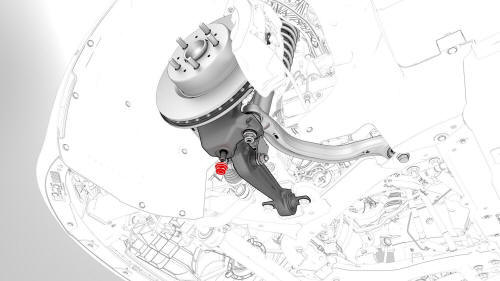
- Check the torque for the nut that attaches the LH tie rod end to the LH
knuckle, and then mark the nut with a paint pen.
 Torque 180 Nm
- Check the torque for the nut that attaches the LH upper control arm to
the LH knuckle, and then mark the nut with a paint pen.
 Torque 56 Nm
- Check the torque for the nut that attaches the LH front lower compliance
link to the front subframe, and then mark the nut with a paint pen.
 Torque 115 Nm

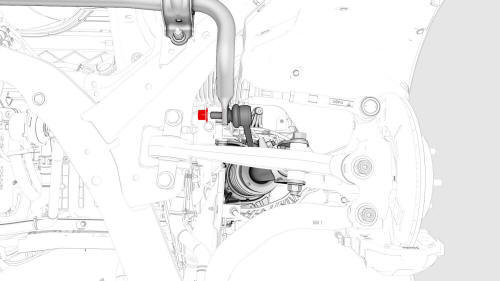
- Check the torque for the nuts that attach the LH front lower lateral
link to the front subframe, and then mark the nuts with a paint pen.
 Torque 115 Nm

- Check the torque for the nut that attaches the LH front lower compliance
link to the LH knuckle, and then mark the nut with a paint pen.
 Torque 180 Nm
- Check the torque for the nut that attaches the LH front lower lateral
link to the LH knuckle, and then mark the nut with a paint pen.
 Torque 180 Nm
- Check the torque for the nut that attaches the LH front stabilizer bar
link to the front stabilizer bar, and then mark the nut with a paint pen.
 Torque 98 Nm
 - Repeat step 5 through step 12 on the RH side of the front suspension
- Install the LH and RH front wheels. See Wheel (Remove and Install).
- Raise the vehicle on a 4 post lift. See Raise Vehicle - 4 Post Lift.
.jpg)
- Check the torque for the nut that attaches the LH front spring and
damper assembly to the LH front lower lateral link, and then mark the nut
with a paint pen.
 Torque 106 Nm
- Check the torque for the nut that attaches the RH front spring and
damper assembly to the RH front lower lateral link, and then mark the nut
with a paint pen.
Torque 106 Nm
- Install the clips (x2) that attach the valance to the front stabilizer bar brackets.
- Install the front aero shield panel. See Panel - Aero Shield - Front (Remove and Replace).
- Remove the vehicle from the 4 post lift. See Raise Vehicle - 4 Post Lift.
READ NEXT:
 Cover - Rear Suspension - LH (Remove and Replace)
Remove
Remove the bolt that attaches the rear suspension cover to the LH lower
rear control arm assembly.
Torque 6 Nm
Release the tabs (x2) that attach the rear suspension cover to the LH
Drop Link - Stabilizer Bar - Rear - LH (Remove and Replace)
Remove
Remove the mid aero shield. See
Panel - Aero Shield - Mid (Remove and Replace).
Remove and discard the nuts that attach the LH drop link to the rear
stabilizer bar and rear LH knuck
SEE MORE:
HV Battery (RWD) (Remove and Replace)
HV Battery (RWD) - Remove
SPECIAL TOOLS
Adapter, Lift Pad, Model 3 (1453419-00-A)
Key, Seat Belt Release, Model 3 (1133787-00-A)
ASY, Battery Table, Manual Lift (1020566-00-F)
Top Plate, Battery Table, Manual Lift (1020566-99-A)
Hoist, H-Frame EMEA (1129166-00-A)
Gantry, Adjustable, Aluminum (107336
Seat Back - 2nd Row - RH (Remove and Install)
Remove
Remove the 2nd row lower seat cushion. See
Seat Cushion - Lower - 2nd Row (Remove and Replace).
Remove the RH 2nd row seat side bolster. See
Bolster - Side - Seat - 2nd Row - LH (Remove and Replace).
Release the clips that attach the bolster bracket, and the remove the
bracket fr
© 2019-2026 Copyright www.tmodel3.com
