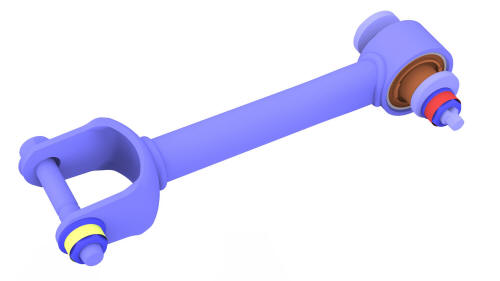
Tesla Model 3: Toe Link - Rear - LH (Remove and Replace)
Tesla Model 3 2017-2026 Service Manual / Suspension / Rear Suspension (Including Hubs) / Toe Link - Rear - LH (Remove and Replace)
Remove
- Remove the LH rear wheel. See Wheel (Remove and Install).
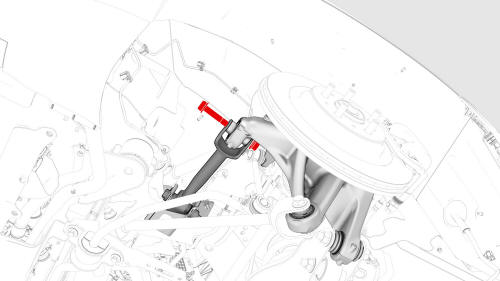
- Remove and discard the bolt and nut that attach the rear toe link to the knuckle.
- Remove the mid aero shield panel. See Panel - Aero Shield - Mid (Remove and Replace).
- Remove and discard the bolt and nut that attach the
rear toe link to the rear subframe, and then remove the
rear toe link from the vehicle.
Install
- Hand tighten the bolts and nuts that attach the rear toe link to the subframe and the knuckle.
.jpg)
- Remove the bolt that attaches the LH rear suspension cover to the lower control arm.
.png)
- Install a spring compressor onto the LH rear coil spring. Line up the hooks per image and verify that the spindle goes through the body opening when the suspension is compressed.
.png)
- Position a support stand underneath the LH rear suspension, and then raise the support stand to simulate vehicle at ride height. Note: Use the rear ride height torque gauge to verify that the rear suspension is set to ride height specifications and adjust the support stand or spring compressor tool , if necessary.
- Measure the distance between the bottom of the quarter panel to the center of the rear axle to make sure that the rear suspension is set to ride height: The distance should measure 378 mm.
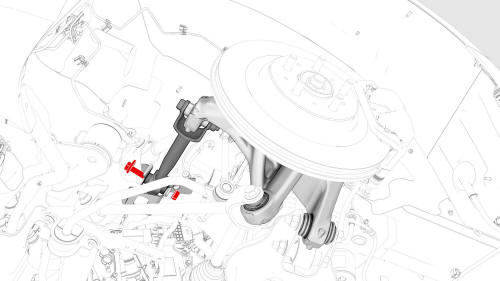
- Fasten the bolt and nut that attach the rear toe
link to the knuckle and mark the bolt and nut area with
a paint pen.
 Torque 76 Nm
- Fasten the bolt and nut that attach the rear toe
link to the subframe and mark the bolt and nut area with
a paint pen.
Torque 85 Nm
- Remove the support stand from underneath the LH rear suspension.
- Remove the spring compressor from the LH rear coil spring.
- Install the bolt that attaches the LH rear suspension cover to the lower control arm. Torque 6 Nm
- Install the LH rear wheel. See Wheel (Remove and Install).
- Check the four wheel alignment. See Four Wheel Alignment (Check).
READ NEXT:
 Damper - Rear - LH (Coil Suspension) (Remove and Replace)
Remove
Raise and support the vehicle on a 2 post lift. See
Raise Vehicle - 2 Post Lift.
Spring - Rear Suspension - LH (Remove and Replace)
Spring - Rear Suspension - LH - Remove
SPECIAL TOOLS
Tool, Spring Compressor, Hook, Model 3
(1135103-00-A)
SEE MORE:
Chiller and EXV Assembly (Remove and Replace)
Chiller and EXV Assembly- Remove
Remove
Remove the mid aero shield panel. See
Panel - Aero Shield - Mid (Remove and Replace).
Remove the underhood storage unit. See
Underhood Storage Unit (Remove and Replace).
Recover the A/C refrigerant. See
A/C Refrigerant (Recovery and Recharge).
Note:
Window Motor / Regulator Assembly - Front - LH (Remove and Replace)
Warning: The side impact airbag deployment depends on the front door
sensor's ability to detect a side impact from air pressure. Make sure that there
are no uncovered holes in the front door shells. Additionally, always reinstall
plugs or tape when servicing or inspecting the front doors and thei
© 2019-2026 Copyright www.tmodel3.com
