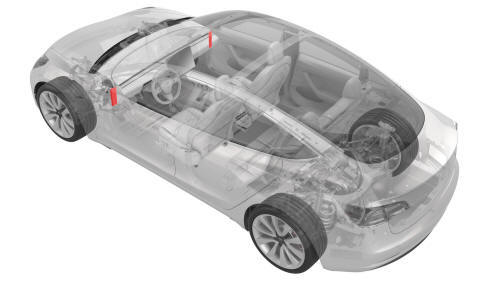
Tesla Model 3: Trim - A-Pillar - Middle - LH (Remove and Replace)
Tesla Model 3 2017-2026 Service Manual / Interior Trim / Pillar and Sill Trim / Trim - A-Pillar - Middle - LH (Remove and Replace)
Remove
- Remove the LH instrument panel end cap. See End Cap - Instrument Panel - LH (Remove and Replace).
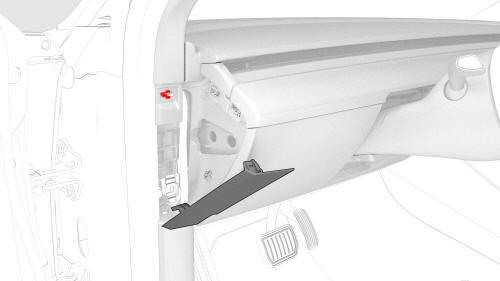
- Release the upper clip that attaches the LH middle A-Pillar trim, and then pull out the trim to remove it from the vehicle.
Note: Remove any remaining LH middle A-pillar trim clip from
the LH A-pillar, and if the LH middle A-pillar trim is to be later installed,
remove the clip from the trim.
Install
- If reusing the same LH middle A-pillar trim, install a new clip onto the trim.
- Align the bottom tab, and then push the top clip to fully seat the LH middle A-pillar trim.
Note: Make sure that the seal seat is on top of the trim.
- Install the LH instrument panel end cap. See End Cap - Instrument Panel - LH (Remove and Replace).
READ NEXT:
 Trim - A-Pillar - Upper - LH (Remove and Replace)
Remove
Open the LH front door.
Remove the LH instrument panel end cap. See
End Cap - Instrument Panel - LH (Remove and Replace).
Remove the LH middle A-Pillar trim. See
Trim - A-Pillar - Midd
Trim - B-Pillar - Lower - LH (Remove and Replace)
Remove
Remove the LH instrument panel end cap. See
End Cap - Instrument Panel - LH (Remove and Replace).
Remove the LH middle A-pillar trim. See
Trim - A-Pillar - Middle - LH (Remove and Replac
Trim - B-Pillar - Upper - LH (Remove and Replace)
SPECIAL TOOLS
Key, Seat Belt Release, Model 3 (1133787-00-A)
Remove
Open both LH doors.
Move the LH front seat fully forward.
Use the seat belt release key to release the LH front seatbelt
SEE MORE:
Fluid Coupling (Straight) - Rear Drive Unit (Remove and Replace)
SPECIAL TOOLS
Kit, Svc Plug, Cooling Hose, Model 3
(1135762-00-A)
Remove
Remove the LH rear drive unit mount. See Moun
Decor Trim - Center Console (Remove and Replace)
Remove
Open the LH front door.
Move the LH front seat to the lowest and most rearward position.
Clip Locations on Center Console
Clip Locations on Decor Trim
Release the clips (x9) that attach the LH center console decor trim to
the center console, and then remove the decor trim.
© 2019-2026 Copyright www.tmodel3.com
