Tesla Model 3: Window Motor / Regulator Assembly - Front - LH (Remove and Replace)
Tesla Model 3 2017-2026 Service Manual / Closures / Door Glass and Regulators / Window Motor / Regulator Assembly - Front - LH (Remove and Replace)
Warning: The side impact airbag deployment depends on the front door sensor's ability to detect a side impact from air pressure. Make sure that there are no uncovered holes in the front door shells. Additionally, always reinstall plugs or tape when servicing or inspecting the front doors and their components.
Remove
- Remove the front LH door glass. See Glass - Door - LH - Front (Remove and Replace)
- Remove the front LH door closeout panel. See Closeout Panel - Door - Front - LH (Remove and Install).
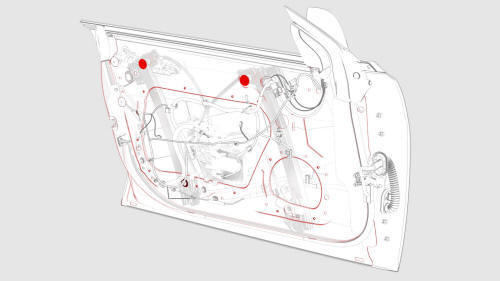
- Remove the plugs that allow access to the window motor/regulator assembly.
- Remove the nuts that attach the window motor/regulator assembly to the
front LH door, and then remove the window motor/regulator assembly from the
door.
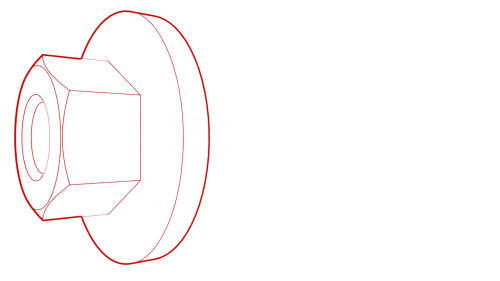 Torque 10 Nm
Install
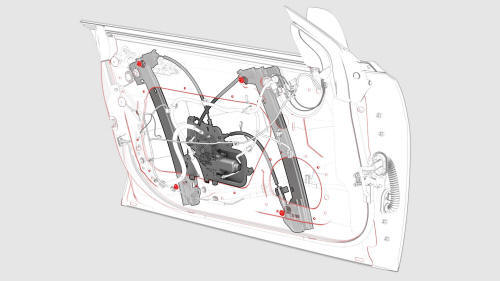
- Position the window motor/regulator assembly into the LH front door for installation.
- Install the nuts that attach the window motor/regulator assembly to the
front LH door.
Torque 10 Nm
- Install the plugs that allow for access to the window motor/regulator assembly.
- Install the front LH door closeout panel. See Closeout Panel - Door - Front - LH (Remove and Install).
- Install the front LH door glass. See Glass - Door - LH - Front (Remove and Replace)
- Adjust the front LH door glass. See Glass - Door - LH - Front (Adjust).
- Install the LH front door trim panel. See Panel - Door Trim - Front - LH (Remove and Install).
READ NEXT:
 Window Motor / Regulator Assembly - Rear - LH (Remove and Replace)
SPECIAL TOOLS
Rivnut Install Kit, for NA (1054712-00-A )Rivnut Install Kit, for EMEA
(1054712-01-A )
Service rivnut (1004296-00-A)Service bolt (1015888-00-C)
Warning: The side impact airbag deploym
Window Regulator - Front - LH (Recalibrate)
Connect a laptop with Toolbox to the vehicle.
In Toolbox, select the connection status icon at the top right corner,
and then select Connect Locally.
Get into the driver seat, and then close the
Window Regulator - Rear - LH (Recalibrate)
Connect a laptop with Toolbox to the vehicle.
In Toolbox, select the connection status icon at the top right corner,
and then select Connect Locally.
Get into the driver seat, and then close the
SEE MORE:
Bracket - License Plate - Front (EMEA) (Retrofit using Jig)
SPECIAL TOOLS
Front license plate bracket jig, Model 3, EMEA (1496772-00-A )
Procedure
Clean the front center surface of the front fascia with isopropyl
alcohol (IPA) wipe, and then allow surface to dry before continuing.
Put the front license plate bracket on the jig: Line up the 2 hol
Hall Sensor - Exterior Release - Door - Front - LH (Remove and Replace)
Remove
Remove the LH front door trim panel. See Panel - Door Trim - Front - LH
(Remove and Install).
Remove the LH front door inner belt seal. See Seal - Inner Belt - Front
Door - LH (Remove and Replace).
Remove the front LH door glass. See Glass - Door - LH - Front (Remove
and Replace)
© 2019-2026 Copyright www.tmodel3.com
