Tesla Model 3: Adjust Rear Camber
Tesla Model 3 2017-2024 Service Manual / Suspension / Adjustment / Four Wheel Alignment (Check and Adjust) / Adjust Rear Camber
- If the rear camber is within specification and does not require adjustment, adjust the rear toe. See Adjust Rear Toe.
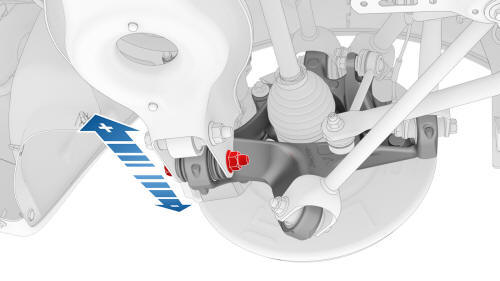
- Slightly loosen, but do not remove, the rear LH lower aft link to knuckle bolt.
- Adjust the rear LH camber to -1.00º +/- 1.0º (+/- 0.80º split).
- Move the knuckle in toward the centerline to add positive camber.
- Move the knuckle out from the centerline to add negative camber.
- If the camber is correct, go to step 11.
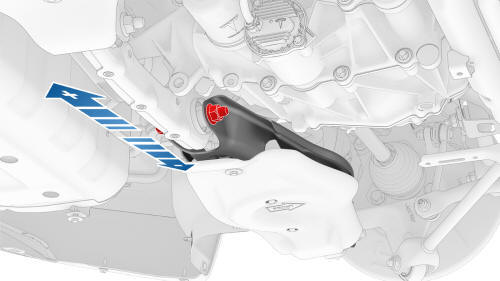
- Slightly loosen, but do not remove, the rear LH lower aft link to subframe bolt.
- Adjust the rear LH camber to -1.00º +/- 1.0º (+/- 0.80º split).
- Move the link in toward the centerline to add positive camber.
- Move the link out from the centerline to add negative camber.
- If the camber is correct, go to step 11.
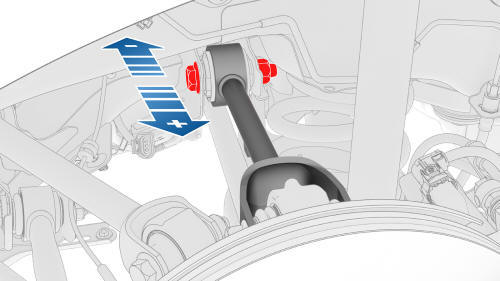
- Slightly loosen, but do not remove, the rear LH upper aft link to subframe bolt.
- Adjust the rear LH camber to -1.00º +/- 1.0º (+/- 0.80º split).
- To add positive camber, move the link out from the centerline.
- To add negative camber, move the link in toward the centerline.
- If the camber cannot be corrected, escalate a Toolbox session.
- Tighten the suspension bolts that were loosened.
.png) Torque Lower Aft
Link to Knuckle Bolt 115Nm
Torque Lower Aft
Link to Subframe Bolt 115 Nm
Torque Upper
Aft Link to Subframe Bolt 134 Nm
Torque Lower Aft
Link to Knuckle Bolt 115Nm
Torque Lower Aft
Link to Subframe Bolt 115 Nm
Torque Upper
Aft Link to Subframe Bolt 134 Nm - Perform step 2 through step 11 for the RH side of the vehicle if necessary.
- Adjust the rear toe. See Adjust Rear Toe.
Adjust Rear Toe
- If the rear toe is within specification and does not require adjustment, adjust the front camber and caster. See Adjust Front Camber and Caster.
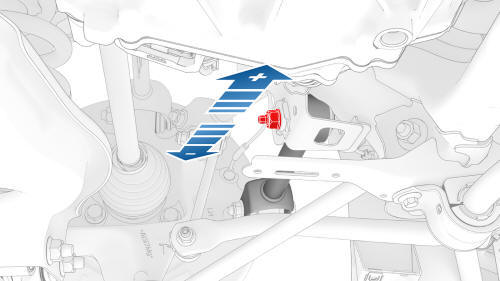
- Loosen the nut on the rear LH toe link to subframe bolt.
- Rotate the rear LH toe link to subframe bolt to adjust the rear LH toe to 0.20º IN +/- 0.15º (+/- 0.1.º split).
- To add positive toe in, move the link in toward the centerline.
- To add negative toe out, move the link out from the centerline.
- When the rear LH toe is correct, tighten the nut.
Torque 85 Nm
- Perform step 2 through step 4 for the RH side of the vehicle if necessary.
- Adjust the front camber and caster. See Adjust Front Camber and Caster.
READ NEXT:
 Adjust Front Camber and Caster
If the front camber and caster are within specification and do not
require adjustment, adjust the front toe. See
Adjust Front Toe.
Remove the cowl screen panel. See
Panel - Cowl Screen (Remove
Adjust Front Toe
If the front toe is within specification and does not require adjustment,
complete the alignment. See
Complete the Alignment.
Loosen the jam nut on the LH inner tie rod.
Rotate the LH i
SEE MORE:
Tuner - FM / HD (Remove and Replace)
Remove
Remove the RH side rail trim. See Trim - Side Rail - LH (Remove and
Replace).
Disconnect the backlight electrical connector from the tuner.
Disconnect the electrical connectors from the front of the tuner.
Disconnect the electrical connector from the rear of the tuner.
Carrier - Front End (Remove and Replace)-Install
Install the clips that attach the front end module electrical harness to
the front end carrier.
Install the hood latch.
Install the secondary hood latch actuator.
With an assistant, position the front end carrier onto the vehicle for
installation.
Note: Hand-tighten the upper bolts of th
© 2019-2024 Copyright www.tmodel3.com
