Tesla Model 3: Antenna - Bluetooth Passive Entry - Front (Remove and Replace)
Tesla Model 3 2017-2026 Service Manual / Electrical / Keyless Entry and Security / Antenna - Bluetooth Passive Entry - Front (Remove and Replace)
Remove
- Raise and support the vehicle. See Raise Vehicle - 2 Post Lift.
- Remove the rear underhood apron. See Underhood Apron - Rear (Remove and Replace).
- Remove the cabin intake duct. See Duct - Cabin Intake (Remove and Replace).
- Remove the hood latch cover. See Cover - Hood Latch (Remove and Replace).
- Remove the underhood storage unit. See Underhood Storage Unit (Remove and Replace).
- Remove the front aero shield panel. See Panel - Aero Shield - Front (Remove and Replace).
- Remove the front fascia valance. See Valance - Front Fascia (Remove and Replace).
- Remove the front fascia. See Fascia - Front (Remove and Install).
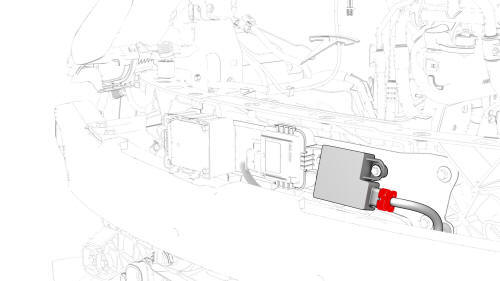
- Disconnect the electrical connector from the front Bluetooth passive entry antenna connector.
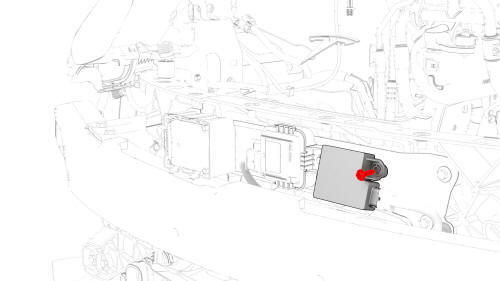
- Remove the bolt that attaches the front Bluetooth passive entry antenna
to the front end carrier, and then remove the antenna from the front end
carrier.
 Torque 9 Nm
Install
Installation procedure is the reverse of removal.
READ NEXT:
 Antenna - Bluetooth Passive Entry - Rear (Remove and Replace)
Remove
Remove the rear fascia. See
Fascia - Rear (Remove and Install).
Disconnect the electrical wiring harness connector from the rear
Bluetooth passive entry module.
Remove the bolt a
Key - Programming (With Authenticated Key Present)
Note: Perform this procedure when at least one of authenticated keys
are present.
Note: The vehicle supports up to 19 keys. When reaching this limit,
a key must be deleted before adding a new key.
A
Module - Body Controller - Security (Remove and Replace)
Module - Body Controller - Security- Remove
Remove
Open all doors and lower all windows
Remove the 2nd row lower seat cushion. See
Seat Cushion - Lower - 2nd Row (Remove and Replace).
Move the
SEE MORE:
Suspension - Front (Check Torque)
Procedure
Remove the LH and RH front wheels. See
Wheel (Remove and Install).
Remove the front aero shield panel. See
Panel - Aero Shield - Front (Remove and Replace).
Remove the clips (x2) that attach the valance to the front stabilizer
bar brackets.
Check the torque for the nuts th
Switch - Steering Wheel - LH (Remove and Replace)
Remove
Remove the driver airbag. See Airbag - Driver (Remove and Replace).
Disconnect the steering wheel electrical wiring harness from the
connector.
Disconnect the electrical harness from the LH steering wheel switch
connector.
Disconnect the electrical harness from the RH s
© 2019-2026 Copyright www.tmodel3.com
