Tesla Model 3: Cooling System - Remove
Tesla Model 3 2017-2024 Service Manual / Thermal Management / Cooling System / Cooling System (Drain and Refill) / Cooling System - Remove
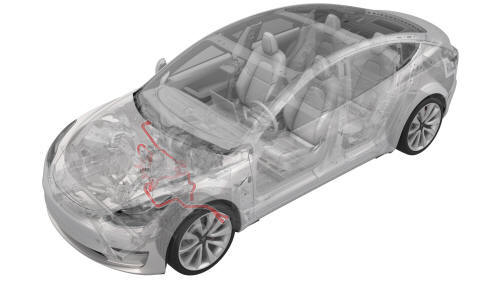
Remove
- Remove the 2nd row lower seat cushion. See Seat Cushion - Lower - 2nd Row (Remove and Replace).
- Remove the rear underhood apron. See Underhood Apron - Rear (Remove and Replace).
- Remove the cabin intake duct. See Duct - Cabin Intake (Remove and Replace).
- Disconnect 12V power. See 12V Power (Disconnect and Connect).
- Remove the front aero shield. See Panel - Aero Shield - Front (Remove and Replace).
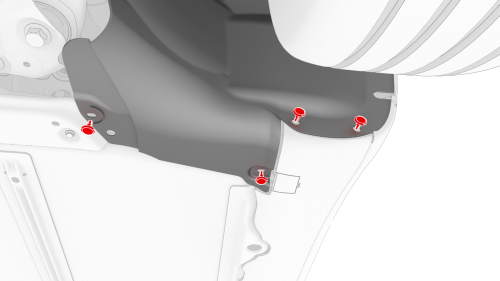
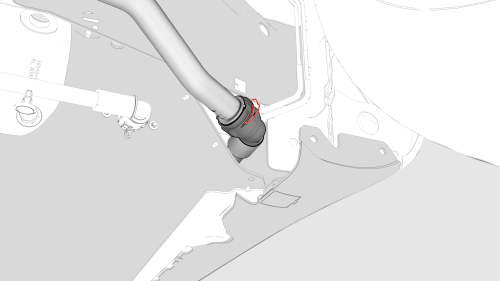
LH side shown, RH similar
- Release the push clips that attach the lower rear edge of the LH and RH wheel liners to the vehicle for access to the coolant hose.
- Pull the LH and RH wheel liners back, and then attach the liners to the subframe with bungee straps.
- Position the coolant drain container underneath the RH front side of the HV battery.
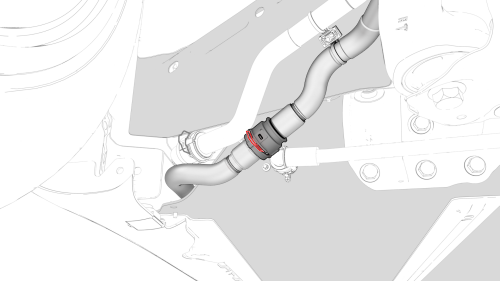
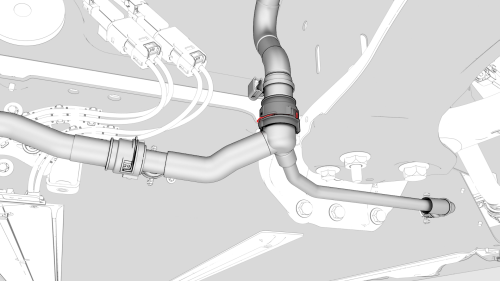
- Release the spring clip to disconnect the powertrain return hose at the RH side of the vehicle, and then plug the female side of the hose.
- Attach a powertrain drain fitting adapter to the male side of the powertrain return hose, and then attach a hose extension to the adapter
- Attach the hose extension to the coolant cart drain hose.
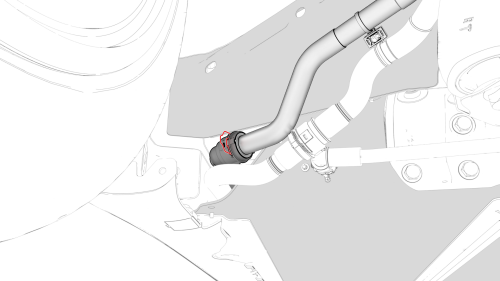
- Release the spring clip to disconnect the rear powertrain supply hose at the RH side of the vehicle, and then plug the male side of the hose.
- Attach a powertrain flush fitting adapter to the female side of the rear powertrain supply hose.
- Attach the powertrain flush fitting adapter to the coolant pressure tester on the coolant cart, and then preset the pressure regulator valve.
- Attach a compressed air line to the coolant pressure tester.
Note: Make sure the valve on the pressure regulator is closed.
- Open the valve on the powertrain drain fitting adapter.
- Slowly open the valve on the pressure regulator and allow coolant to drain out of the powertrain return hose
- Close the valve on the pressure regulator when no more coolant is draining from the powertrain return hose
- Remove the powertrain flush fitting adapter from the female side of the powertrain supply hose.
- Remove the powertrain drain fitting adapter from the male side of the powertrain return hose.
- Remove the plugs and attach the spring clips (x2) to reconnect both powertrain coolant hoses.
- Remove the powertrain drain fitting adapter from the cart drain hose, and then remove the powertrain flush fitting adapter from the cart pressure hose.
- Position the coolant drain container underneath the LH front side of the HV battery.
- Release the spring clip to disconnect the HV battery return hose at the LH side of the vehicle, and then plug the male side of the hose.
- Attach the battery drain fitting adapter to the female side of the HV battery return hose, and then attach the battery drain fitting adapter to the coolant cart drain hose.
- Release the spring clip to disconnect the HV battery supply hose, and then plug female side of the hose.
.png)
- Release the clips that attach the chiller hose to the body.
- Attach a battery flush fitting adapter to the male side of the HV battery supply hose.
- Attach the battery flush fitting adapter to the coolant cart pressure hose.
- Open the valve on the battery drain fitting adapter.
- Slowly open the valve on the pressure regulator and allow coolant to drain out of the HV battery return hose.
- Close the valve on the pressure regulator when no more coolant is draining from the HV battery return hose
- Disconnect the compressed air line from the coolant pressure tester.
- Remove the battery drain fitting adapter from the female side of the HV battery return hose.
- Remove the battery flush fitting adapter from the male side of the HV battery supply hose.
- Remove the plug and reconnect the HV battery to battery chiller hoses.
- Remove the plug and reconnect the HV battery return hose.
- Install the clips that attach the battery chiller hose to the body.
- Remove the coolant drain container from underneath the vehicle.
- Remove the battery drain fitting adapter from the cart drain hose, and then remove the battery flush fitting adapter from the cart pressure hose.
READ NEXT:
 Cooling System - Procedure
Procedure
LH side shown, RH similar
Release the bungee straps and install the push clips that attach the
lower rear edge of the LH and RH front wheel liners to the vehicle.
Install the front ae
Cooling System (Partial Refill and Bleed)
DRAFT
Warning:
This procedure was derived from pre-production computer models, and
might not reflect the real-world situation. Warnings and cautions might be
missing. Follow safety requirements and
Cooling System (Vacuum Refill)
SPECIAL TOOLS
Refiller, Cooling System (1050448-00-A)
Procedure
Note: It is important that the drive rails remain off throughout
this procedure. If the drive rails become active, such as from touchin
SEE MORE:
Visual and Audio Feedback
When you shift to Reverse, the Park Assist
view displays on the touchscreen, showing
objects that are in close proximity to the front
and rear of Model 3. This view closes when
you shift into Drive unless an object is
detected close to the front of Model 3, in
which case the Park Assist view c
Stabilizer Bar - Front (Remove and Replace)
Remove
Remove the front fascia valance. See
Valance - Front Fascia (Remove and Replace).
LH side shown, RH similar
Remove and discard the nuts that attach the front stabilizer bar to the
LH and RH front stabilizer bar links, and then move the front stabilizer bar
links aside.
Torque
© 2019-2024 Copyright www.tmodel3.com
