Tesla Model 3: ECU - Headlight - Install
Tesla Model 3 2017-2025 Service Manual / Electrical / Exterior Lights / ECU - Headlight (Remove and Replace) / ECU - Headlight - Install
Install
- Connect the LH headlight ECU connector, and then position the ECU onto the headlight.
Note: Position the seal to the headlight ECU, if necessary.
Note: Align the electrical connector to the headlight ECU, and then close the locking tab while pushing the connector into the headlight ECU.
Note: Make sure that the electrical connector and locking tab are fully seated.
Note: Press the headlight ECU downward, and then turn it to align the fastener holes and anti-rotating guides.
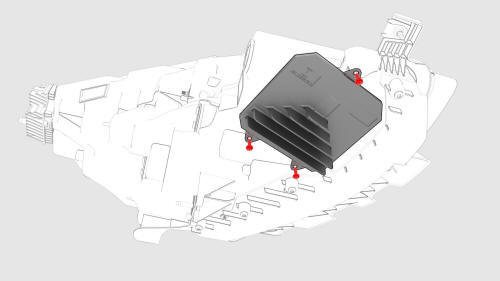
- Install the screws that attach the headlight ECU to the LH headlight
assembly.
.png) Torque
2.5 Nm
Torque
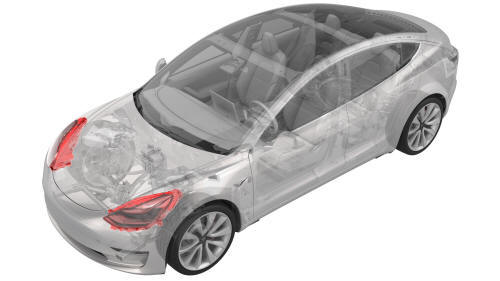
2.5 Nm - Install the LH headlight assembly. See Headlight - LH (Remove and Replace).
- Install the front fascia. See Fascia - Front (Remove and Install).
- Install the LH front wheel and the RH front wheel. See Wheel (Remove and Install).
- Install the underhood storage unit. See Underhood Storage Unit (Remove and Replace).
- Install the hood latch cover. See Cover - Hood Latch (Remove and Replace).
- Install the cabin intake duct. See Duct - Cabin Intake (Remove and Replace).
- Install the rear underhood apron. See Underhood Apron - Rear (Remove and Replace).
- If a new headlight ECU has been installed, update the vehicle firmware. Otherwise, skip to the next step.
- Adjust the headlights. See Headlights - Adjust - NA (Wall Method).
Headlights - Adjust - EMEA (Tool Method)
Adjust Headlights Using a Headlight Tester
This procedure is under development and will be available soon.
READ NEXT:
 Headlights - Adjust - EMEA (Wall Method)
Adjust Headlights Using a Wall
Apply Tape to Wall
Apply tape to a wall 23.6 in (60 cm) from the ground.
Apply tape to the floor 31.1 ft (9.5 m) from the wall.
Note: EU vehicles require a 1 to
Headlights - Adjust - NA (Tool Method)
Adjust Headlights Using a Headlight Tester
Park the vehicle on a level surface.
Make sure that all 4 tires are inflated to specification.
Open the front trunk hood.
On the touchscreen, enter h
Headlights - Adjust - NA (Wall Method)
Adjust Headlights Using a Wall
Position the vehicle for adjusting the headlights. The vehicle should be:
Located in a darkened area.
Parked on a level surface.
Perpendicular to a wall that ha
SEE MORE:
Bracket - Fascia Side to Fender - LH (Remove and Replace)
Remove
LH shown, RH similar; one clip is behind the
knuckle
Remove the LH and RH front wheels.
Release the clips (x9) that attach the front portion of the LH wheel
arch liner to the vehicle, and then move the liner aside to perform the
following steps.
LH shown, RH similar
Loosen th
Oil Pump - Rear Drive Unit(Remove and Replace)
Remove
Disconnect 12V power. See
12V Power (Disconnect and Connect).
Drain the gearbox fluid from the rear drive unit. See
Gearbox Fluid - Rear Drive Unit (Drain and Refill).
Remove the bolts that attach the oil pump to the rear drive unit, and
then remove the pump from the rear drive
© 2019-2025 Copyright www.tmodel3.com
