Tesla Model 3: High Beam Headlights
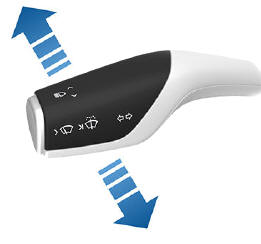
Push the left-hand steering column lever away from you and release to turn the high beam headlights on continuously. To cancel, push the lever away from you again.
To briefly flash the high beam headlights, pull the lever towards you and release.
The high beam headlights can automatically switch to low beam when there is light detected in front of Model 3 (for example, from an oncoming vehicle). To turn this feature on or off, touch Controls > Lights > Auto High Beam.
Note: Your chosen setting is retained until you manually change it.
In situations where Auto High Beam is turned on but the high beams are turned off because light is detected in front of Model 3, you can temporarily turn on the high beams by pulling the lever toward you.
The following indicator lights are visible on the touchscreen to show the status of the headlights:
 Low beam headlights are on.
 High beam headlights are on and
Auto High Beam is disabled or
currently unavailable.
 Auto High Beam is enabled and high
beams are on. Model 3 is ready to
turn off the high beams if light is
detected.
 Auto High Beam is enabled but high
beams are not on because light is
detected in front of Model 3. When
light is no longer detected, high
beams automatically turn back on.
Warning: Auto High Beam is an aid only and is subject to limitations. It is the driver's responsibility to make sure that the headlights are appropriately adjusted for weather conditions and driving circumstances.
Headlights After Exit
When Headlights after Exit is on, the exterior headlights remain on when you stop driving and park Model 3 in low lighting conditions.
They automatically turn off after one minute or when Model 3 locks. When off, headlights turn off when you engage the Park gear and open a door.
To turn this feature on or off, touch Controls > Lights > Headlights after Exit.
Headlight Adjustments
To adjust the angle of the headlights, touch Controls > Service > Adjust Headlights, then follow the onscreen instructions. You can choose which headlight you would like to adjust by selecting it on the touchscreen.
Warning: Proceed with caution when adjusting headlights. Tesla has carefully calibrated the position of the headlights to be in an optimum position for most driving scenarios. Tesla recommends that you do not adjust headlights unless you are familiar with how headlights should be adjusted. Once adjusted, you will be unable to automatically restore them to their originally calibrated position.
Contact Tesla for assistance when adjusting headlights.
READ NEXT:
 Turn Signals
The turn signals flash three times or
continuously, depending on how far up or
down you move the lever. Lightly push the
turn signal lever up or down for a three-flash
sequence. For a continuous s
Overview
The touchscreen displays the status of Model
3 at all times. What you see depends on
whether the vehicle is:
Parked (shown below).
Driving
Charging
When Model 3 is parked, the status area
SEE MORE:
Heat Exchanger - Front Drive Unit (Remove and Replace)
Remove
Remove the front subframe assembly. See
Subframe Assembly - Front (Dual Motor) (Remove and Install)
Release the clip that connects the front drive unit inverter-heat
exchanger hose to the heat exchanger coolant inle
Release the clips that attach the front drive unit inverter-
External Charging Connectors
Mobile Connector
Firmware Update - CHAdeMO Charging Adapter
CAN Setup
Connect the USB-CAN dongle to a laptop that is equipped with Toolbox
Connect the CHAdeMO CAN programming connector to the USB-CAN dongle.
Connect the CHAdeMO CAN programming connector to an external 12V power
supply.
Connect the
