Tesla Model 3: Interior Overview & Exterior Overview
Tesla Model 3 2017-2026 Owner's Manual / Overview / Interior Overview & Exterior Overview
Interior Overview
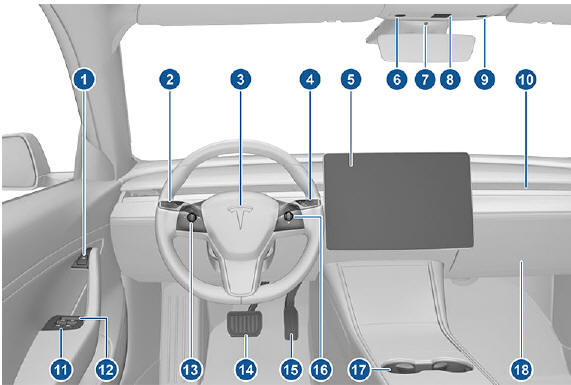
- Door open button
- High beams, turn signals and wipers and washers
- Horn
- Gear selector, Traffic-Aware Cruise Control and Autosteer
- Touchscreen
- Driver dome light
- Cabin camera
- Hazard warning flashers
- Passenger dome light
- Climate control vent
- Power window switches
- Manual door release
- Left scroll button
- Brake pedal
- Accelerator pedal
- Right scroll button
- Center console
- Glovebox
Exterior Overview
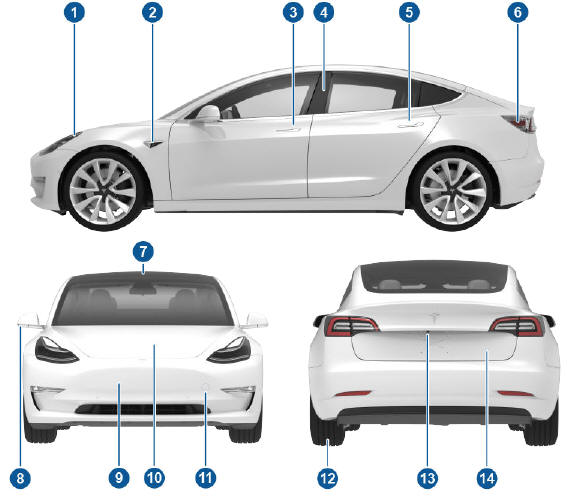
- Exterior lights
- Autopilot camera
- Front door handle
- Key card sensor, Autopilot camera
- Rear door handle
- Charge port
- Autopilot cameras
- Exterior mirrors
- Radar sensor (hidden from view)
- Hood/front trunk
- Tow eye cover
- Wheels and tires
- Rear view camera
- Rear trunk
READ NEXT:
 Touchscreen Overview
The features and information you need to drive Model 3 are displayed on the touchscreen. When driving, the touchscreen displays driving-related information such as driving speed, vehicle range, warn
Opening and Closing
This section contains detailed instructions on how to operate the various components of the Tesla Model 3. It covers important things such as keys, doors, trunk, windows, sunroof and glass roof, child
Keys
Three Types of Keys
Model 3 supports three types of keys:
Authenticated phone - You can set up
your personal smartphone to
communicate with Model 3 using
Bluetooth. Supports automatic lockin
SEE MORE:
Overhead Console - Front (Remove and Replace)
Remove
Release the clips (x2) that attach the front overhead console to the
headliner, and then lower the console from the headliner.
Caution:
To avoid damaging the headliner, do not pry against the headliner.
Insert a 90 degree trim tool near the dome light and pull downwards to releas
Subframe Assembly - Front (RWD) - Install
Install
Position the subframe lifting tool against the front subframe, and then
attach the straps (x3) to the subframe.
Note: Make sure to align the two subframe lifting tool guides with
the front subframe.
Lower the front drive unit onto the front subframe
Note: Make sure not to move the r
© 2019-2026 Copyright www.tmodel3.com
