Tesla Model 3: Inverter - Rear Drive Unit - Install
Tesla Model 3 2017-2024 Service Manual / Rear Drive Unit / Rear Drive Inverter / Inverter - Rear Drive Unit (Remove and
Install) / Inverter - Rear Drive Unit - Install
Install
- Secure the ESD strap to the inverter housing.
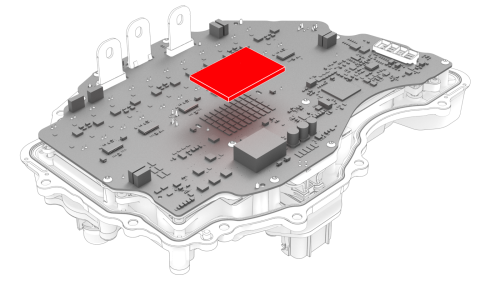
- Carefully peel the gap pad from the inverter PCB.
- Use an IPA wipe to remove any residue and prepare the gap pad location on the inverter PCB.

- Peel the backing off of the new gap pad, position the pad into place, and press it onto the inverter PCB.
- Inspect the condition of the gap pad on the inverter PCB.
- Fully covers the discharge resistor array and that no resistors are visible.
- Clean and free of debris.
- Evenly adhered to the inverter PCB.
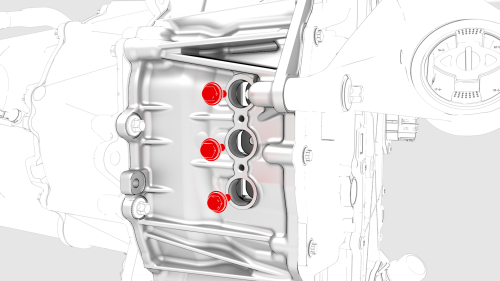
- Install a new inverter gasket.
- Use an IPA wipe to clean the HV mating surfaces of the motor and inverter 3-phase terminals.
- Carefully align the inverter to the 2 pins in the rear drive unit, and then install the inverter to the rear drive unit. Make sure that the 3-phase terminals align during installation.
Caution: Avoid damage to the printed circuit board of the inverter.
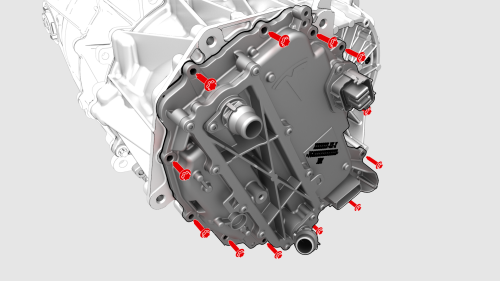
- Hand-tighten the new bolts (x12) that attach the inverter to the gearbox assembly.
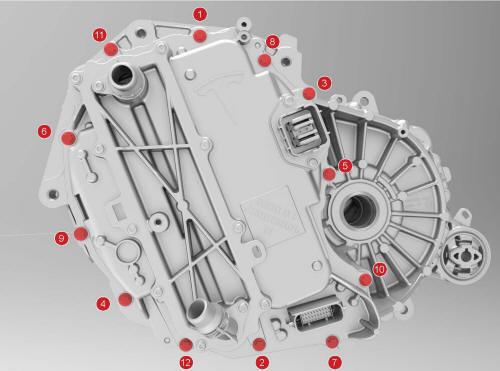
- Torque the bolts in the sequence shown.
 Torque 5 Nm +20 deg
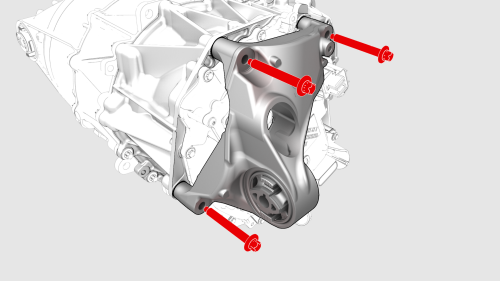
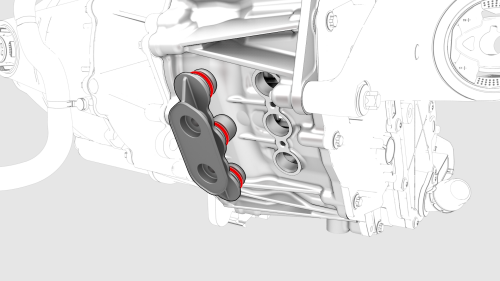
- Install the LH rear drive unit mount to the rear drive unit, and then hand-tighten the bolts (x3) that attach the mount to the rear drive unit.
- Tighten the bolts in a two-step,
counter-clockwise pattern, starting with the upper-right
bolt.
.png) Torque 35 Nm +55 deg
Torque 35 Nm +55 deg
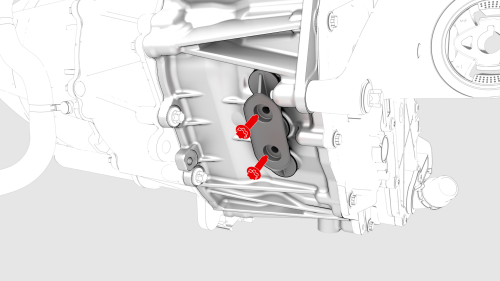
- Install the new bolts (x3) that attach the 3 phase cable to the inverter assembly.
- Tighten the bolts to this specification.
 Torque 11.5 Nm
- Loosen the bolts 180 degrees.
- Tighten the bolts to this specification.
.png) Torque 5 Nm +40 deg
Torque 5 Nm +40 deg
- Apply a film of ATF-9 fluid to the walls of the gear case bores, and then install the new 3-phase access cover.
- Install the bolts (x2) that attach the 3-phase
access cover to the rear drive unit assembly.
 Torque 7.5 Nm
- Perform an inverter air leak test. See Inverter Air Leak Test.
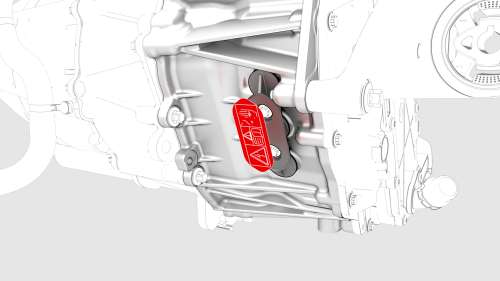
- Apply a new 3-phase access label.
- Remove the ESD wrist strap.
- Install the rear drive unit. See Drive Unit - Rear (Remove and Replace).
READ NEXT:
 Inverter - Rear Drive Unit - Remove
SPECIAL TOOLS
Skt, 3/8in Dr, 10EP Torx Plus External
(1130479-00-A)
Lever
Inverter - Rear Drive Unit - Install
Install
Secure the ESD strap to the replacement inverter
housing.
SEE MORE:
Center Console (Remove and Install) - Install
Install
With an assistant, install the center console into the vehicle as
follows:
Tilt the front of the center console downwards.
Slide the center console towards the front of the vehicle.
Tilt the rear of the center console downwards until it is in place.
Open the center console rotati
Headlights - Adjust - NA (Tool Method)
Adjust Headlights Using a Headlight Tester
Park the vehicle on a level surface.
Make sure that all 4 tires are inflated to specification.
Open the front trunk hood.
On the touchscreen, enter headlight adjustment mode: Controls > Service
> Adjust Headlights.
Turn on the headlights.
© 2019-2024 Copyright www.tmodel3.com
