Tesla Model 3: Link - Fore - Lower - Rear - LH - Install
Install
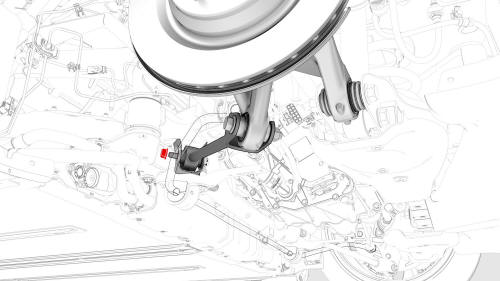
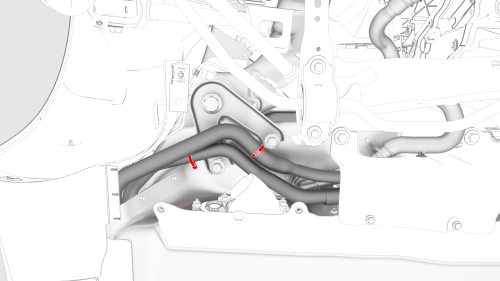
- Install the LH rear lower fore link to the subframe, and then hand-tighten the bolt that attaches the LH rear lower fore link to the subframe.
- Hand-tighten the bolt and the nut that attaches the LH rear lower fore link to the knuckle.
- Hand-tighten the smaller bolts that attach the LH shear plate to the HV battery.
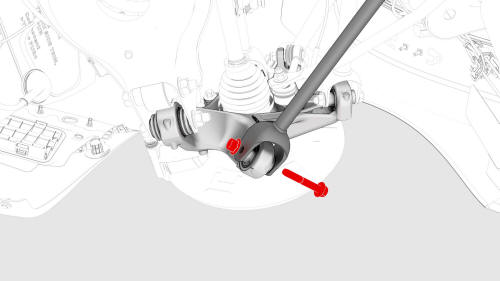
- Install the bolt that attaches the larger LH shear
plate and subframe to the body.
 Torque 165 Nm
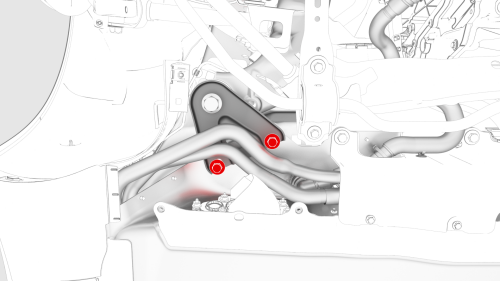
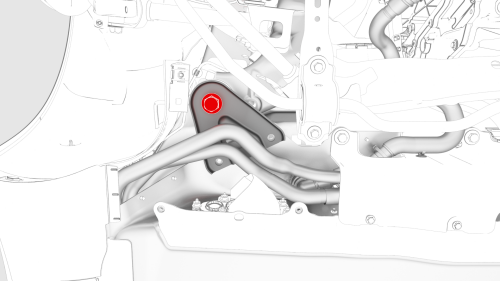
- Tighten the bolts (x2) that attach the smaller LH
shear plate to the HV battery.
 Torque 30 Nm
- Install the clips that attach the coolant hose to the LH shear plate.
- Remove the support stand from underneath the vehicle.
.png)
- Install a spring compressor onto the LH rear coil spring. Line up the hooks per image and verify that the spindle goes through the body opening when the suspension is compressed.
.png)
- Position a support stand underneath the LH rear suspension, and then raise the support stand to simulate vehicle at ride height.
Note: Make sure that the support stand does not block access to the spring compressor or suspension bolts.
Note: Use the rear ride height torque gauge to verify that the rear suspension is set to ride height specifications and adjust the support stand or spring compressor tool , if necessary.
.jpg)
- Measure the distance between the bottom of the quarter panel to the center of the rear axle to make sure that the rear suspension is set to ride height: The distance should measure 378 mm.
- Tighten the bolts that attach the LH rear lower fore
link bolt to the knuckle and to the subframe. Mark the
bolt with a paint pen.
 Torque 76 Nm
 - Remove the support stand from underneath the LH rear suspension.
- Remove the spring compressor from the LH rear suspension coil spring.
- Install the LH rear wheel arch liner. See Wheel Arch Liner - Rear - LH (Remove and Replace).
- Install the LH rear wheel. See Wheel (Remove and Install).
- Perform a four wheel alignment adjustment. See Four Wheel Alignment (Check and Adjust).
READ NEXT:
 Link - Fore - Upper - Rear - LH (Remove and Replace)
SPECIAL TOOLS
Tool, Spring Compressor, Hook, Model 3 (1135103-00-A)
Remove
Remove the rear subframe assembly. See
Subframe Assembly - Rear (Remove and Install).
Remove the bolt and nut that
Stabilizer Bar - Rear (Remove and Replace)
Remove
Raise and support the vehicle. See Raise Vehicle - 2
Post Lift.
Remove the mid aero shield panel. See Panel - Aero
Shield - Mid (Remove and Replace).
Suspension - Rear (Check Torque)
SPECIAL TOOLS
Tool, Spring Compressor, Hook, Model 3
(1135103-00-A)
3/4 Ton Underhoist Stan
SEE MORE:
Bracket - License Plate - Front (EMEA) (Retrofit using Template)
Procedure
Clean the front center surface of the front fascia.
Align the template with the parking sensors, and then use masking tape
to hold the template in place.
LH side shown, RH side similar
Align the front license plate bracket over the template, and then secure
the bracket
Duct - Footwell - RH (Remove and Replace)
DRAFT
Warning:
This procedure was derived from pre-production computer models, and
might not reflect the real-world situation. Warnings and cautions might be
missing. Follow safety requirements and use extreme caution when working on or
near high voltage systems and components.
Remove
Remove
