Tesla Model 3: Module - Body Controller - Security- Install
Install
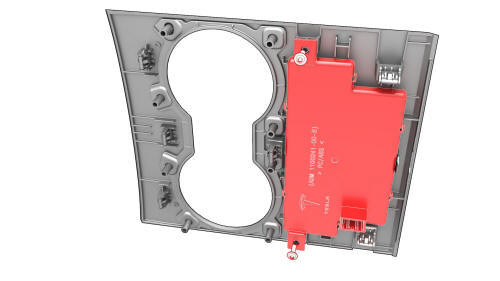
- Install the screws (x2) that attach the security body controller module
to the cup holder decor panel.
 Torque 1.6 Nm
.jpg)
- Connect the electrical connector to the security body controller module.
.jpg)
- Attach the clips (x6) that attach the cup holder decor panel to the center console assembly.
- Install the RH bright strips: Start with the corner nearest to the IP carrier, and then continue towards the rear. Repeat this step on the LH bright strip.
.png)
LH shown, RH similar
- Install the screws (x7) that attach the RH bright strip to the center
console assembly. Repeat this step on the LH bright strip.
.jpg) Torque 1.6 Nm
Torque 1.6 Nm - Install the RH center console decor trim, and then repeat this step on the LH center console decor trim. See Decor Trim - Center Console (Remove and Replace).
- Reconnect 12V power, but do not install the rear underhood apron at this time. See 12V Power (Disconnect and Connect).
- Connect a laptop with Toolbox to the vehicle.
- In Toolbox, type "VCSEC" in the search tab.
Note: Make sure "Actions" is selected, if not already.
- In Toolbox, click the play button next to the "PING-TP_VCSEC" and select Run.
Note: This action will ensure communication with the newly installed VCSEC.
- Use Toolbox to update the vehicle firmware.
- Log into Garage using the laptop, and then search for the VIN or vehicle nickname.
- From the SUMMARY tab, click Delete VCSEC Certificate, and then click OK on the pop up window.
Caution:
This action CANNOT be undone.
Note: This action will remove associated VCSEC certificate from the server.
- In Toolbox, click the play button next to "PROC_VCSEC_X_PROVISIONING" and select Run.
Note: This action secures VCSEC by exchanging encryption keys and certificate with Tesla and the vehicle.
Note: Customer's phone will need to be re-paired to the vehicle after completing this entire procedure.
- In Toolbox, click the play button next to "TEST-SELF_VCSEC_X_ENDPOINT-COMM" and select Run.
Note: This action checks endpoint communication ability.
- In Toolbox, click the play button next to "repair_network.ODIN_VCSEC_pairNFCCard" and select Run.
- Put the NFC key cards on the center console behind the cup holders.
Note: 2 NFC key cards are required when pairing, either 2 NFC key cards that have never been programmed, or one programmed NFC key card and one that has never been programmed.
- In Toolbox, type the number of key cards to be paired to the vehicle, and then select Run Network.
- In Toolbox, select the environment/garage type for the vehicle.
Note: If the routine fails, select retry.
- Check the function of the new programmed NFC card keys: Tap each of the NFC key cards on the LH exterior B-pillar area to lock and unlock the vehicle, and then put one NFC key card at a time on the center console behind the cup holders and step on the brake pedal to start the vehicle.
- In Toolbox, type "IMMOBILIZER" in the search tab.
- In Toolbox, click the play button next to "PROC_DI_X-IMMOBILIZER" and select Run.
Note: This action will pair new VCSEC with DI to the initialize the immobilizer.
- In Toolbox, type "ODOMETER" in the search tab.
- In Toolbox, click the play button next to "PROC-DID_DI_VEHICLE-ODOMETER" and select Run.
- In Toolbox, type "RESET_DI" in the search tab.
- In Toolbox, click the play button next to "TEST-RESET_DI" and select Run.
Note: This action runs a routine to clear alerts.
Note: Make sure to select routine for "DI UDS ECU Reset."
- Disconnect the laptop from the vehicle.
- Install the rear underhood apron. See Underhood Apron - Rear (Remove and Replace).
- Close the hood.
- Move the driver seat and front passenger seat fully forward.
- Install the 2nd row lower seat cushion. See Seat Cushion - Lower - 2nd Row (Remove and Replace).
- Restore the driver seat and front passenger seat back to their original position.
READ NEXT:
 Siren - Battery Backed (Remove and Replace)
Remove
Remove the front fascia assembly. See
Fascia - Front (Remove and Install).
Disconnect the connector from the battery backed siren.
Remove the bolt that attaches the battery backe
Reservoir - Windshield Washer (Remove and Replace)
Remove
Remove the rear underhood apron. See
Underhood Apron - Rear (Remove and Replace).
Remove the cabin intake duct. See
Duct - Cabin Intake (Remove and Replace).
Remove the hood latch cover
SEE MORE:
Halfshaft - Front Drive Unit - LH - Install
Install
Apply approximately 1 gram of Molykote M-77
Lubricant Paste only to the hub mating face on the
outboard side of the LH front drive unit halfshaft.
Brake Hose - Flexible - Front - LH (Remove and Replace)
SPECIAL TOOLS
Flare nut crowfoot set (1079041-00-A)
Remove
Caution:
Brake fluid dissolves paint. Have clean towels and plenty of
water standing by
