Tesla Model 3: Taillight - LH- Remove
Tesla Model 3 2017-2024 Service Manual / Electrical / Exterior Lights / Taillight - LH (Remove and Replace) / Taillight - LH- Remove
SPECIAL TOOLS
SKT, BUMP STOP, MDL 3 (1460222-00-B)
Remove
- Remove the 2nd row lower seat cushion. See Seat Cushion - Lower - 2nd Row (Remove and Replace).
.jpg)
- Open the trunk, and then use the bump stop removal tool to remove the LH trunk stop.
Caution: Do not use other tools to pry at the trunk stop as this could damage the taillight or trunk stop.
- Remove the trunk floor trim. See Trim - Floor - Trunk (Remove and Replace).
- Remove the trunk sill trim. See Trim - Sill - Trunk (Remove and Replace).
- Remove the LH 2nd row seat side bolster. See Bolster - Side - Seat - 2nd Row - LH (Remove and Replace).
- Remove the LH 2nd row seatback. See Seat Back - 2nd Row - LH (Remove and Install).
- Remove the trunk side trim.
- For the LH side, see Trim - Side - Trunk - LH (Remove and Replace).
- For the RH side, see Trim - Side - Trunk - RH (Remove and Replace).
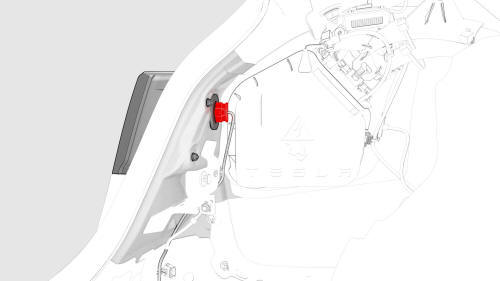
- Disconnect the electrical harness from the taillight connector.

- Remove the nuts that attach the taillight to the vehicle.
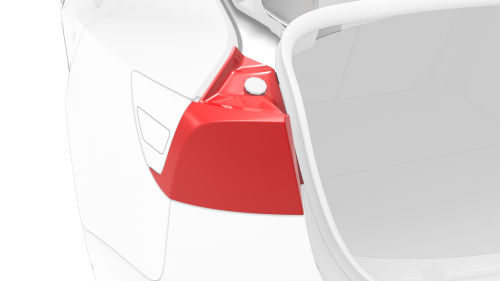
- Remove the taillight assembly from the vehicle.
Tip: Lift the trunk seal for better clearance.
- Remove and discard the grommets from the vehicle.
READ NEXT:
 Taillight - LH - Install
Install
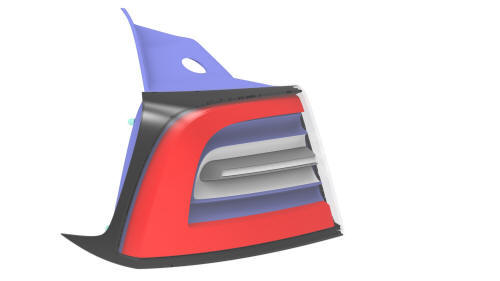
If the taillight is to be reinstalled, replace the gaskets from around
each taillight mounting bolt (x2) and the taillight electrical connector
(x1).
Install new grommets onto the v
Reflex Lens - Rear - RH (Remove and Replace)
Remove
Note: This procedure applies only to the RH side. The LH rear
reflex lens is part of the charge port.
Apply masking around the RH rear reflex lens.
Use a plastic trim tool to release th
Reflector - Fascia - Rear - LH (Remove and Replace)
Remove
Remove the rear fascia assembly and place it on a padded surface. See
Fascia - Rear (Remove and Install).
Remove the rear fascia assembly and place it on a padded surface. See
Fascia
SEE MORE:
Module - TPMS (Sensor ID Learn)
SPECIAL TOOLS
TOOL, TPMS SERVICE,
ATEQ VT30 (1050759-00-A)
TOOL, TPMS SERVICE,
ATEQ VT36 (1050759-00-B)
Procedure
Review the TPMS
serv
Link - Aft - Lower - Rear - LH - Remove
SPECIAL TOOLS
Tool, Spring Compressor, Hook, Model 3
(1135103-00-A)
Tool, Rear Ride Height Torque, Model 3
(1137855-00-A)
© 2019-2024 Copyright www.tmodel3.com
