Tesla Model 3: Wiper Motor- Remove
Tesla Model 3 2017-2024 Service Manual / Electrical / Wipers and Washers / Wiper Motor (Remove and Replace) / Wiper Motor- Remove
Remove
- Remove the rear underhood apron. See Underhood Apron - Rear (Remove and Replace).
- Remove the cabin intake duct. See Duct - Cabin Intake (Remove and Replace).
- Remove the hood latch cover. See Cover - Hood Latch (Remove and Replace).
- Remove the underhood storage carpet. See Carpet - Underhood Storage (Remove and Install).
- Remove the underhood storage unit. See Underhood Storage Unit (Remove and Replace).
- Remove the wiper arms. See Wiper Arms (Remove and Replace).
.jpg)
LH shock tower cover shown, RH similar
- Release the clips that attach the LH and RH shock tower covers to the vehicle, and then remove the covers from the vehicle.
.png)
- Release the clips that attach the cowl screen to the vehicle, and then
remove the cowl screen from the vehicle.
.jpg)
- Disconnect the electrical connector from the wiper motor.
Warning: Do not place limbs within the motor linkage area as the wiper arms will automatically transition to Parking Mode.
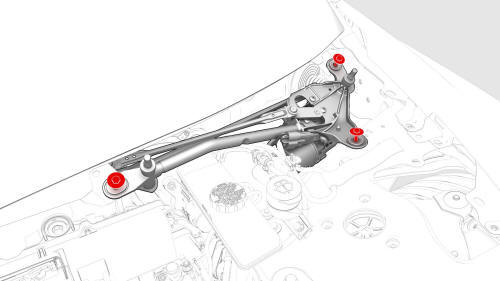
- Remove the bolts that attach the wiper motor to the body, and then
remove the wiper motor from the vehicle.
READ NEXT:
 Wiper Motor- Install
Install
Install the bolts that attach the wiper motor to the vehicle.
Torque 7 Nm
Connect the electrical connector to the wiper motor.
Warning: Do not place limbs within the motor linka
Wiper Arms (Remove and Replace)
Remove
Remove the rear underhood apron. See
Underhood Apron - Rear (Remove and Replace).
Remove the wiper arm nut covers.
Release the LH and RH wiper arm hoses from the Y-tube.
Release
Wiper Blades (Adjust)
SPECIAL TOOLS
Adjustment
Using the touchscreen, put the wipers in "Service Mode".
Clean the wiper blades and the windshield thoroughly with isopropyl
alcohol wipes, or equivalent.
Spray the
SEE MORE:
Bracket - Rear Wing - LH (Remove and Replace)
Remove
LH shown, RH similar
Remove the 2nd row lower seat cushion.
Open the trunk, and then remove the LH and RH trunk stops.
Remove the trunk floor trim.
Remove the trunk sill trim.
Remove the LH 2nd row seat side bolster.
Remove the LH 2nd row seatback.
Remove the RH 2nd row seat si
Vehicle Electrical Isolation Procedure
SPECIAL TOOLS
Insulation Multimeter, Fluke 1507 (1076921-00-B)
Test Probes, Slim, Fluke TP38 (1130480-00-A)
Warning: This procedure verifies that high voltage power is no
longer available to high voltage components (PTC heater, A/C compressor,
inverters, etc). Perform this procedure before servici
© 2019-2024 Copyright www.tmodel3.com
