Tesla Model 3: Actuator - Upper Mode- Remove
Tesla Model 3 2017-2024 Service Manual / Thermal Management / Cabin HVAC / Actuator - Upper Mode (Remove and Replace) / Actuator - Upper Mode- Remove
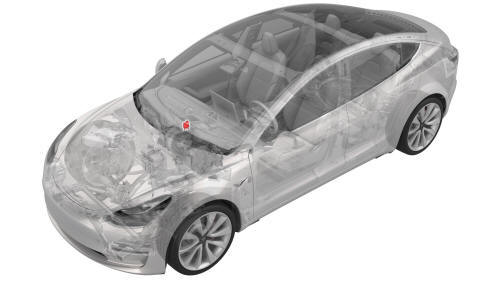
Remove
- Remove the 2nd lower seat cushion. See Seat Cushion - Lower - 2nd Row (Remove and Replace).
- Remove the rear underhood apron. See Underhood Apron - Rear (Remove and Replace).
- Disconnect 12V power. See 12V Power (Disconnect and Connect).
- Remove the LH instrument panel end cap. See End Cap - Instrument Panel - LH (Remove and Replace).
- Remove the LH air wave end cap. See End Cap - Air Wave - LH (Remove and Replace).
- Remove the RH instrument panel end cap. See End Cap - Instrument Panel - LH (Remove and Replace).
- Remove the front passenger floormat.
- Remove the RH center console side panel carpet. See Carpet - Side Panel - Center Console - LH (Remove and Replace).
- Remove the passenger footwell cover. See Cover - Footwell - Passenger (LHD) (Remove and Replace).
- Remove the front passenger knee airbag. See Airbag - Knee - Front Passenger (Remove and Replace).
- Remove the RH air wave end cap. See End Cap - Air Wave - LH (Remove and Replace).
- Remove the main instrument panel decor trim. See Decor Trim - Instrument Panel - Main (Remove and Replace).
- Remove the glove box. See Glove Box (LHD) (Remove and Replace).
- Remove the RH footwell duct. See Duct - Footwell - RH (Remove and Replace).
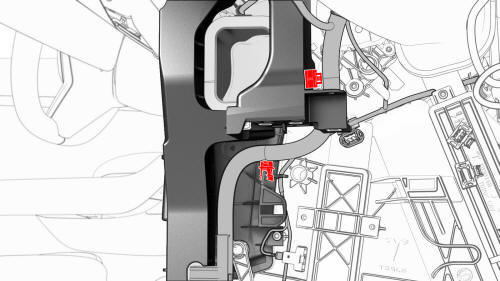
- Release the clips that attach the instrument panel harness to the RH side of the HVAC assembly.

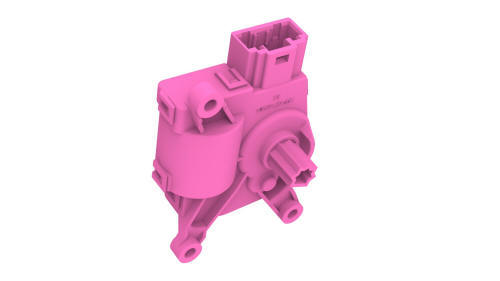
- Disconnect the electrical connector from the upper mode actuator.
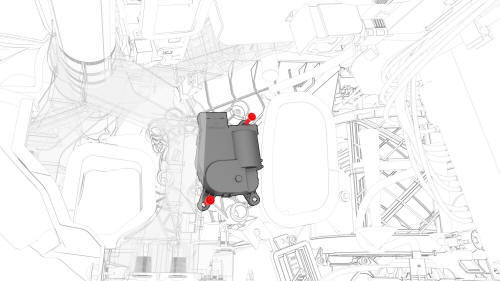
- Remove the bolts that attach the upper mode actuator to the HVAC
assembly, and then remove the upper mode actuator.
READ NEXT:
 Actuator - Upper Mode- Remove
Install
Position the upper mode actuator onto the HVAC assembly; align the guide
and push the actuator towards the left to install.
Install the bolts that attach the upper mode actuator to th
Actuator - Vent - LH (Remove and Replace)
Remove
Remove the LH front vent. See
Vent - Front - LH (Remove and Replace).
Remove the bolts that attach the LH vent actuator to the vent, and then
remove the LH vent actuator.
Install
I
Actuator - Vent - RH (Remove and Replace)
Remove
Remove the RH front vent. See
Vent - Front - RH (Remove and Replace).
Remove the screws that attach the RH vent actuator to the RH front vent,
and then remove the actuator from the
SEE MORE:
Handle - Exterior Release - Door - Rear - LH (Remove and Replace)
Warning: The side impact airbag deployment depends on the front door
sensor's ability to detect a side impact from air pressure. Make sure that there
are no uncovered holes in the front door shells. Additionally, always reinstall
plugs or tape when servicing or inspecting the front doors and t
Closeout Panel - Door - Front - LH (Remove and Install)
SPECIAL TOOLS
Rivnut Install Kit, for NA (Optional special tool if the thread for the
closeout panel becomes stripped) (1054712-00-A )
Rivnut Install Kit, for EMEA (Optional special tool if the thread for the
closeout panel becomes stripped) (1054712-01-A )
Service Rivnut (Optional special tool
© 2019-2024 Copyright www.tmodel3.com
