Tesla Model 3: Actuator - Upper Mode- Remove
Tesla Model 3 2017-2024 Service Manual / Thermal Management / Cabin HVAC / Actuator - Upper Mode (Remove and Replace) / Actuator - Upper Mode- Remove
Install
- Position the upper mode actuator onto the HVAC assembly; align the guide and push the actuator towards the left to install.
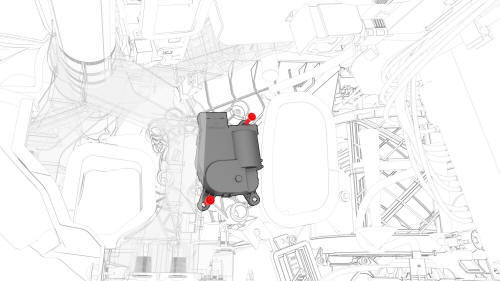
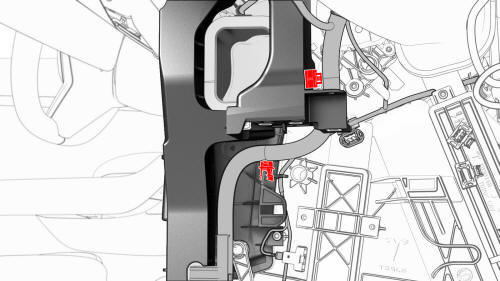
- Install the bolts that attach the upper mode actuator to the HVAC
assembly.
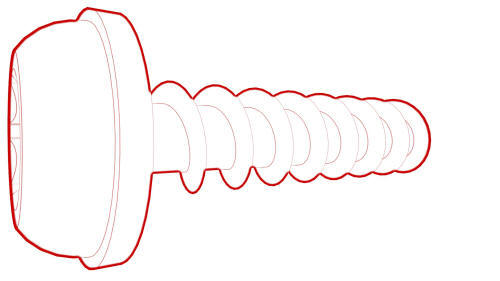 Torque 1.2 Nm

- Connect the upper mode actuator electrical connector.
- Install the clips that attach the instrument panel harness to the RH side of the HVAC assembly.
- Install the RH footwell duct. See Duct - Footwell - RH (Remove and Replace).
- Install the glove box. See Glove Box (LHD) (Remove and Replace)
- Install the main instrument panel decor trim. See Decor Trim - Instrument Panel - Main (Remove and Replace).
- Install the RH air wave end cap. See End Cap - Air Wave - LH (Remove and Replace).
- Install the front passenger knee airbag. See Airbag - Knee - Front Passenger (Remove and Replace).
- Install the passenger footwell cover. See Cover - Footwell - Passenger (LHD) (Remove and Replace).
- Install the RH center console side panel carpet. See Carpet - Side Panel - Center Console - LH (Remove and Replace).
- Install the front passenger floormat.
- Install the RH instrument panel end cap. See End Cap - Instrument Panel - LH (Remove and Replace).
- Install the LH air wave end cap. See End Cap - Air Wave - LH (Remove and Replace).
- Install the LH instrument panel end cap. See End Cap - Instrument Panel - LH (Remove and Replace).
- Reconnect 12V power. See 12V Power (Disconnect and Connect).
- Install the rear underhood apron. See Underhood Apron - Rear (Remove and Replace).
- Install the 2nd lower seat cushion. See Seat Cushion - Lower - 2nd Row (Remove and Replace).
READ NEXT:
 Actuator - Vent - LH (Remove and Replace)
Remove
Remove the LH front vent. See
Vent - Front - LH (Remove and Replace).
Remove the bolts that attach the LH vent actuator to the vent, and then
remove the LH vent actuator.
Install
I
Actuator - Vent - RH (Remove and Replace)
Remove
Remove the RH front vent. See
Vent - Front - RH (Remove and Replace).
Remove the screws that attach the RH vent actuator to the RH front vent,
and then remove the actuator from the
Air Extractor - LH (Remove and Replace)
Remove
Remove the rear fascia. See
Fascia - Rear (Remove and Install).
Press downward at the top to release the tabs that attach the air
extractor to the body, then swing the upper portion
SEE MORE:
Correct Driving Position
The seat, head support, seat belt and airbags
work together to maximize your safety. Using
these correctly ensures greater protection.
Position the seat so you can wear the seat belt
correctly, while being as far away from the
front airbag as possible:
Sit upright with both feet on the
Trunk (Remove and Install)- Remove
Remove
Remove the trunk lid trim. See Trim - Lid - Trunk (Remove and Replace).
Disconnect the LH and RH rear fog/reverse light electrical connectors.
Disconnect the rear facing camera electrical connector.
Disconnect the trunk exterior release switch electrical connector.
© 2019-2024 Copyright www.tmodel3.com
